
Welcome to myProctor.
This is your practical guide to myProctor — written for the people running the event. If you're a Proctor, TCA, ATCA, or in the Tech team, start here. We'll cover the things you actually do each day: checking in, reading messages, handing out devices, and getting help when something breaks.
I'm brand new
First time opening the app? Start here for a 2-minute walkthrough.
I need to check in
How to scan the attendance QR when you arrive and leave.
Something's wrong
How to send a Support message so Tech or the TCA can help.
Just show me the basics
The one-page cheat sheet. Bookmark it.
Looking for deeper detail?
Admins have a separate reference with every setting, permission, and internal state. Tap Admin reference → in the top-right of the page.
Your first time in myProctor.
It takes about two minutes. You'll create an account with your email and a password, let the app use your camera and notifications, then ask your Admin to set your role and city.
1. Install the app
myProctor is distributed to your work iPad or iPhone through your organisation's device management. It should already be on your home screen — look for the green icon. If it's not there, speak to your TCA; they can push the install. You can also install it on your personal iPhone from the App Store and sign in with the same account.
2. Sign up with your email
The app uses straight email + password — there's no "Sign in with Google" or "Sign in with Apple" button. The first time you open the app:
- Open myProctor. You'll see a login screen with two fields (Email, Password) and two buttons: Login (blue) and Sign Up (green).
- Type your work email in the Email field. This will be your permanent identifier — pick the email you actually use, because once your account exists, the email cannot be changed. Display name can be edited any time, but email is locked.
- Type a password you'll remember. Anything you choose works — there's no minimum complexity rule beyond Firebase's basic requirements (6+ characters).
- Tap the green Sign Up button. The app creates your account and signs you in automatically.
From then on, opening the app brings you to the same screen. Type your email + password and tap the blue Login button to come back in.
You'll start as a Proctor
Every brand-new account is auto-assigned the Proctor role with no city. Until your Admin updates this, you'll have a minimal menu and you won't see any city-specific data. Send your Admin your registered email so they can find you in Manage Users and set your real role (Tech, TCA, Manager, etc.) and your city. After they save, sign out and back in — your full menu appears.
3. Set your Display Name
By default the app shows the local part of your email as your name (so jane.smith@company.com shows up as "jane.smith"). To replace it with your real name:
- Tap your avatar in the top-right of Home.
- Tap Edit Profile.
- Update the Display Name field with your real name (e.g. "Jane Smith").
- Save. The new name shows everywhere the app shows your identity — broadcasts, attendance logs, batch custody, etc.
You can edit Display Name as many times as you want. Email, however, is permanent.
4. Allow notifications and camera
On your first run, iOS will ask two things:
- Notifications — tap Allow. You want these. Broadcasts from leadership arrive this way.
- Camera — tap Allow. You need this for QR scanning (attendance, devices, box labels).
If you accidentally tap Deny, don't worry — go to iOS Settings → myProctor and turn them back on.
5. Take a look around
The menu icon in the top-left opens your sidebar. What you see there depends on your role — a Proctor sees fewer items than a TCA, and an Admin sees everything. If something's missing that you think should be there, your Admin probably hasn't elevated your role yet (see step 2 above). For more on this see Your access.
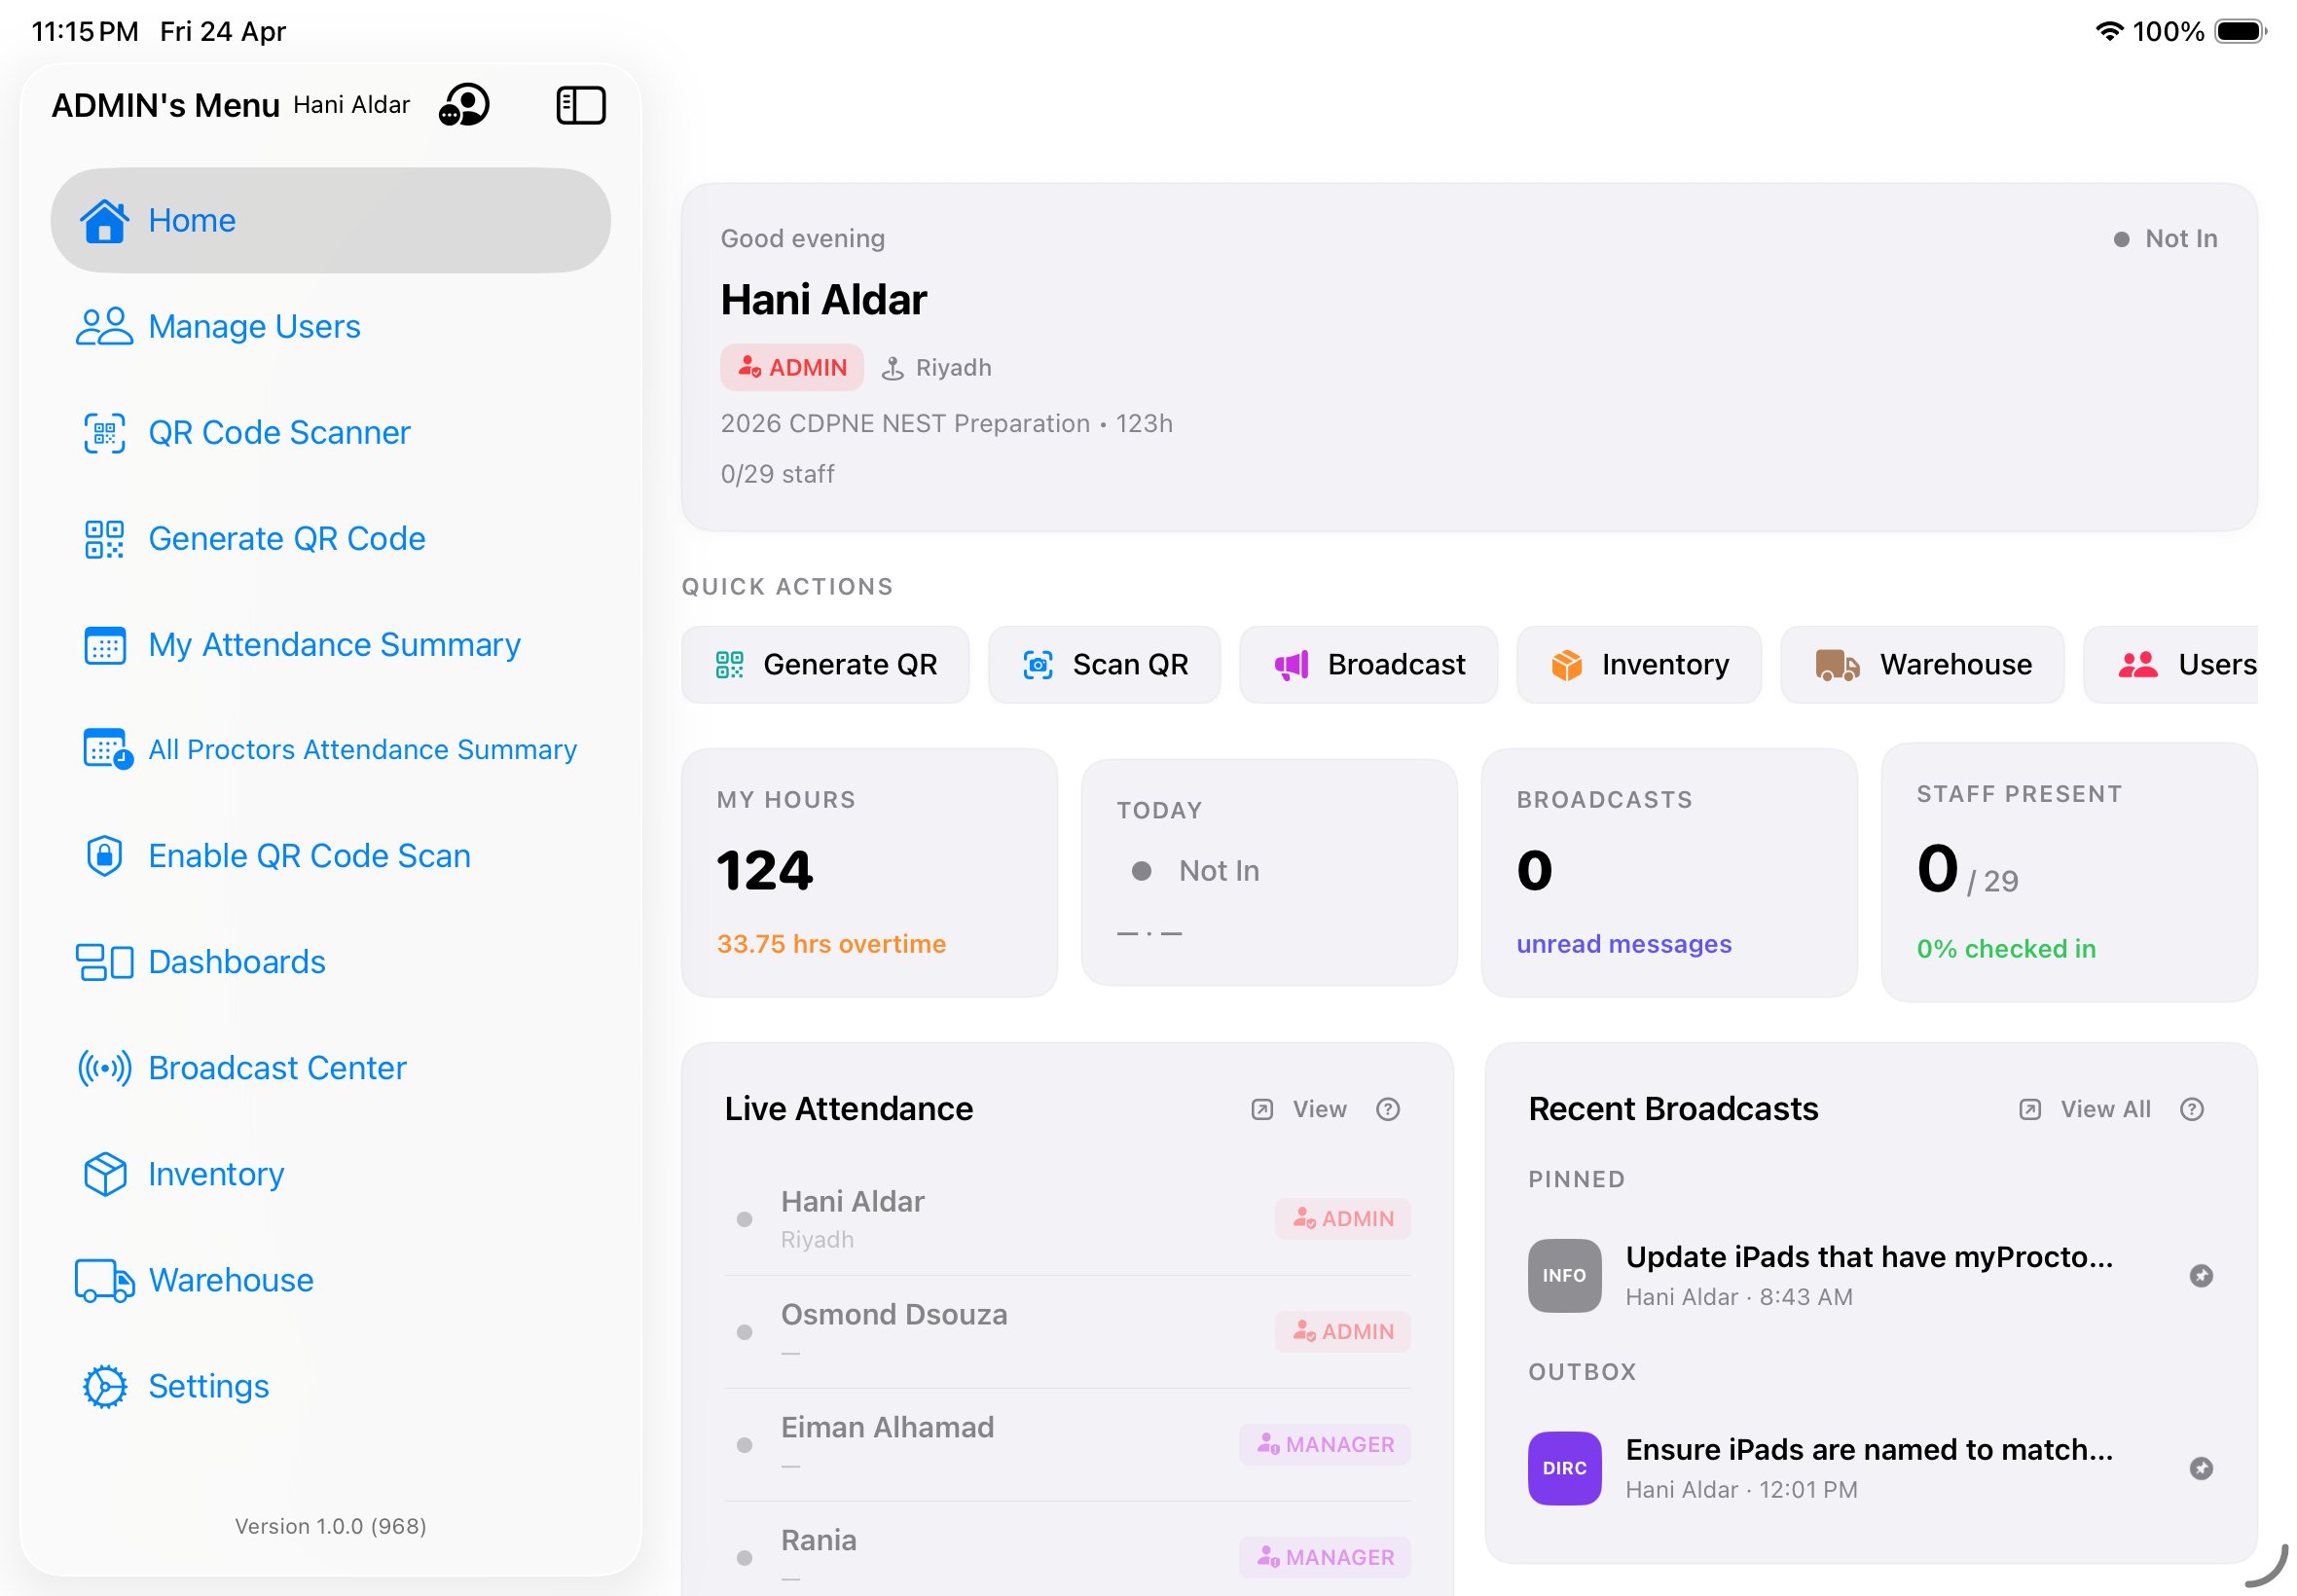
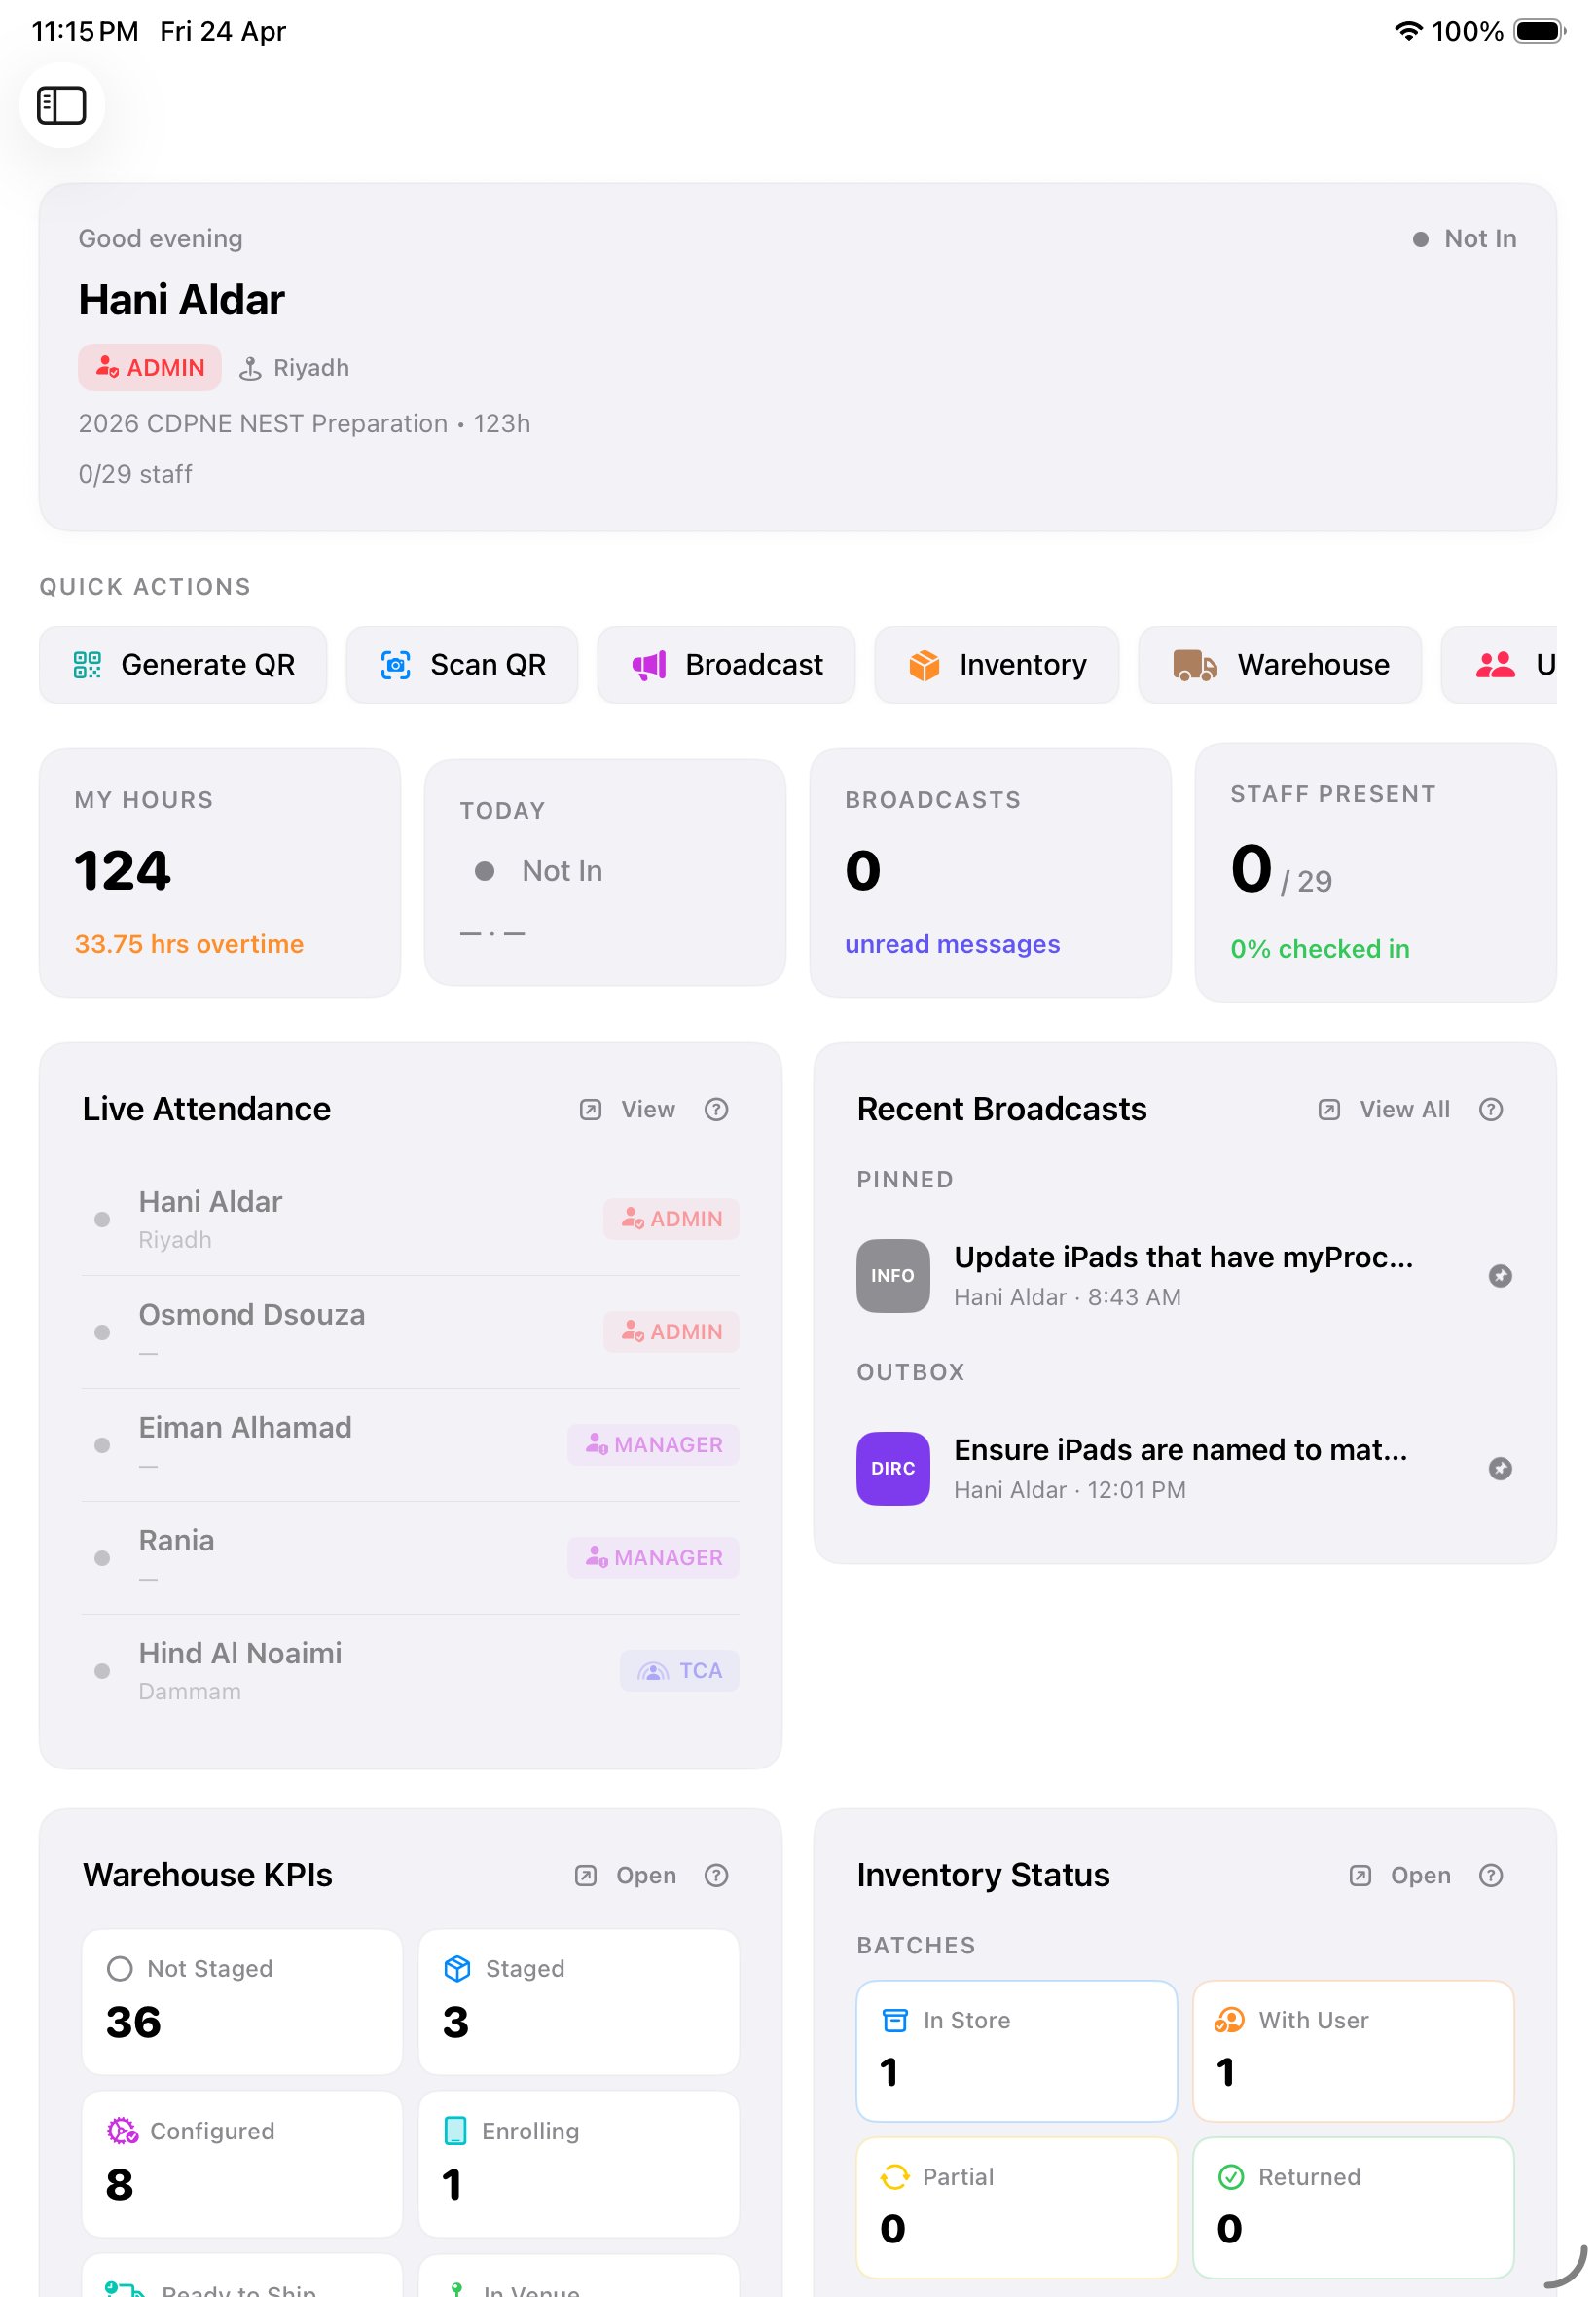
Home at a glance.
Home is your launch pad. Every time you open the app, you land here. Here's what each part does.
The greeting banner
At the very top — "Good morning, [your name]". Your role chip (ADMIN, TCA, TECH, etc.) and your city sit just below. The event name and its total scheduled hours tell you what's running today. The green/red dot on the right shows if you're checked in.
Quick Actions
The row of circular icons: Generate QR, Scan QR, Broadcast, Inventory, Warehouse, Users. Tap any of them to jump straight to that feature without going through the menu. The set you see depends on your role — a Proctor sees fewer; a TCA sees more.
Your four stats
- My Hours — total hours you've logged this event. If you've gone past the working threshold, the overtime count shows in orange below.
- Today — your current status (In / Not In) and your check-in time.
- Broadcasts — how many unread messages are waiting for you.
- Staff Present — how many of your team are currently checked in.
Live Attendance
A live list of who's at the venue right now. The dot next to each name is green if they're checked in, grey if not. Tap View to see the full list and details.
Recent Broadcasts
The last few messages from leadership, with pinned ones on top. Tap any card to read the full message.
Pull down to refresh
If you think Home hasn't updated (colleagues checked in but you don't see them yet), pull the screen down with your finger. Everything reloads.
Checking in and out.
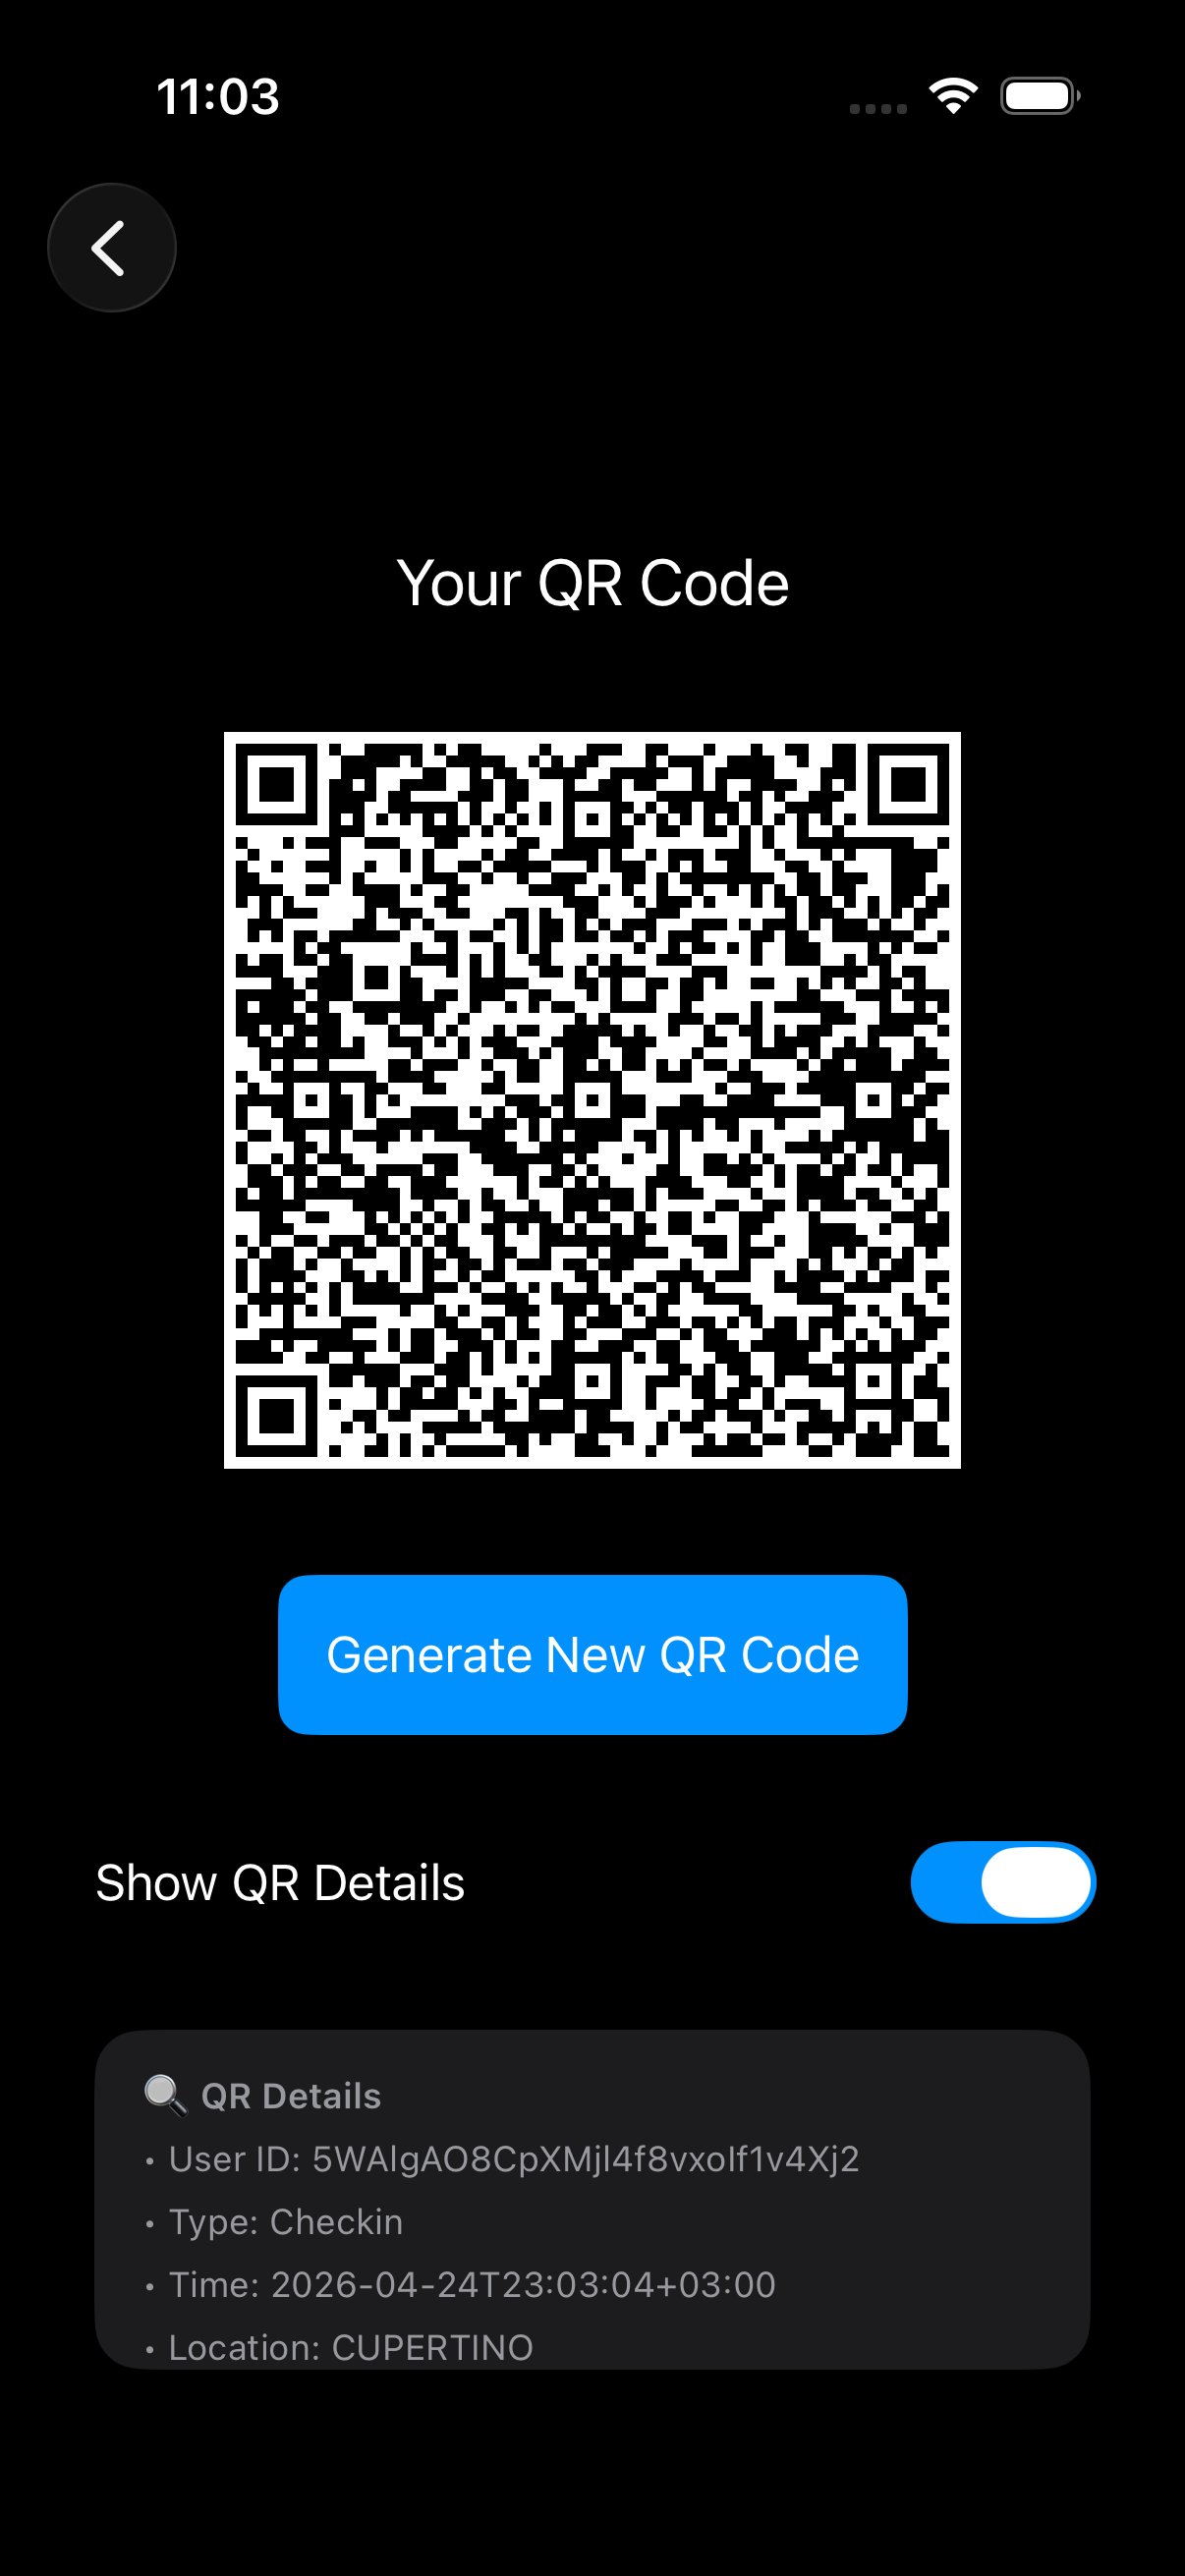
myProctor's attendance is a generate-then-scan flow. On your own device, you tap Generate QR — that creates a short-lived QR code stamped with your user ID, your location (city + GPS), the action (check-in or check-out), and the timestamp. Walk to the common-use iPad at the venue desk — running in scanner mode — and hold your QR up. The iPad reads it; your attendance logs.
What you'll need
- Your own device — your personal phone or your assigned corporate iPad/iPhone — with myProctor installed and you signed in.
- The common-use iPad at the venue — a shared device sitting at the TCA's station, running myProctor in Scanner Mode (camera always live, biometric-locked between scans). Your TCA will point it out on day one.
Checking in when you arrive
- Open myProctor on your own device. You land on Home.
- Tap "Generate QR" in the Quick Actions row. A full-screen QR code appears — stamped with your user ID, your location (city + GPS), the action (check-in), and the current timestamp. It's valid for about 15 seconds.
- Walk straight to the common-use iPad at the venue desk — quickly, before the QR times out. The iPad's camera is already live, waiting for you.
- Hold your QR up to the iPad's camera. Don't tap anything on the iPad — it captures automatically.
- The iPad shows green — "Checked in, [your name], [time]". Your own device confirms too.
- Back on Home, pull down to refresh. Your dot turns green; the Today tile shows your check-in time.
Checking out when you leave
Exactly the same flow. The QR you generate this time is stamped with check-out as the action — myProctor knows because you're already checked in. Generate → walk to the common-use iPad → hold up → done.
When you're late
If you arrive past the start time your TCA set for your shift, the iPad pauses before logging your scan — it prompts you to type a short remark explaining why (traffic, family, prayer, etc.). Submit the remark and the attendance logs with your justification attached. Your TCA sees the note in the daily summary.
This only blocks the log momentarily — once you submit the remark, your check-in is recorded with that exact arrival time. There's no penalty in the app itself; the remark is just so your TCA knows the story.
When your QR expires before scanning
The QR is good for about 15 seconds. If you take longer to walk over to the iPad — or you stopped to chat on the way — the timer runs out and the iPad rejects your scan with "QR expired". Just:
- Go back to your device.
- Tap Generate QR again — you'll get a fresh one.
- Walk to the iPad without delay this time. It'll scan cleanly.
Won't scan?
Increase your screen brightness to maximum so the QR is crisp. Hold the phone 15–20 cm from the iPad. Make sure your QR fills the screen — no notification banners cropping it. If a fresh QR still won't scan after a couple of tries, ask your TCA to log your attendance manually.
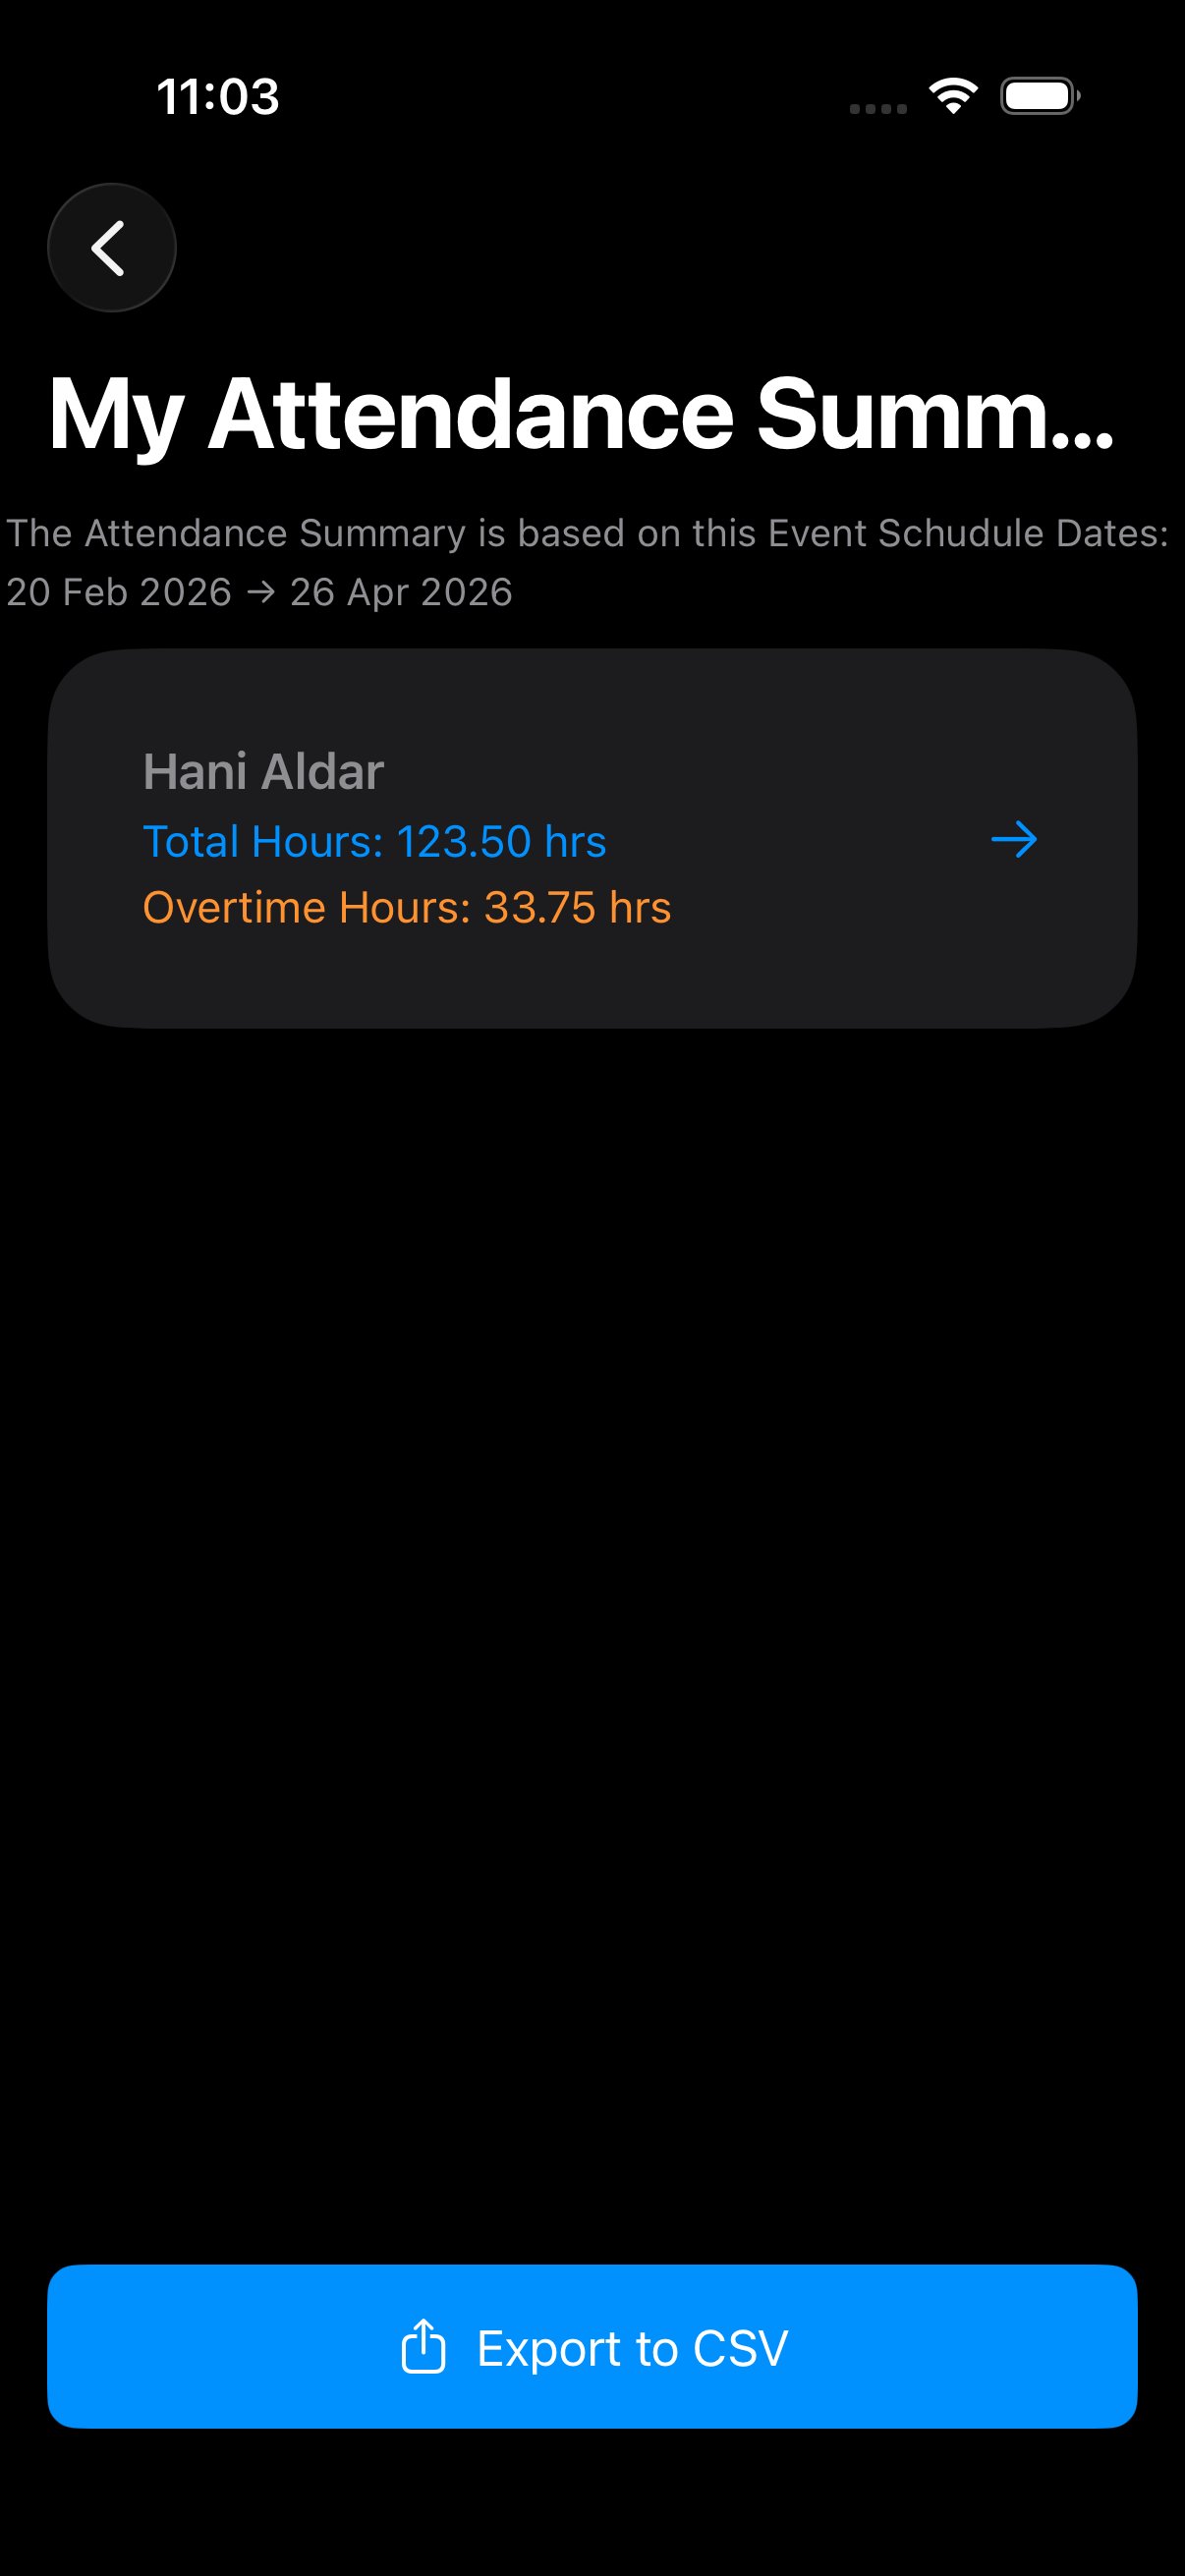
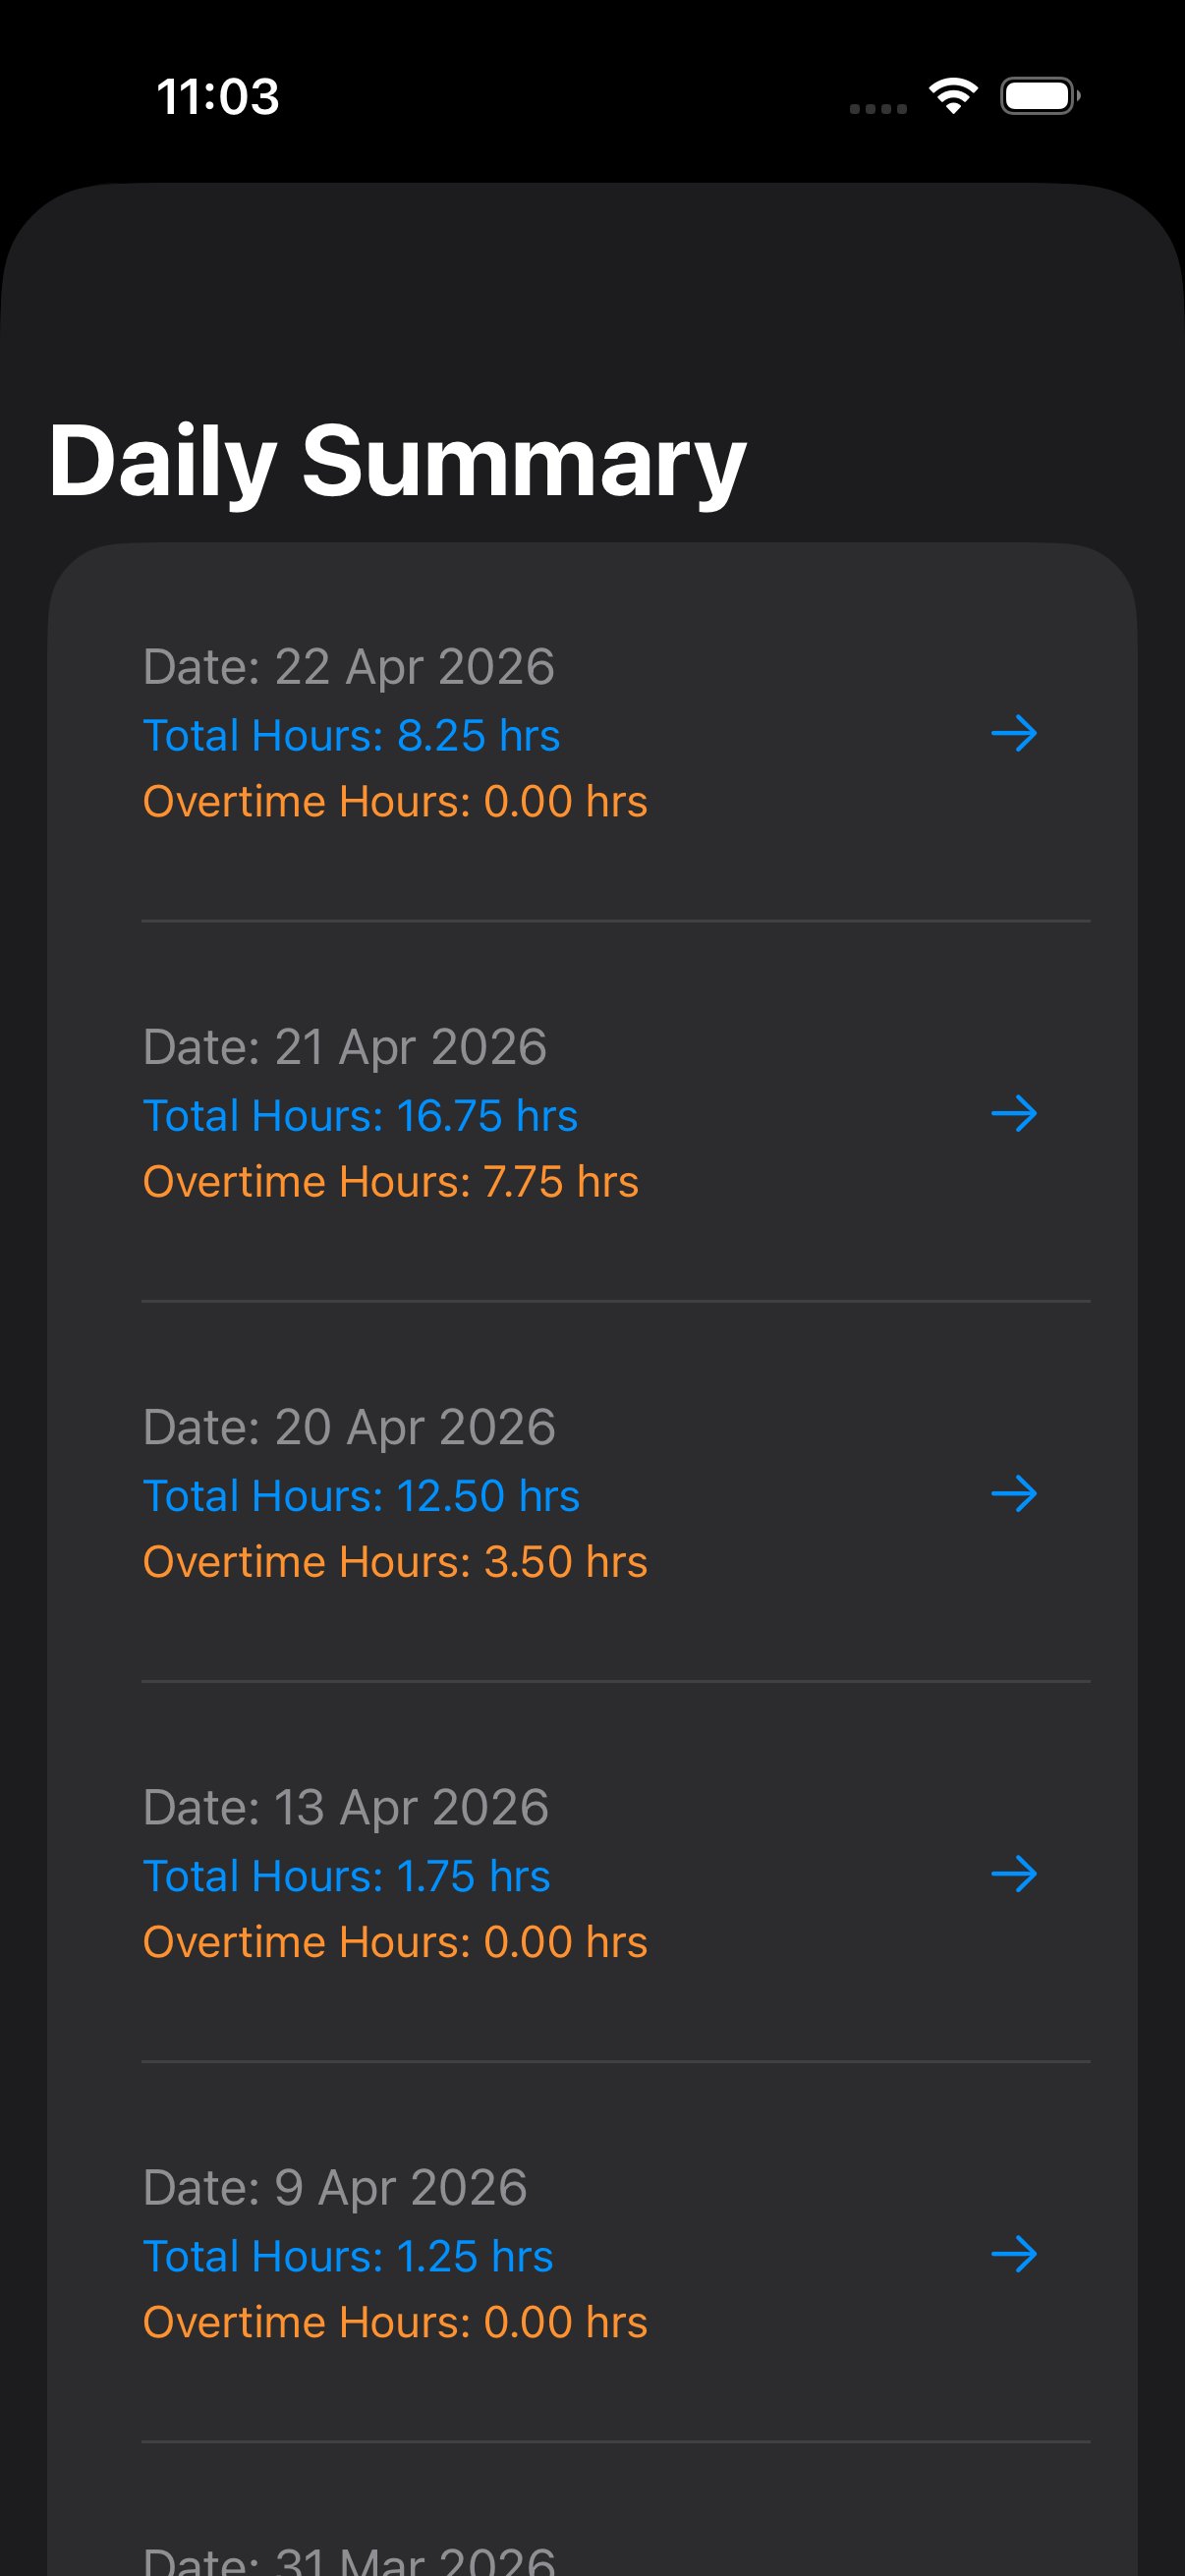
Seeing your hours
Open the menu (icon top-left) and tap My Attendance Summary. You'll see every day you've worked on this event, with check-in time, check-out time, total hours, and any overtime. Today is at the top.
I forgot to scan
It happens. Find your TCA or Admin — they have a 3-day window in which they can add a missing scan. Tell them roughly when you actually arrived or left; they'll log it with a note.
Reading messages from HQ.
Broadcasts are short messages leadership, TCAs, or Tech send to everyone (or everyone in a specific role). You read them in Broadcast Center, and you'll also get a push notification when one arrives.
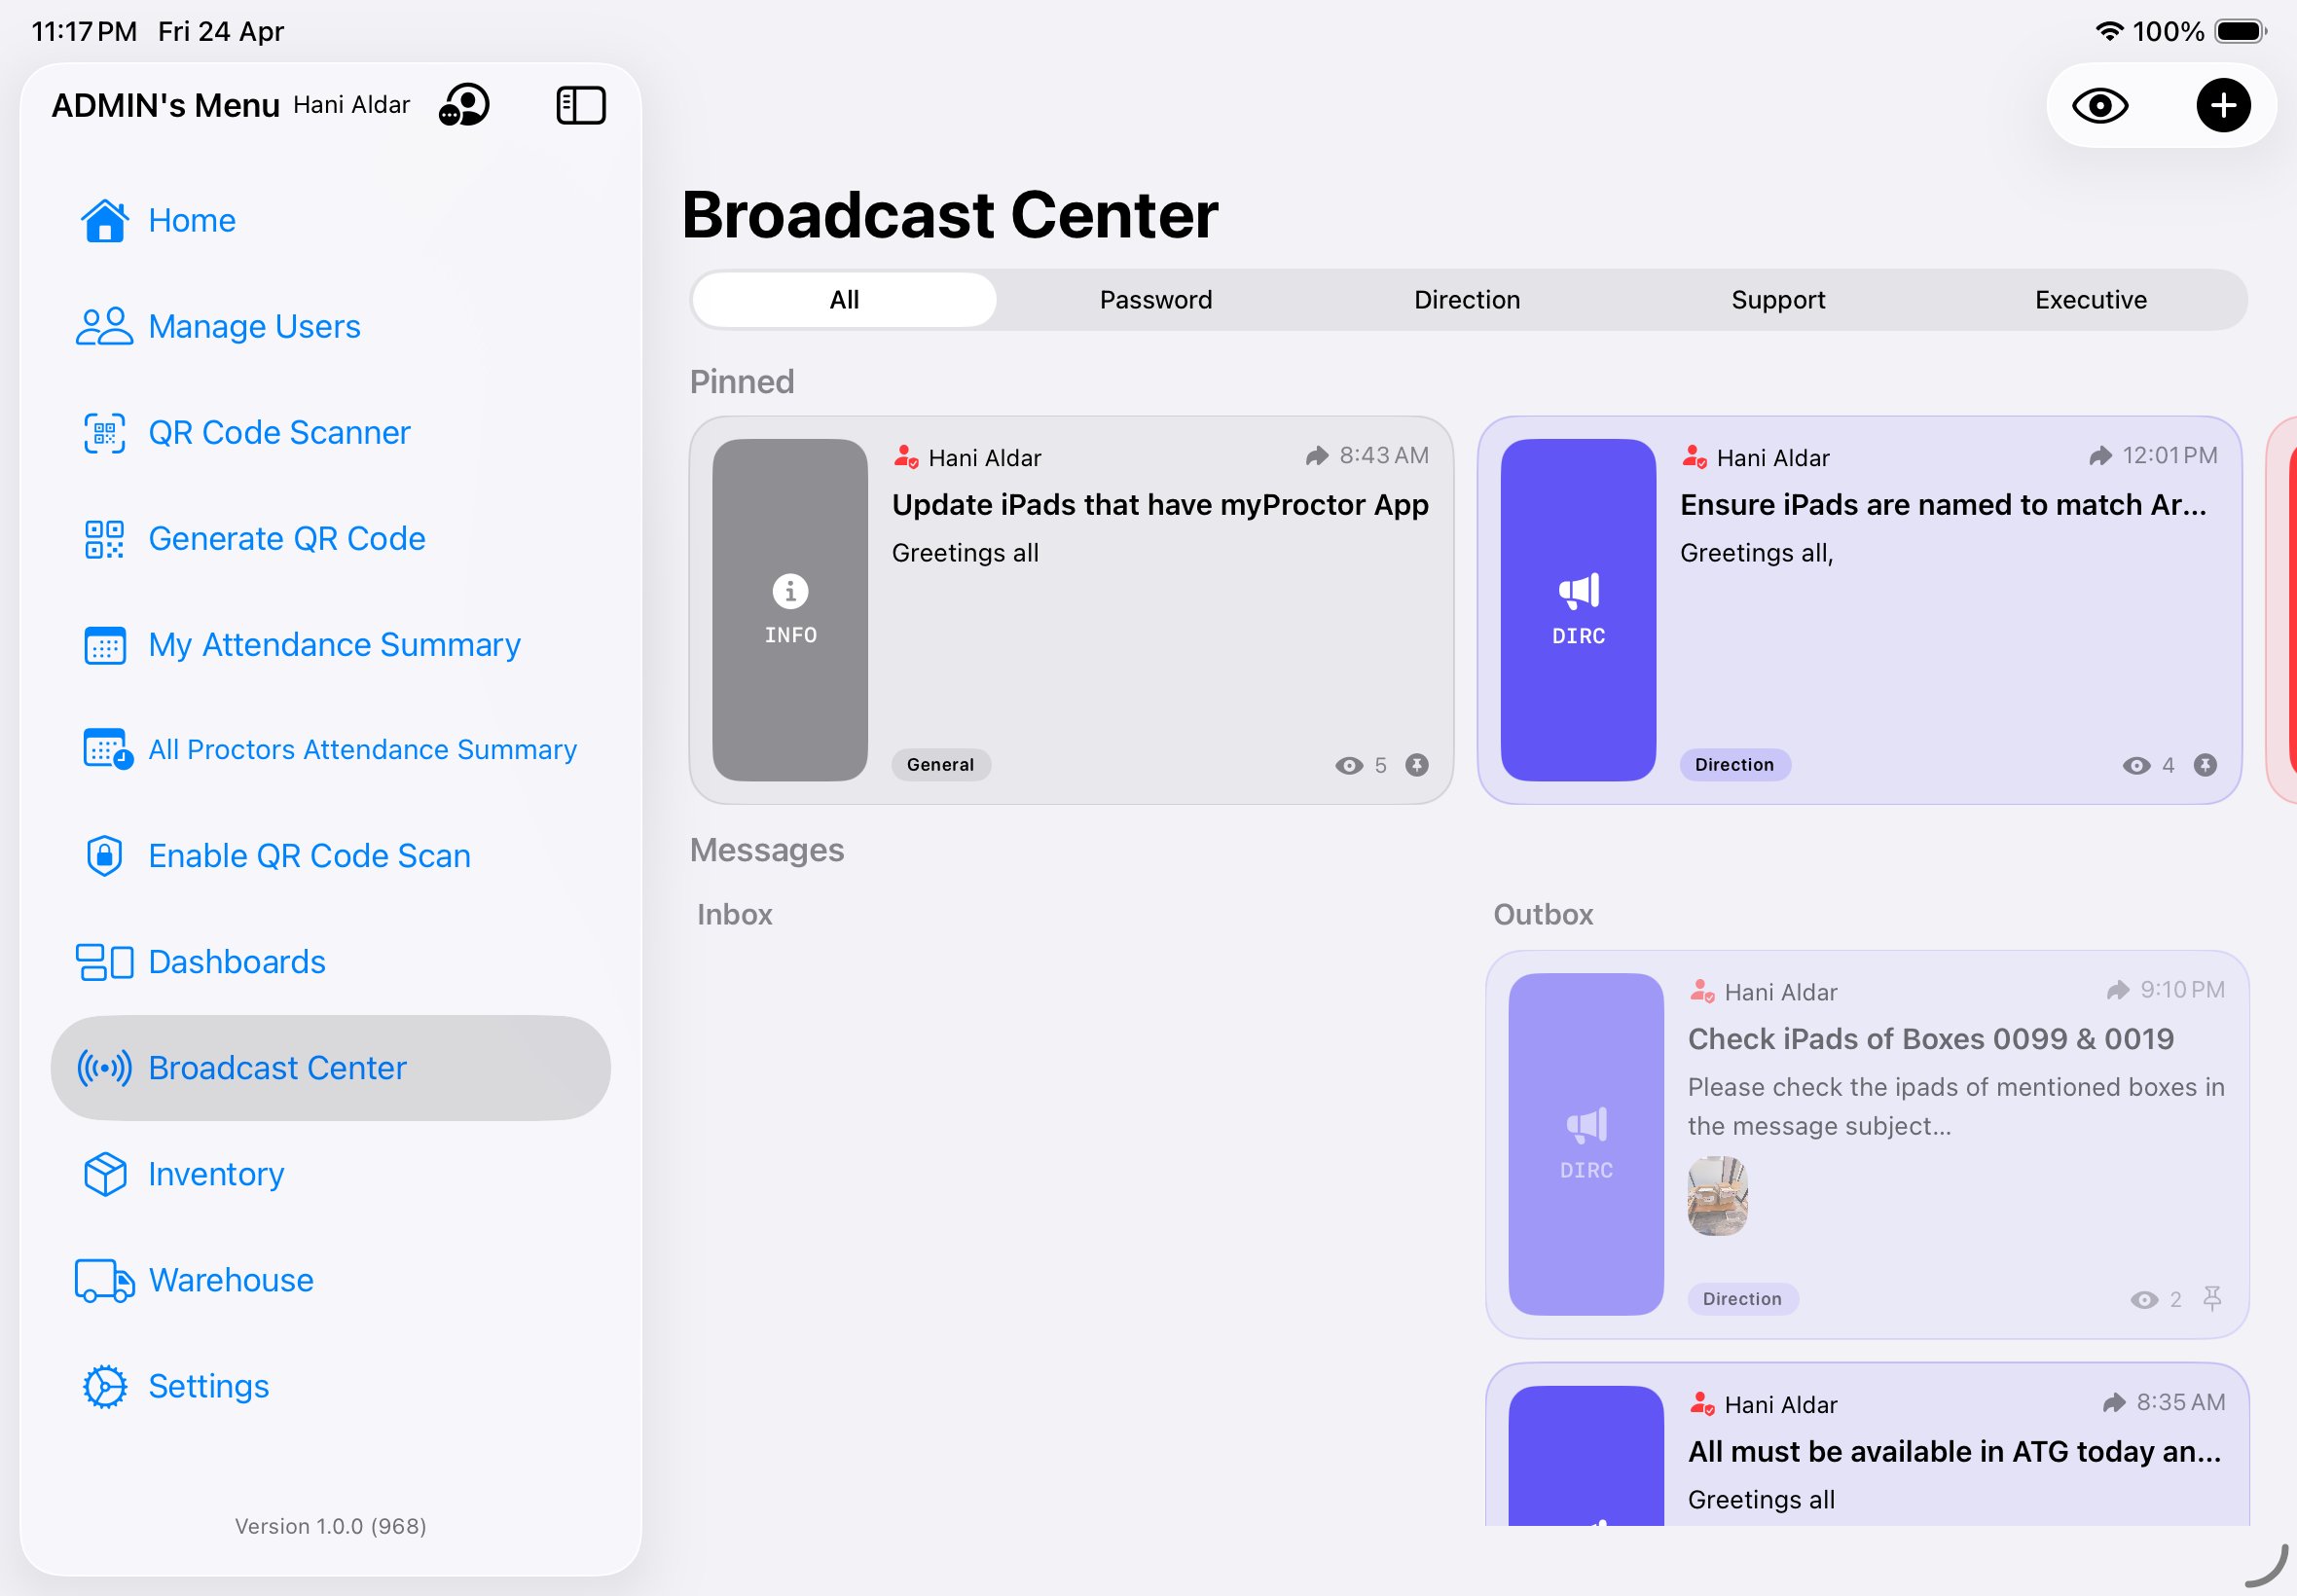
The tabs at the top
The row of tabs — All · Password · Direction · Support · Executive — filters which messages you see. Leave it on All if you want everything. Tap one of the other tabs to show just that type.
Pinned
Important messages that leadership wants you to see on top, no matter when they were sent. Anything pinned globally is something the senders specifically want every reader's eyes on. Read pinned messages first when you open the app each morning.
Inbox & Outbox
- Inbox — messages sent to you.
- Outbox — messages you sent (if you have send permissions). For most Proctors, Outbox will be empty until you send your first Support ticket.
The message types
| Badge | Meaning | From whom |
|---|---|---|
| PSWD | Password — highest-priority operational broadcast from leadership. Anything urgent enough to need this channel. | Admin / Manager |
| DIRC | Directions — stage moves, timing changes, crowd control. | Admin, TCA, ATCA |
| EXEC | High-priority executive announcements. | Admin / Manager |
| INFO / General | Routine day-of information. | Anyone |
| SUPR | Support threads — tickets, technical requests, logistics. | You or your colleagues |
Reading a message
Tap any card to open the full message. The view count updates automatically — so your TCA knows you've seen it.
Pinning one for yourself
If there's a message you want to keep sticky in your inbox (a Direction you'll reference all morning, a Support thread you're tracking), long-press the card and tap Pin for me. This is just for your view; it doesn't change what your colleagues see.
When something goes wrong.
Broken iPad? Missing printouts? Need a supervisor? Send a Support message. It goes to the right team automatically — you don't need to know who to contact.
Pick the right type
| Type | Use it for | Goes to |
|---|---|---|
| Technical | iPad problems — frozen, won't charge, wallpaper QR unreadable, battery dead, device swapped out. | The Tech team in your city |
| Logistics | Missing printouts, stationery, refreshments, room setup, seating adjustments. | Admin + Manager in your city |
| Administrative | Candidate issues, escalations, complaints, policy questions. | Admin + Manager in your city |
The City field is filled in for you
When you open the New Broadcast composer, the City field is already pre-filled with your assigned city — your message will reach the right team automatically. If you want it to go to every city instead, clear the field before tapping Send.
Sending a Technical request — step by step
- Open Broadcast Center (from Home Quick Actions or the sidebar).
- Tap the + button in the top-right. The New Broadcast sheet slides up.
- Tap Support on the Type row.
- Tap Technical on the second row. The "This will notify" preview updates to show TECH.
- Fill in a clear Title. Example: "iPad frozen — room B, seat 07". Be specific — which iPad, where.
- Fill in a Message. Describe what's happening and what you've already tried.
- Tap Send.

What happens next
- Tech gets a push notification immediately. Your message appears in their Home.
- They may come to your room, or message you back in the same thread.
- Once the issue is fixed, the ticket status changes. You'll see it move from "open" to "resolved" in your Outbox.
Be precise in the title
"iPad not working" is hard to act on. "iPad A-07 frozen on exam screen, restart didn't help" lets Tech grab a replacement before they even leave the Tech room.
TCA & ATCA tasks.
As a TCA or ATCA, you run your venue. You'll spend most of event day coordinating your team, reading the room, and making sure every candidate is in their seat on time. The two things only a TCA can do are send Direction messages to the whole venue and see across all rooms at once.
Sending a Direction message
Use Direction messages to coordinate your team — "Rooms A and B please start seating now", "Move surplus candidates to Room C", "Break at 11:15 sharp". These go to every staff member in your venue.
- Open Broadcast Center from Home or the sidebar.
- Tap the + button in the top-right.
- Tap Direction on the Type row. The "This will notify" preview shows every staff role.
- Title: short, clear, imperative. Example: "Start seating — all rooms".
- Message: the specific action and time.
- Tap Send. Everyone at the venue gets a push.
Spotting problems early
Your Home page has two cards that you should glance at every 30 minutes during event day:
- Staff Present — should equal the full team size by mid-morning. If not, someone didn't check in.
- Recent Broadcasts — scan for any Support tickets from your rooms so you can escalate before candidates notice.
You can also do everything Tech does
Receiving boxes from the warehouse, handing out devices, swapping a broken iPad mid-exam, taking batches back at end of day — these are Tech tasks, but TCA and ATCA can do all of them too, scoped to your city (just like Admin, but city-bounded). See the Tech tasks section below for the procedures. Day-to-day, leave them to the Tech user assigned to your venue; step in when they're stretched or unavailable.
Tech tasks.
As Tech, you handle every iPad at the venue from the moment the warehouse box arrives to the moment it goes back. You receive shipments, hand devices to Proctors, swap broken ones mid-exam, mark conditions, and take everything back at end of day. You're also the first responder for any Support ticket flagged Technical.
Creating a batch
Before you can hand iPads to anyone, those iPads have to be inside a batch. A batch is a small group of devices (1–20) you create in one go and then assign to a single user. As Tech, you'll create most batches; TCAs and ATCAs can create them too if needed.
- Open Inventory from the sidebar menu, or tap the Inventory tile on Home.
- Tap the QR scan icon in the top-right of the toolbar. A scanner overlay opens — this is the batch-creation flow.
- Pick the batch mode. Four options:
- Student — up to 20 iPads to give to students for their assessment session. Each iPad is bound to a specific seat (its wallpaper QR and Display Name carry the seat code, e.g.
RIY-A-07); backup iPads (BAK1,BAK2) replace primary units mid-session if needed. - Staff — an iPad with myProctor for a Proctor or Tech who doesn't have it on their personal device.
- Special — an iPad with myProctor for a TCA, ATCA, Warehouse, Manager, or Admin who doesn't have it on their personal device.
- Generic Use — an iPad for a TCA/ATCA to run the venue's check-in terminal (Scan Mode kept on so Proctors can walk up and scan their attendance QR), or to run another web-app outside myProctor.
- Student — up to 20 iPads to give to students for their assessment session. Each iPad is bound to a specific seat (its wallpaper QR and Display Name carry the seat code, e.g.
- Pick the assignee — the user this batch will go to. Search by name or scroll through the list.
- Scan each iPad's wallpaper. Stay on the same scanner view and point the camera at each iPad's wallpaper QR (it's the QR shown as the iPad's lock-screen / home-screen wallpaper). Each successful scan adds a row.
- Tap Submit. The batch is created with status In Store. The iPads now belong to this batch but you haven't handed them out yet — that's a separate step (next section).
If a device won't scan in
You'll get an alert immediately if (a) the device isn't in your city's enrolled inventory, (b) it's already part of another active batch, or (c) it's marked Damaged or Missing. The batch won't submit until every device on the list is recognized, free, and Clear. Resolve the flagged ones first — return the conflicting batch, or swap in a Clear unit — then try again.
Receiving devices from the warehouse
Before the event, the Warehouse team prepares boxes of iPads and ships them to your venue. On the receiving side:
- Open Inventory from the sidebar.
- Find the incoming box — it'll appear with a "Shipped" or "Pending approval" chip.
- Tap to confirm. The app asks you to scan the box label. Scan it.
- Count matches? Tap Approve. The box moves to "In Venue" status.
- Count doesn't match or damage? Tap Reject and note the issue. The Warehouse team gets pinged immediately.
Handing a batch out to a user
Once you've created a batch, it sits in In Store status — bound to the assignee but still in the venue store. Hand it out when the user shows up.
- Open Inventory → Batches. Find the batch (it's listed under the assigned user's name and city group).
- Swipe the batch row to the left. Two action buttons appear: Add Device (indigo, +) and Hand Out (orange).
- Tap Hand Out. Confirm the assignee.
- Done. Custody moves from In Store to With User. The hand-out timestamp is recorded on the batch and on every iPad inside it. The batch now appears on that user's Home.

When a Technical ticket arrives
You'll get an iOS push notification reading "Technical Support — [sender name]". Tapping it opens the thread directly.
- Read the Title + Message. Note the room, seat, and what's wrong.
- Grab a replacement device from your Tech trolley or the backup batch.
- Go to the venue, swap the device, confirm the candidate is back in their exam.
- Back in the app, open the ticket thread and reply with "Replaced — candidate resumed at [time]". The ticket status moves to resolved.
Acting on a single device inside a batch
Sometimes you don't want to act on the whole batch — just one iPad inside it (a candidate's device that broke, a Proctor leaving early with one device, etc.). Tap the chevron on a batch row to expand it and see every device. Each device row has its own per-device actions:
- Edit (per-device) — change just that iPad's condition (Clear / Damaged / Missing) without touching the rest of the batch.
- Replace (per-device) — swap a defective or missing iPad for a working spare. The replacement scanner opens; scan the new iPad's wallpaper QR and the new device takes the old one's slot in the batch (and seat code, in Student batches). The old device is marked Damaged or Missing automatically.
- Return (per-device) — return that single iPad to store while the rest of the batch stays with the assignee. Good for early-finishers or partial returns.
So yes — you can return, replace, or change condition for just one device of a batch without disturbing the others.
Replacing a damaged device in a Student batch
For Student batches, every device is pinned to a seat code (e.g. RIY-A-07). When you replace a device using the per-device Replace action above, the seat code stays — the new iPad inherits the old one's seat. Student attendance and exam results stay attached to the seat, not to the hardware, so the swap is invisible to the candidate.
- Open the batch containing the damaged device. Tap the chevron to expand the device list.
- Find the damaged device row.
- Tap Replace. The scanner opens.
- Scan the spare iPad's wallpaper QR. The app swaps them — old device becomes "replaced", new device takes the seat.
- Confirm the old device's condition is set to Damaged so Warehouse knows what to do.
Marking a device's condition
Every device has a condition: Clear · Damaged · Missing. When you receive a device back, swap one out, or notice damage mid-event, set its condition so the Warehouse team knows what to do.
- Open Inventory or Warehouse → Boxes.
- Find the device (expand the batch, or scan its serial, or search).
- Tap Edit on the device row and pick the right condition (Clear → Damaged → Missing).
- Save. The new condition is recorded with timestamp and your user.
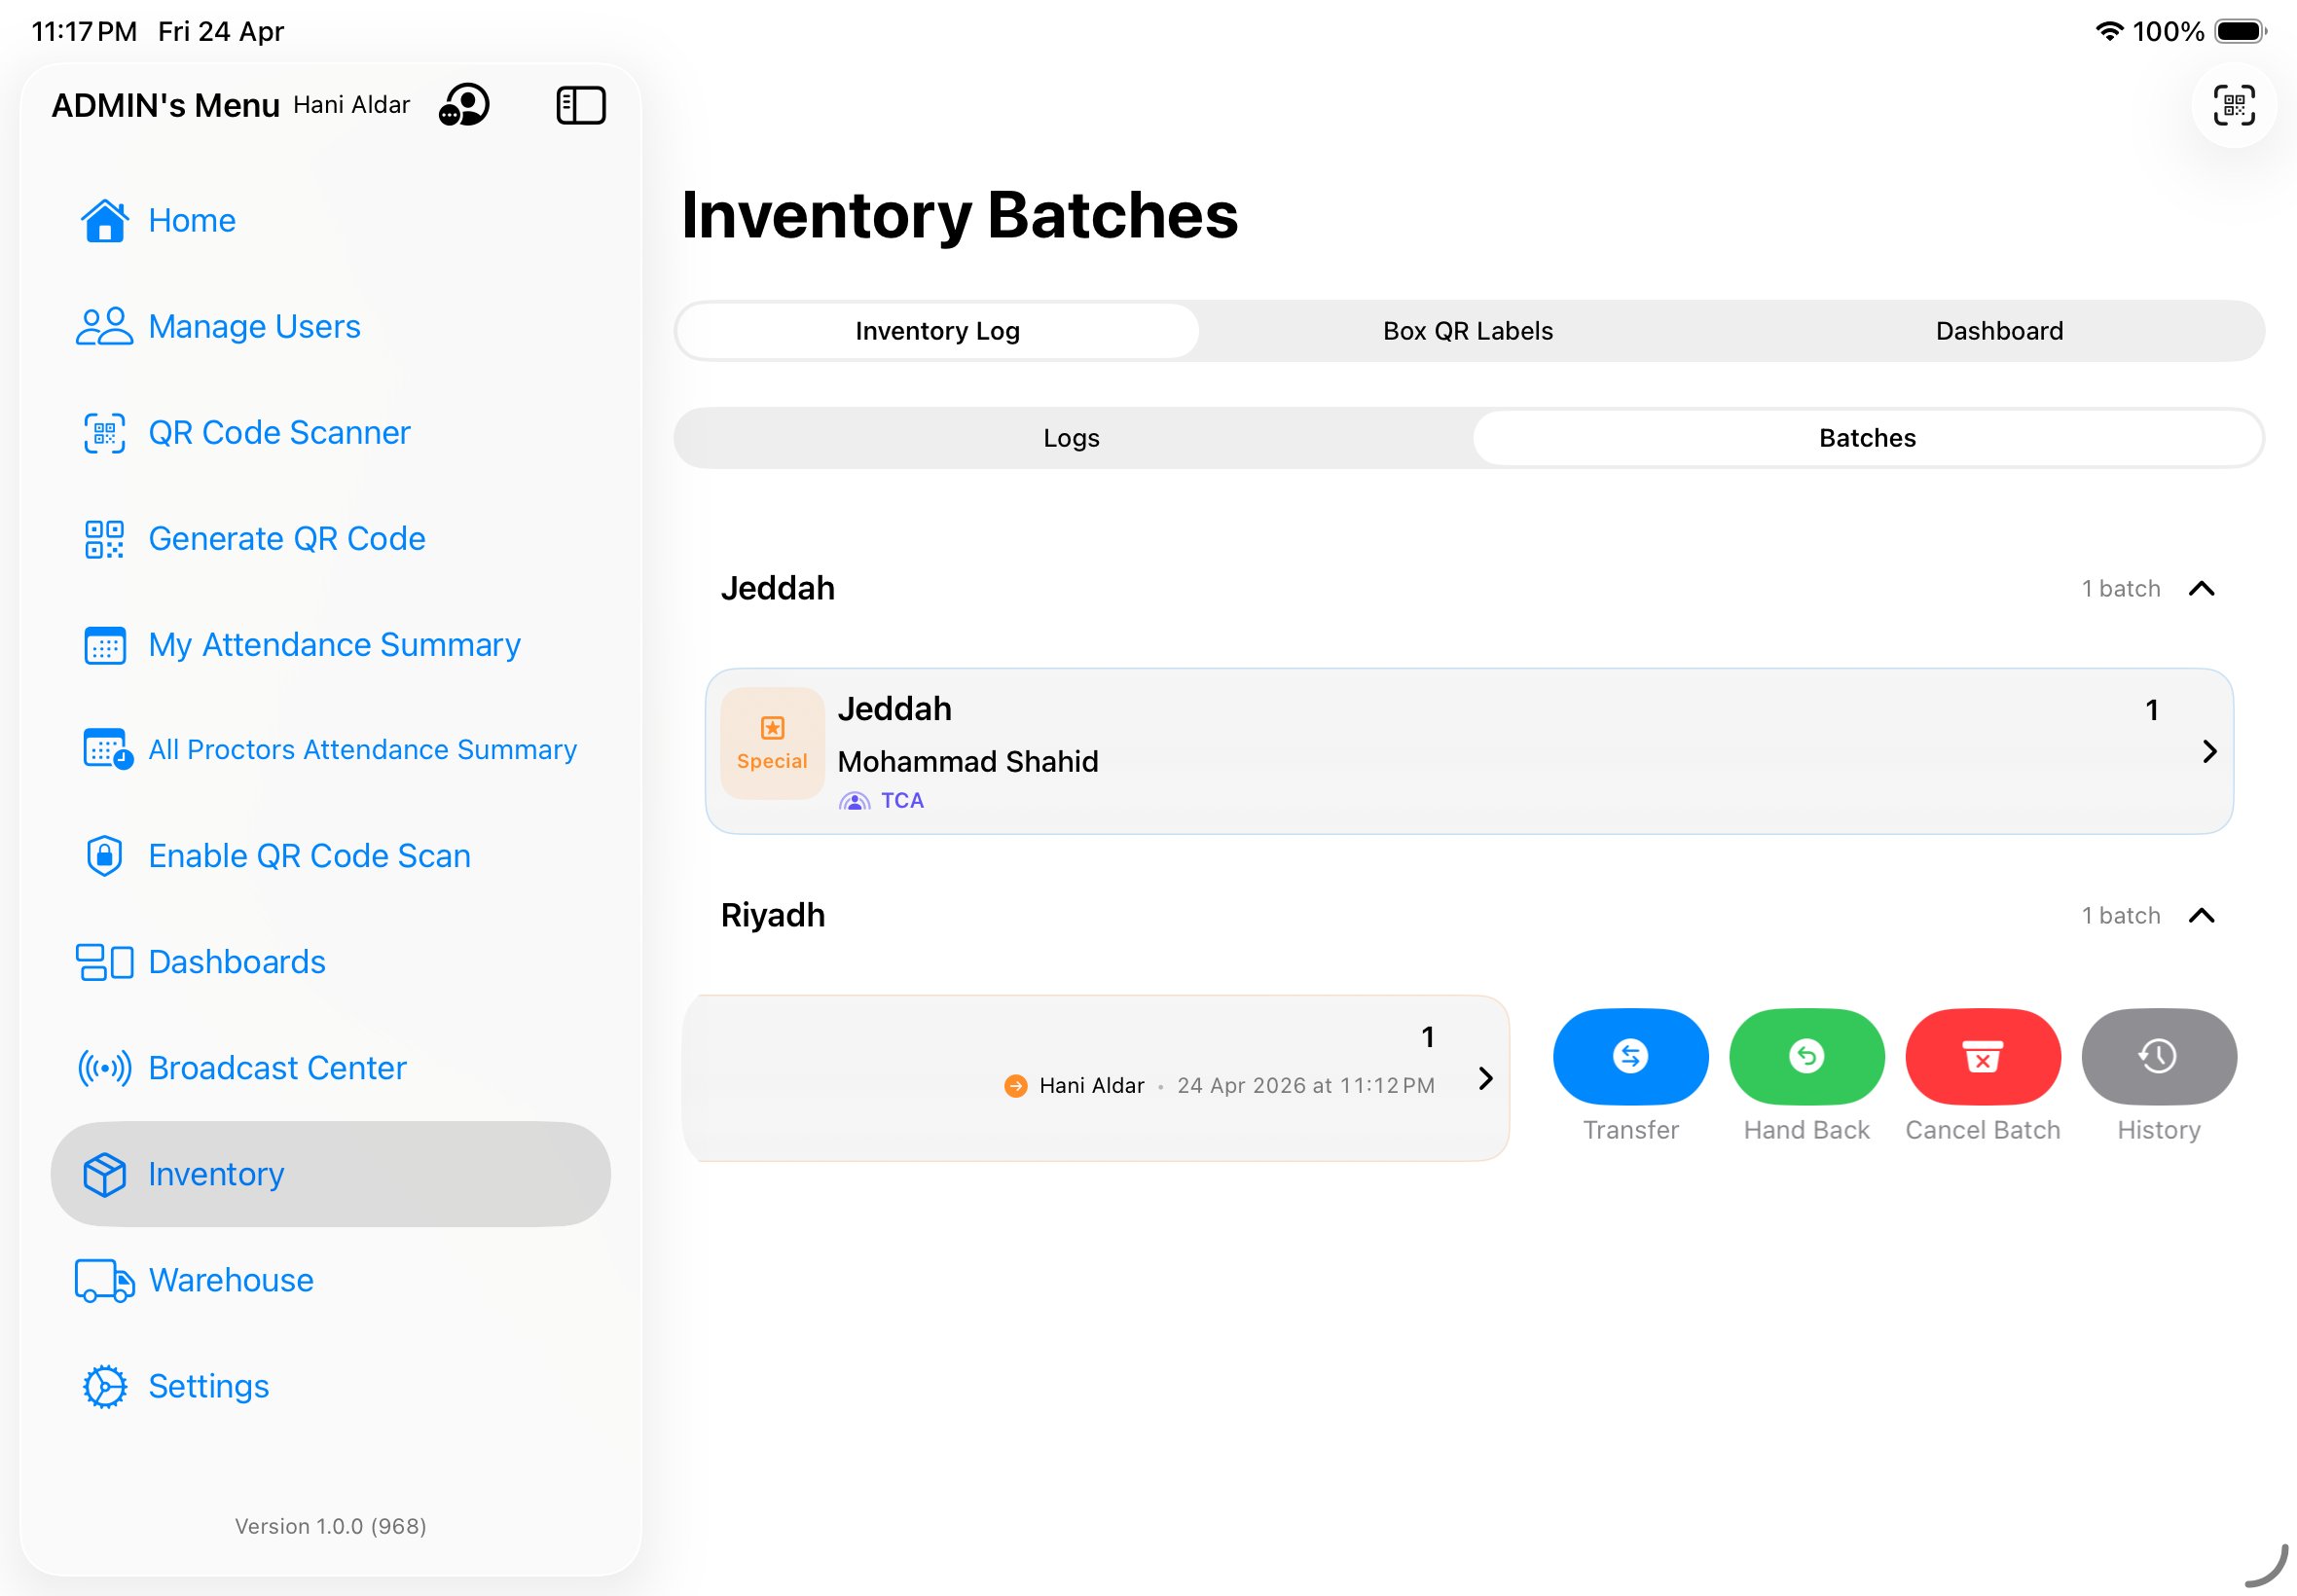
Getting a batch back at end of day
- Find the batch in Inventory (it'll be at the bottom, under the assignee's name).
- Swipe the batch row to the right. Four buttons appear: Transfer, Hand Back, Cancel Batch, History.
- Tap Hand Back.
- Mark condition for each device — Clear / Damaged / Missing. Default is Clear.
- Confirm. The batch returns to In Store. The hand-back timestamp is recorded on the batch and on every iPad. Damaged or Missing devices are flagged for Warehouse follow-up; Clear devices are free to be added to a new batch tomorrow.
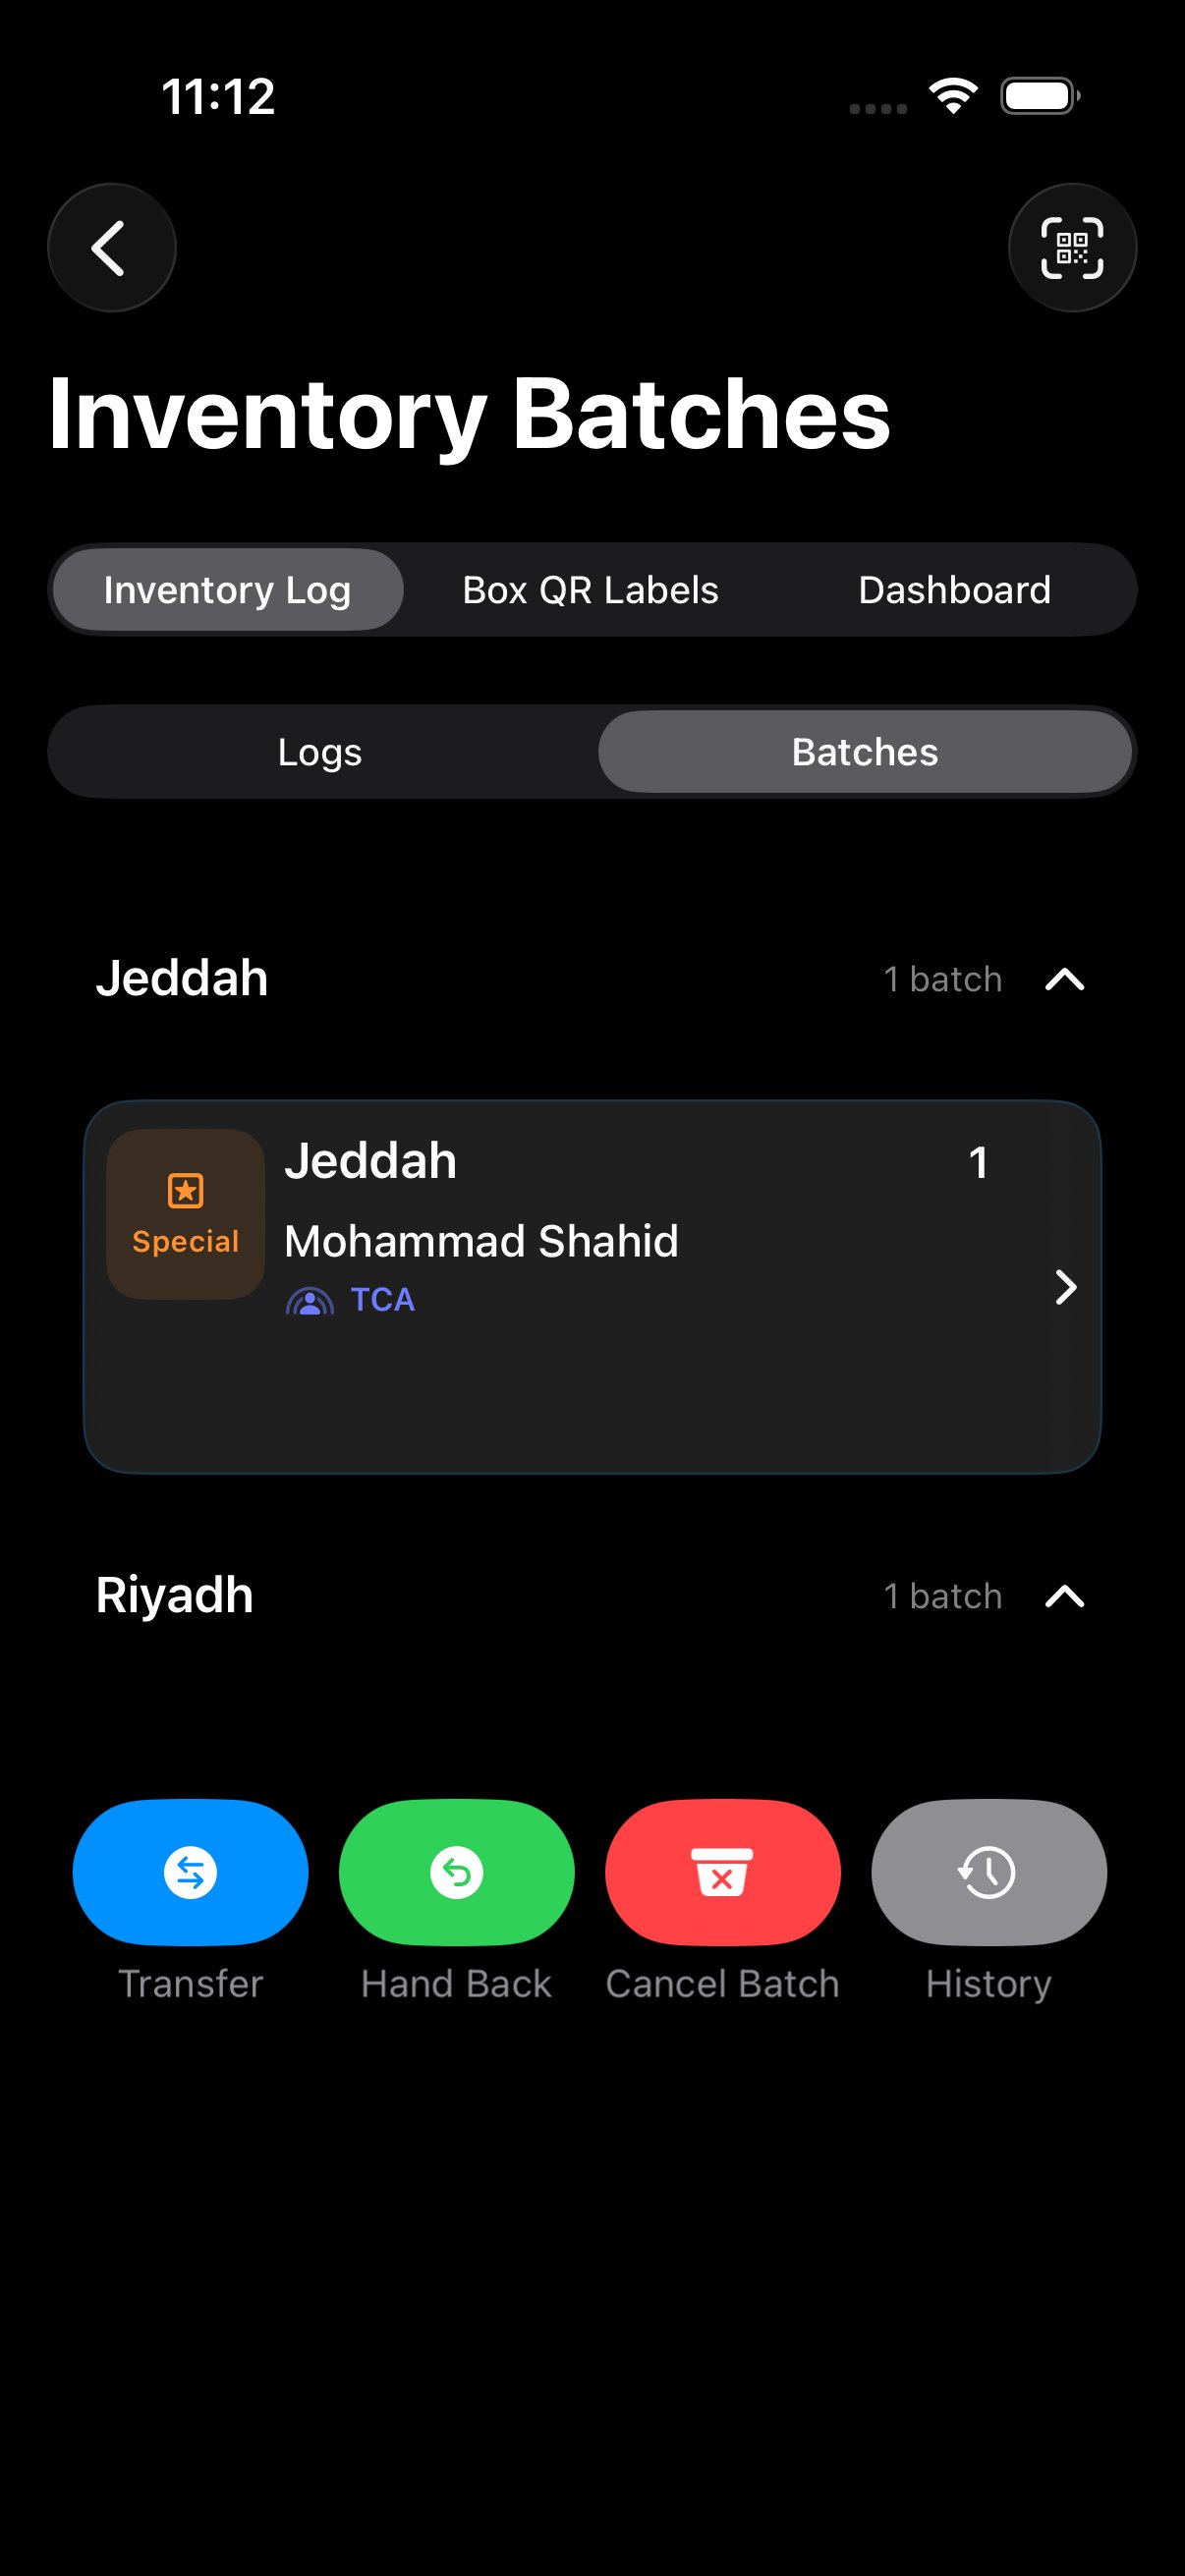
Transfer, Cancel, History
The other three swipe-right actions cover edge cases:
- Transfer — reassign an active batch from one user to another without the intermediate hand-back. Useful for shift changes mid-event, or when a Proctor leaves early and a colleague picks up the same student session. The new assignee sees the batch on their Home; the old one no longer does.
- Cancel Batch — void the batch entirely. All iPads inside are released back to the free pool. Use this if a batch was created by mistake, or an event was scrapped before any session began. Cancelled batches stay visible in History but are excluded from active dashboards.
- History — open the batch's full audit trail: created, handed out, handed back, devices replaced, condition changes, cancellation. Each event shows who did it, when, and from/to whom. Great for resolving "who had this device when?" questions after the fact.
Keep a spare trolley stocked
You'll move faster if you start the day with 5–10 charged, configured, spare iPads. Ask the TCA to set aside a small "Tech reserve" batch for you before event start.
Your access.
Your role (Proctor, Tech, TCA, ATCA, Admin) determines which sections of the app you can see and which actions you can take. You can check yours anytime.
Viewing your Access Profile
- Tap the overflow menu in the top-right of any screen (three dots, or the person-icon menu).
- Tap "Show Access Profile".
- A sheet slides up showing your role, your city, your accessible venues, and the list of menu options available to you.
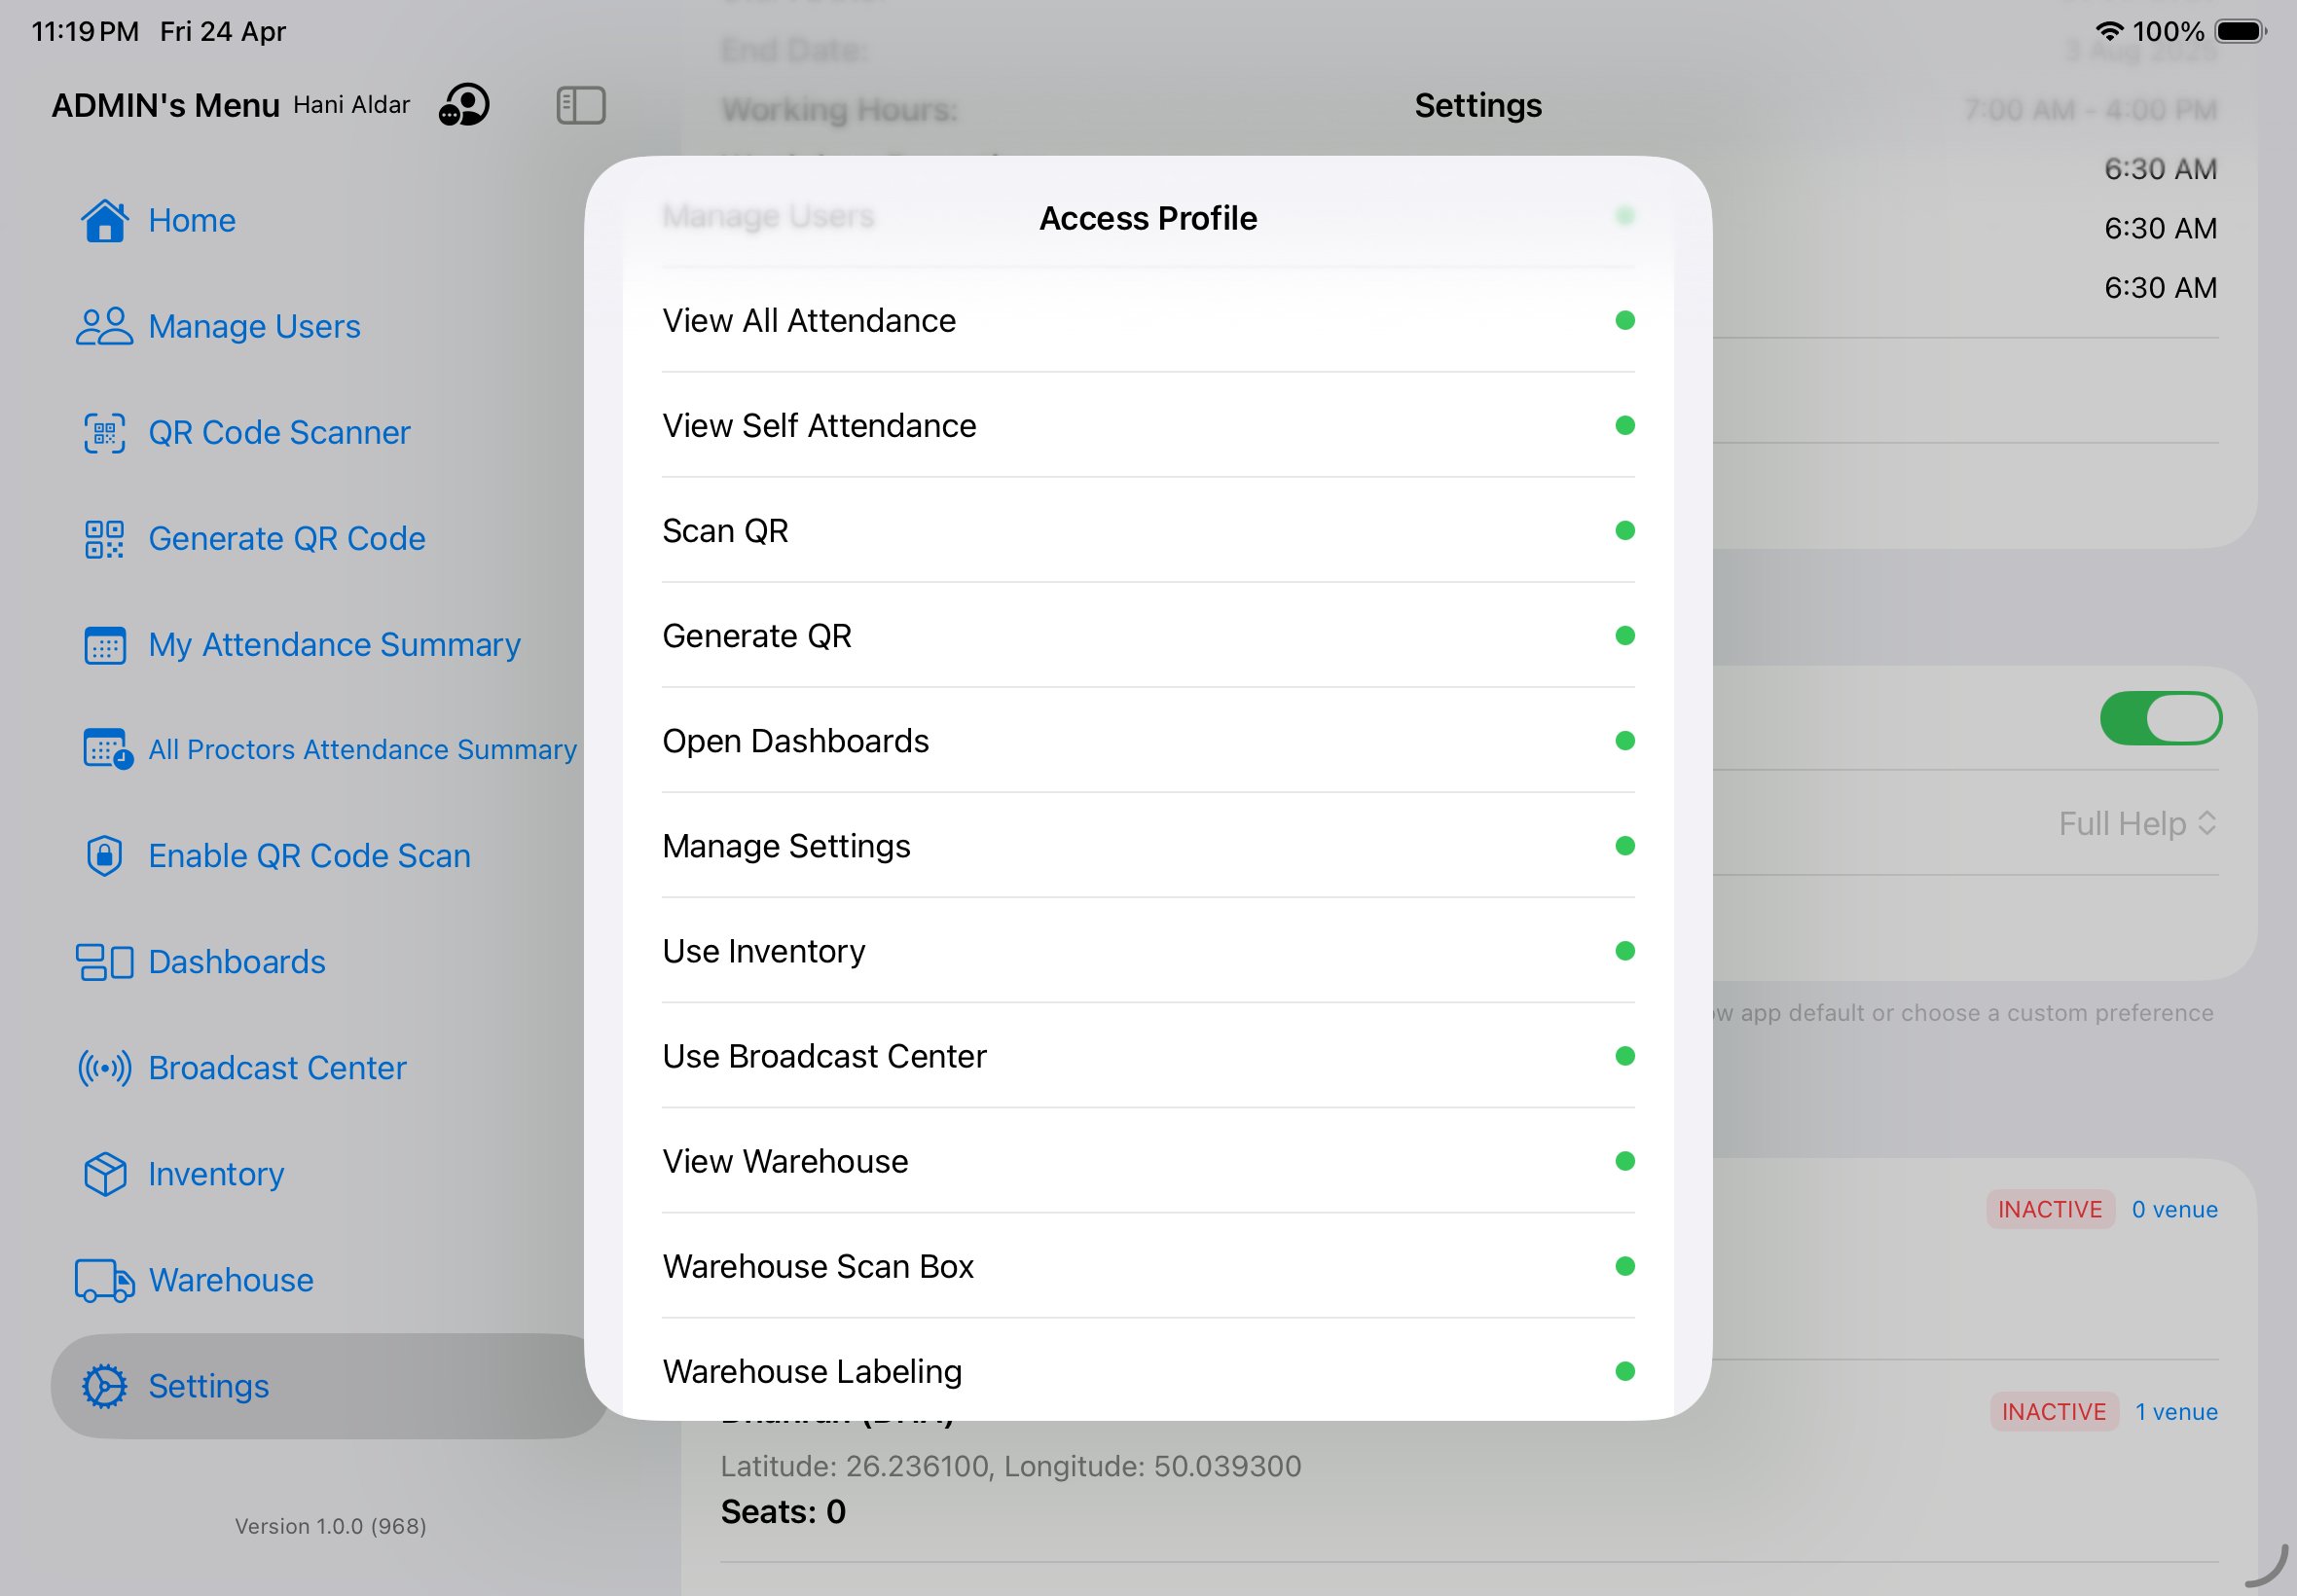
If something you need is grey
Every grey dot means you can't see that part of the app. That might be correct — a Proctor shouldn't see Warehouse — but if you think it's a mistake, talk to your Admin or the SuperAdmin. They can add individual permissions to your account without changing your role.
Your city and venues
You're assigned to one city (shown at the top of Access Profile). Within that city, you can be given access to one or more specific venues. If you travel to a venue that isn't in your list, you won't be able to log attendance there until the Admin adds it.
Got stuck?
Common things that go wrong, and the fastest way to fix them.
"I can't sign in"
- Double-check your email. Use the exact email you originally signed up with — typos and capitalisation matter (the app does normalise case for matching, but it's still worth checking).
- Wrong password? Tap Login and try again carefully. If you genuinely can't recall, contact your Admin — there's no self-service password reset in the current build, so the Admin clears it server-side and tells you a temporary password.
- Brand-new and never signed up? You need to tap the green Sign Up button (not Login) the first time. After that, every visit uses Login.
- Check your network. Sign-in needs internet. If the Wi-Fi is dodgy, switch to mobile data.
- Signed in but the menu is almost empty? That's the default Proctor state. Your Admin needs to set your real role and city in Manage Users. Once they do, sign out and back in.
"The QR scanner won't read"
- Clean the lens — a smudge is the #1 culprit.
- Adjust distance — too close and the camera can't focus; try 10–15 cm away.
- Check the lighting — glare on the QR or backlighting behind it both confuse the camera.
- Reopen the scanner — tap Cancel, then Scan QR again.
"A section is missing from my menu"
It means you don't have that permission. Open your Access Profile to confirm — the missing item will have a grey dot. If you think that's wrong, ask your Admin to grant it.
"I don't see my messages"
- Pull down to refresh Broadcast Center.
- Check you're on the right tab — the tab filter (All / Password / Direction / Support) may be hiding the type you're looking for.
- Check your role filter — some messages are only sent to specific roles.
"The app is behaving weirdly"
Force-quit it (swipe up from the bottom of the screen and flick myProctor up), then reopen. 90% of glitches are fixed this way. If not, sign out and back in — from the sidebar, tap your name and then Logout. If still broken, report it to the Tech team via a Support ticket.
"I need to reach the Admin"
Send a Support → Administrative message. It goes to every Admin and Manager in your city, so one of them will respond quickly. (For room-supply or stationery issues, use Logistics instead — same destination, but it helps them triage.)
Cheat sheet.
Everything on one page. Screenshot this or bookmark the section.
Need a printable, role-by-role version?
Open the printable quick guide — one section per role with step-by-step "what to do, and how" tables. Designed to fit on letter / A4 paper so you can pin it where you need it.
Daily flow
- Arrive — open app, tap Generate QR, hold your QR up to the common-use iPad at the venue desk.
- Check pinned messages — Broadcast Center → read anything pinned at the top before doing anything else.
- Do your job — Proctor your room / TCA your venue / Fix iPads / etc.
- Leave — Generate QR again and scan it on the common-use iPad before you go.
"How do I…" one-liners
| Task | Path |
|---|---|
| Check in / out | Home → Generate QR → hold it to the venue's common-use iPad |
| I was late | Type a short remark when prompted before scan logs |
| QR said "expired" | Generate a new QR and walk straight to the iPad |
| See my hours | Sidebar → My Attendance Summary |
| Send a Support ticket | Broadcast Center → + → Support → pick type |
| Send a Direction (TCA) | Broadcast Center → + → Direction |
| Read a pinned message | Broadcast Center → Pinned section at top |
| Hand out a device (Tech) | Inventory → batch → swipe left → Hand Out |
| Mark a device damaged (Tech) | Tap the condition pill on the device row |
| See what I have access to | Top-right menu → Show Access Profile |
| Sign out | Sidebar → your name → Logout |
Message types at a glance
| Badge | Means |
|---|---|
| PSWD | Password — highest-priority leadership broadcast |
| DIRC | Direction from TCA/Admin |
| EXEC | Executive-priority announcement |
| INFO | General info |
| SUPR | Support thread |
Device condition pills
| Pill | When to use |
|---|---|
| Clear | Device is fine, no issues |
| Damaged | Screen cracked, charging port broken, physical damage |
| Missing | Device not returned at end of day |
| Malfunction | Works but glitchy — flag for Tech inspection |
When in doubt
- iPad broken? → Support → Technical
- Room setup issue? → Support → Logistics
- Need a manager? → Support → Admin
- App broken? → Force-quit, reopen. Still broken? Support → Technical.