
The WOW Room in your Pocket & Hand.
myProctor is an iOS and iPadOS app that runs the full lifecycle of proctored screening events across Saudi Arabia — from warehouse prep weeks before event day, through attendance and broadcast operations in-event, to reconciliation afterward. This help center covers every screen, permission, and rule.
Getting started
Sign in, permissions, and your first minute in the app.
Roles & ranks
Ten roles, how rank drives access, city scoping.
Home dashboard
Your role-adaptive landing screen, gesture by gesture.
Attendance
QR check-in/out, OT math, manual fallback, broken logs.
Broadcast Center
Five channels, routing, pin/delete, support lifecycle.
Warehouse pipeline
The ten stages, handovers, and recovery paths.
How this guide is organised
Start here covers orientation — what the app is, how roles work, and how to sign in. Daily use covers the screens most people open every event day. Operations covers the deeper warehouse, labeling, and configuration workflows. Reference is the long tail — the permission matrix, masquerade, error codes, and glossary.
The WOW Room in your Pocket & Hand
myProctor takes the command experience of the WOW Room and makes it portable. The iPhone version keeps it in your pocket on the move; the iPad version puts it in your hand at the venue desk — where it also becomes the common-use check-in terminal. Same command, two form factors, anywhere you need them.
A few things to know
- Online-only by design. The app depends on Firestore for writes. Offline, you'll see an overlay but won't lose data.
- All timestamps are Asia/Riyadh. The business schedule, OT calculations, and special-period rules assume KSA time.
- iOS and iPadOS only. No Android, no web. Built in SwiftUI against Firebase/Firestore with AES-GCM encryption for broadcasts.
- Self-signup with email and password. No SSO, no Google, no Apple ID — the app uses straight email + password authentication via Firebase Auth. New accounts default to Proctor role with no city assignment until an Admin updates them in Manage Users.
Getting started.
Two minutes to sign up, two minutes to get an Admin to elevate you. After that, myProctor remembers your device and delivers notifications whenever broadcasts or attendance events involve you.
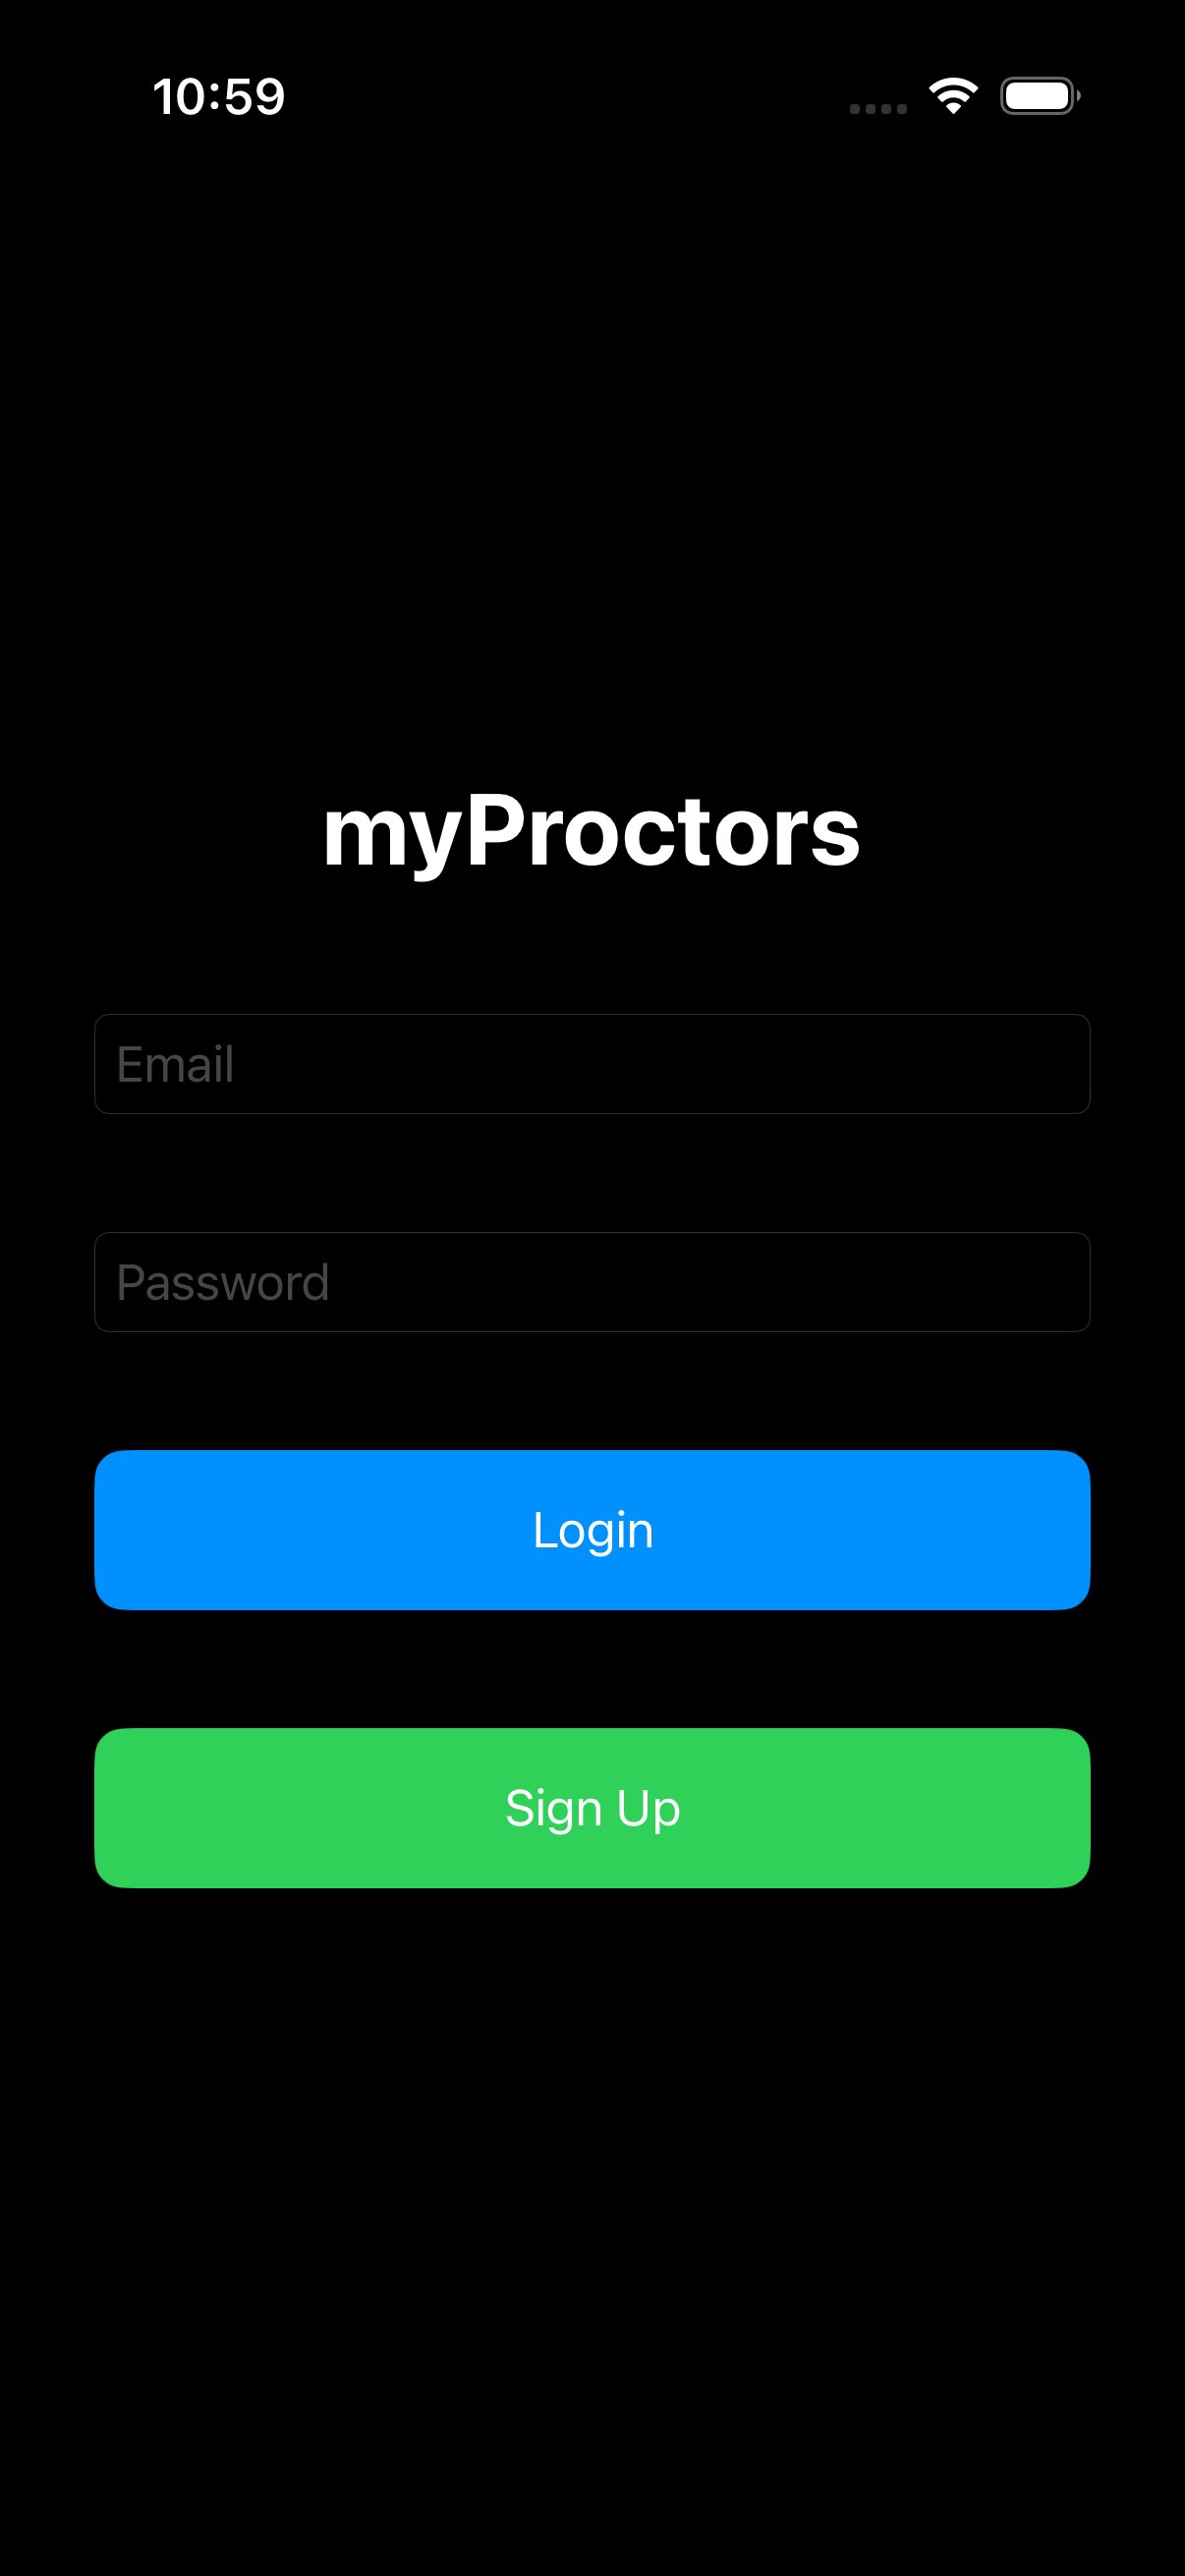
First sign-up & sign-in
myProctor uses plain email + password authentication backed by Firebase Auth. There is no Google sign-in, no Apple ID, no Enterprise SSO — every user owns their credentials directly.
- Install from the App Store or accept the managed install pushed by your MDM. On first launch, grant the permissions the app asks for (see the table below).
- Sign up. On the login screen, enter your work email address and a password you'll remember, then tap the green Sign Up button. The app creates your Firebase Auth account and a matching user record in Firestore.
- You're auto-assigned the Proctor role with no city. This is the default for every new account. The relevant Admin must edit your access profile in Manage Users → Edit Access to set your real role (Tech, TCA, Manager, etc.) and assign you to a city. Until then your menu is the minimal Proctor menu and you won't see any city-scoped data.
- Sign in. On subsequent launches, enter the same email + password and tap the blue Login button. Your Access Profile downloads (typically under 3 seconds) and you land on Home.
- Update your Display Name. The app initially shows the local part of your email as your name. Open profile menu → Edit Profile and replace it with your real name. Display Name is editable any time; email is the immutable identifier and cannot be changed once the account exists.
Why default to Proctor?
Proctor is the lowest-privilege login role. Auto-assigning it means a brand-new account can authenticate but cannot see any city's data, send broadcasts, touch inventory, or manage users until an Admin explicitly elevates them. The Admin's first task whenever someone signs up is to open Manage Users, find the new entry, and set role + city. Until then the user sits in a sandbox.
Permissions the app asks for
| Permission | Why | Required? |
|---|---|---|
| Location (While Using) | Stamp your attendance QR with GPS coords (4 decimal places — ~10 m accuracy). Auto-detect your city. | Yes |
| Camera | Scan QR codes for attendance, inventory, and warehouse enrollment. | Yes |
| Notifications | Receive broadcast pushes, support replies, and handover approvals via APNs / FCM. | Recommended |
| Face ID / Touch ID | Unlock the scanner sheet and gated admin actions without re-typing a password. | Recommended |
Online only
myProctor needs a live connection to Firestore for all writes (attendance, broadcasts, inventory actions). When you lose connectivity, an offline overlay appears globally. No data is lost — actions simply wait until you're back online.
The profile menu
Tap your avatar in the top-right corner of Home to open the profile menu. You'll find three key items:
- Edit Profile — update your Display Name (initially the local part of your email — change it to your real name) and phone number (must match
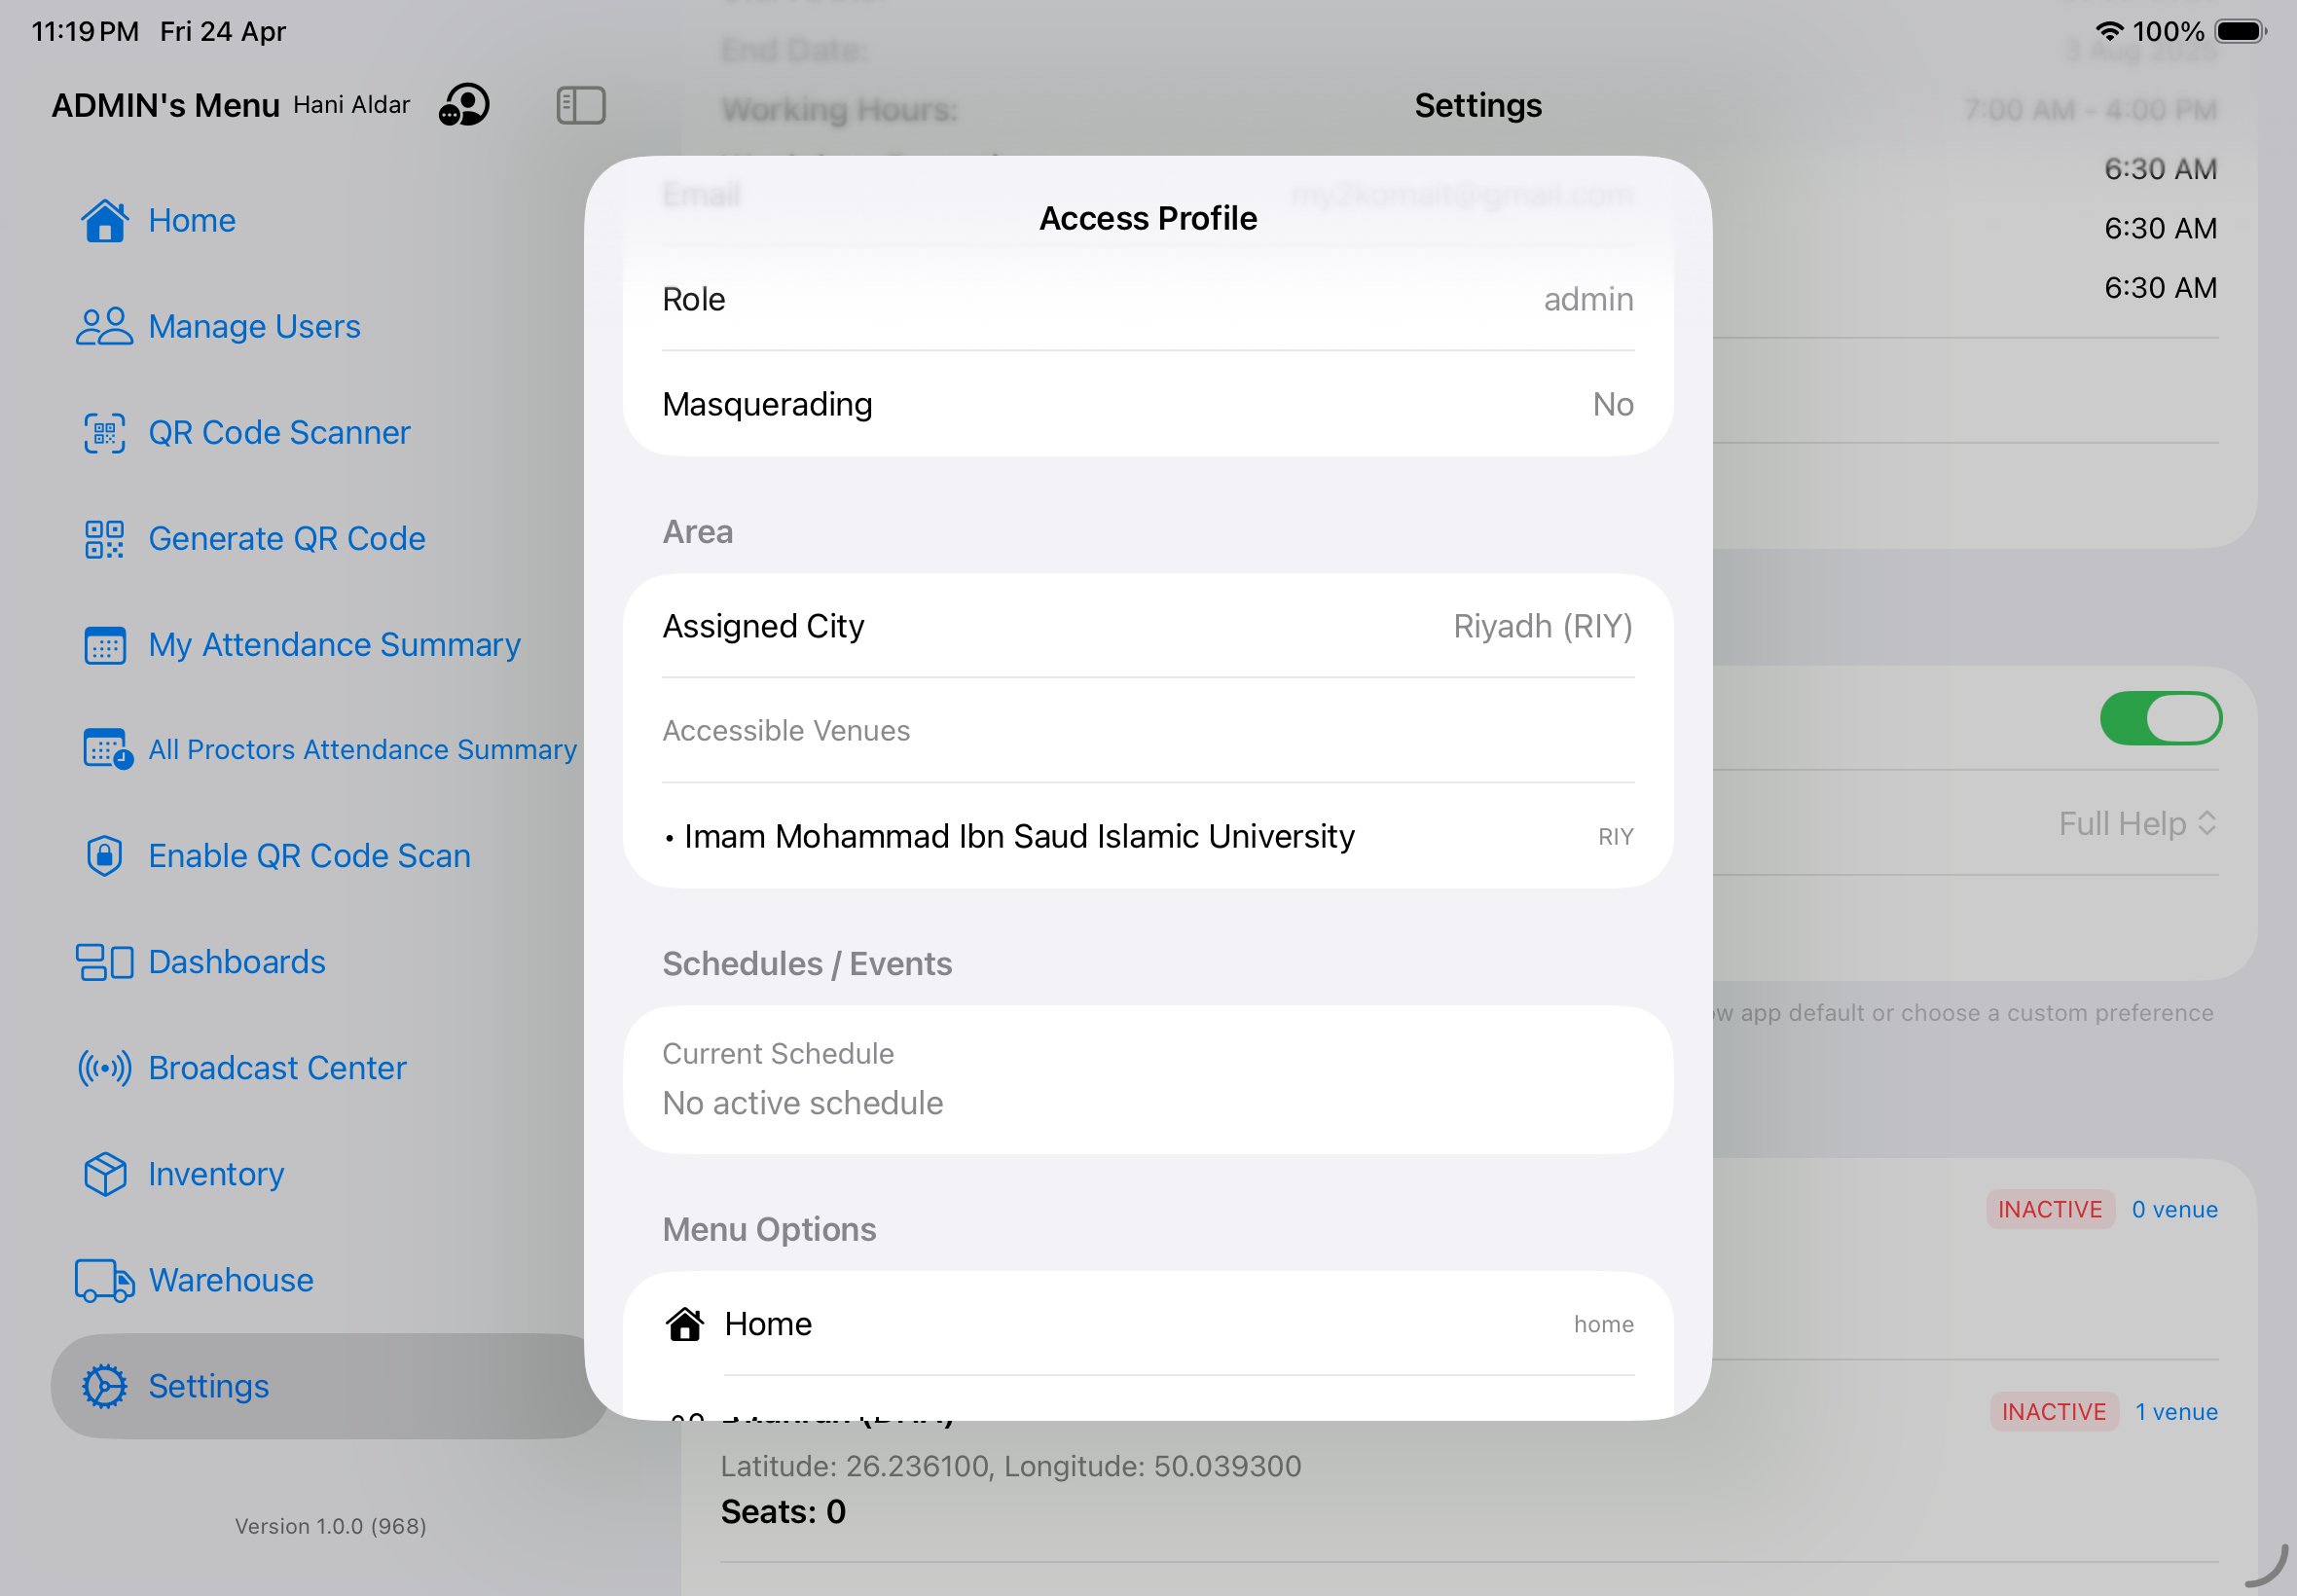
^05\d{8}$, e.g.0551234567). Email is immutable here; it's the identifier the app uses to locate your account in Firestore. - Access Profile — read-only view of your role, rank, city scope, and every permission granted to you. Useful when you're not sure why a menu is or isn't showing.
- Stop Masquerade — only visible when an Admin has masqueraded as you (or vice versa). Instantly returns you to your own Access Profile.
Implementation notes · auth + token flush
Sign-up and sign-in both use Firebase Auth with the email/password provider. createUserWithEmail(_:password:) creates the Auth record and a backing Firestore document at /users/{uid} with default role = "PROCTOR", city = nil, and displayName set to the email's local part. The Admin updates these fields via the Manage Users sheet.
Email is treated as an immutable primary key downstream — QR payloads, attendance records, broadcast routing, and inventory custody all reference the user by their Firebase UID, which is permanently bound to the email at account creation. Display Name is purely cosmetic and can be edited freely via UserProfile.updateDisplayName(_:).
On a successful sign-in, the app flushes any stale FCM token and re-registers to ensure push targeting is correct for the new user. See NotificationBadgeManager.clearAll() and AppDelegate.didRegisterForRemoteNotificationsWithDeviceToken.
Roles & ranks.
Every menu, every broadcast channel, every warehouse action is gated by two things: your role (what kind of team member you are) and your rank (a numeric weight from 1 to 100). Rank is what drives the can-I-do-this logic throughout the app.
The ten roles
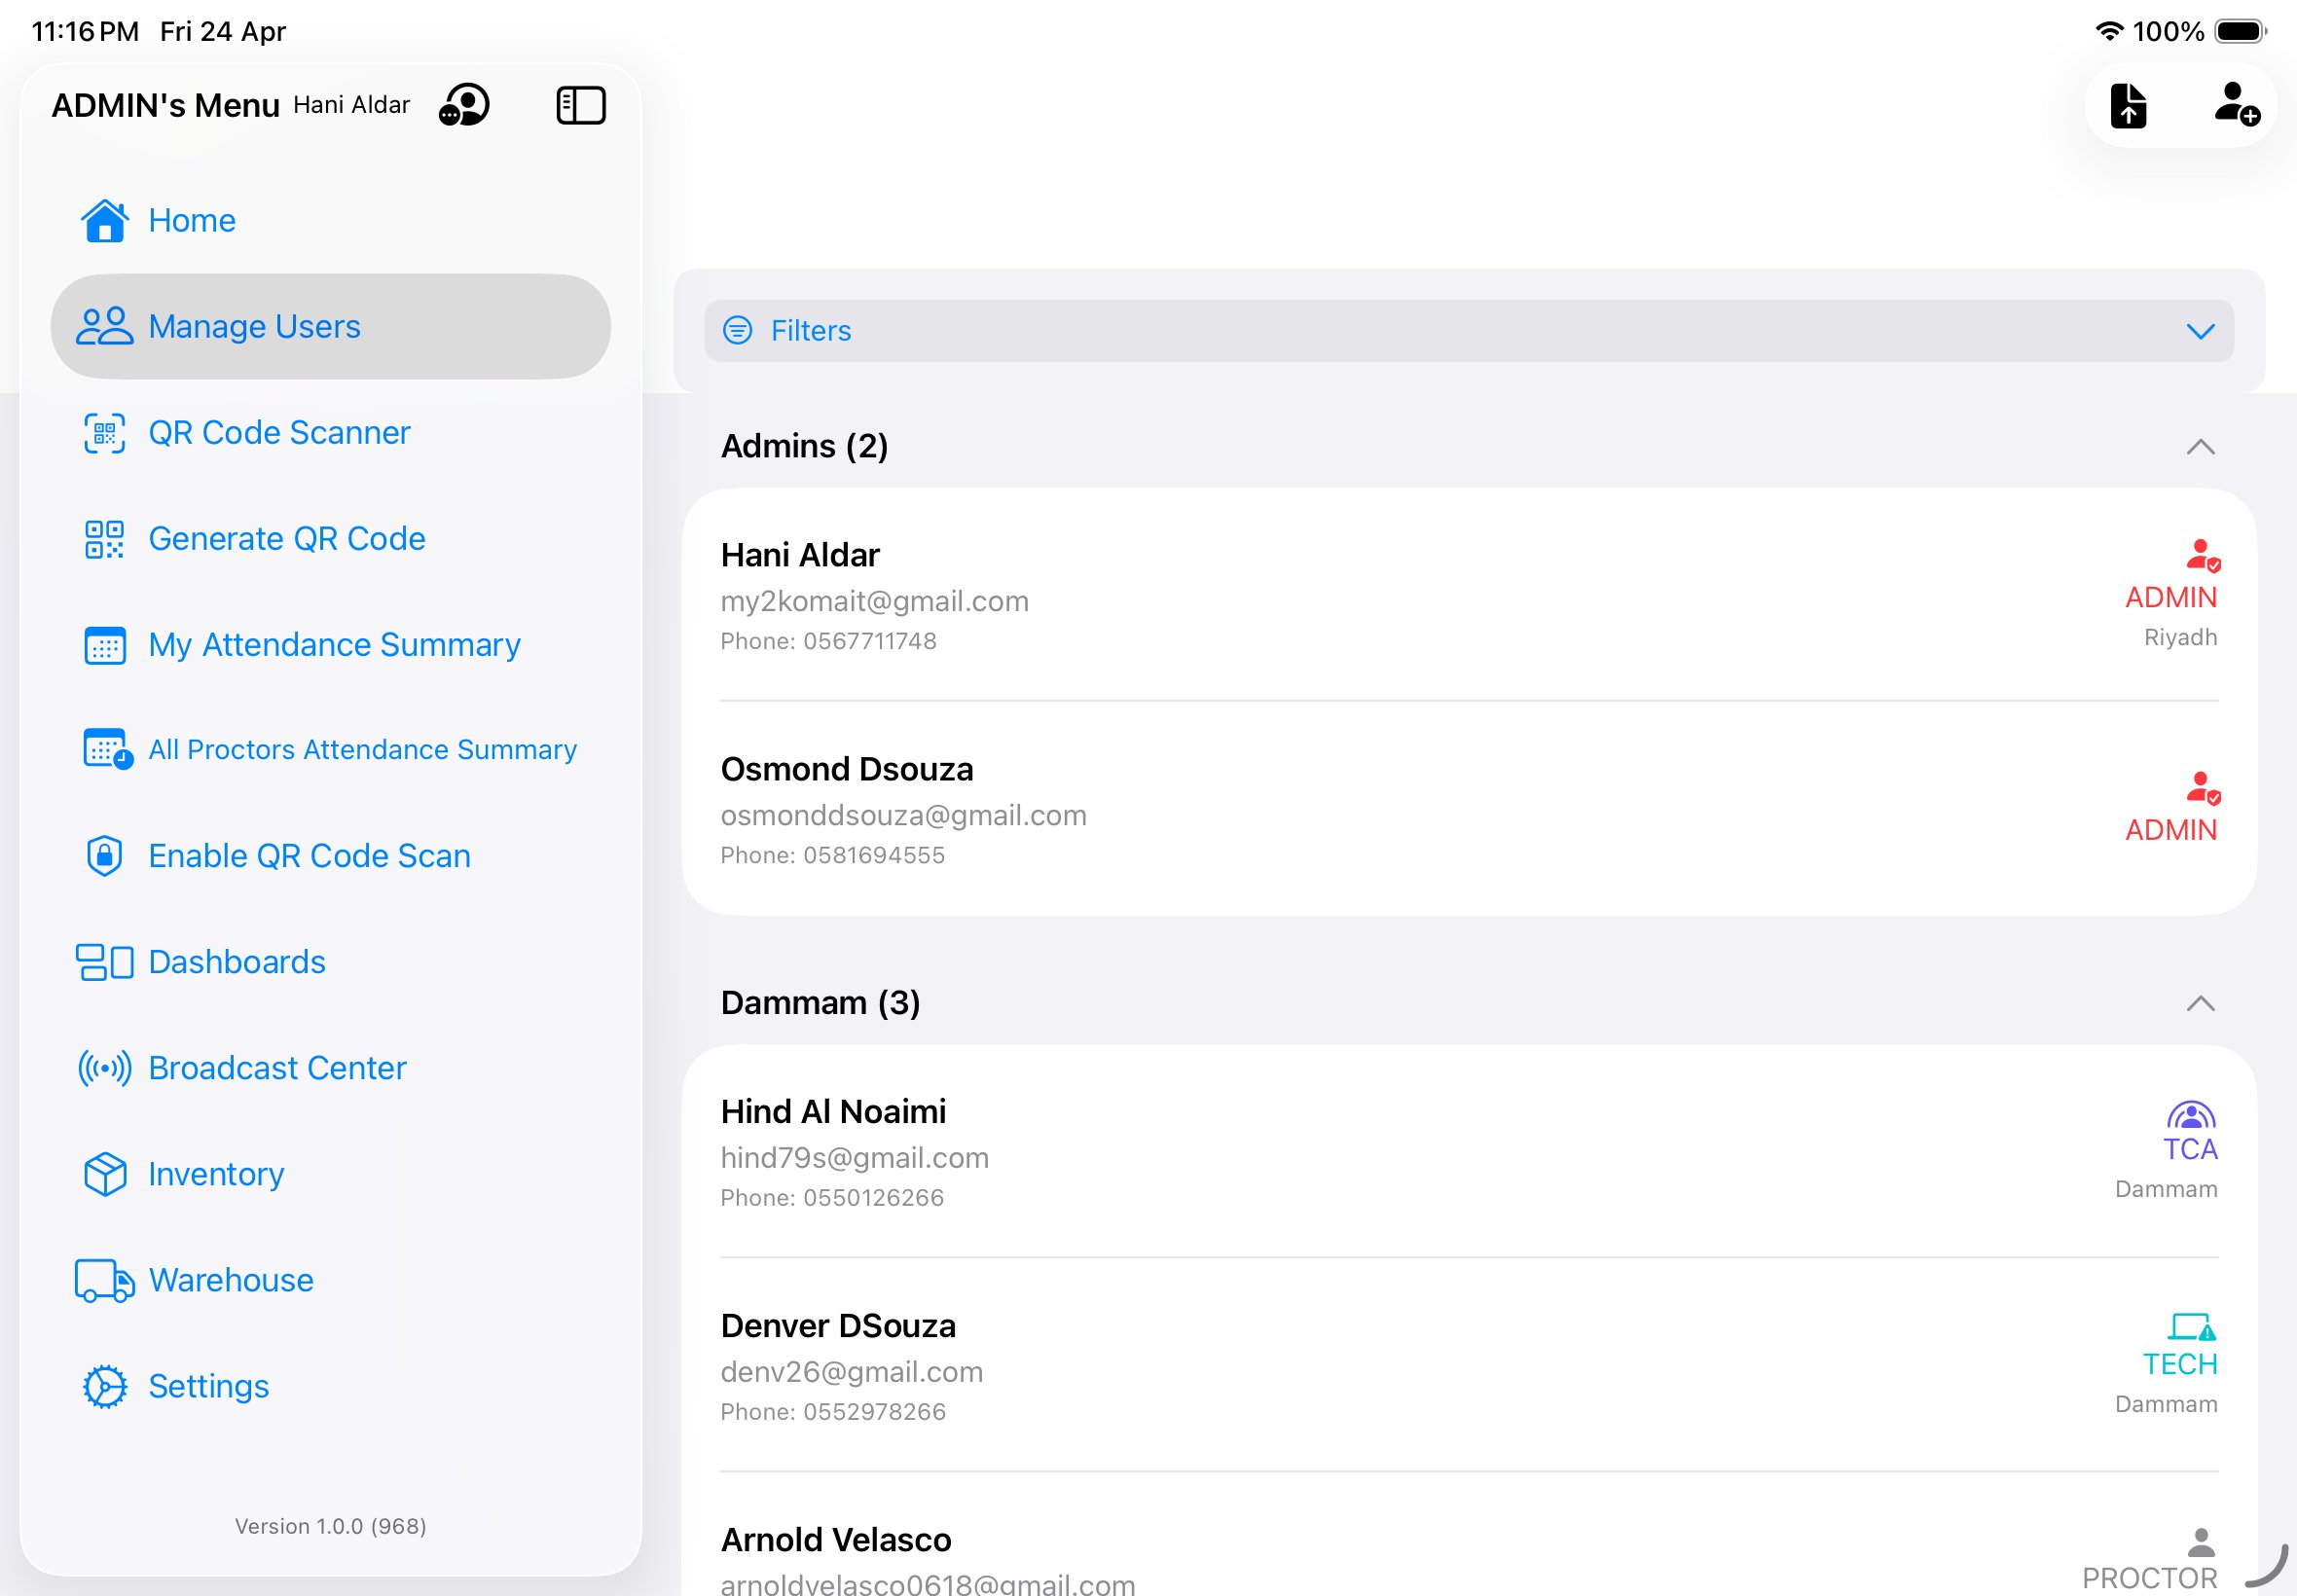
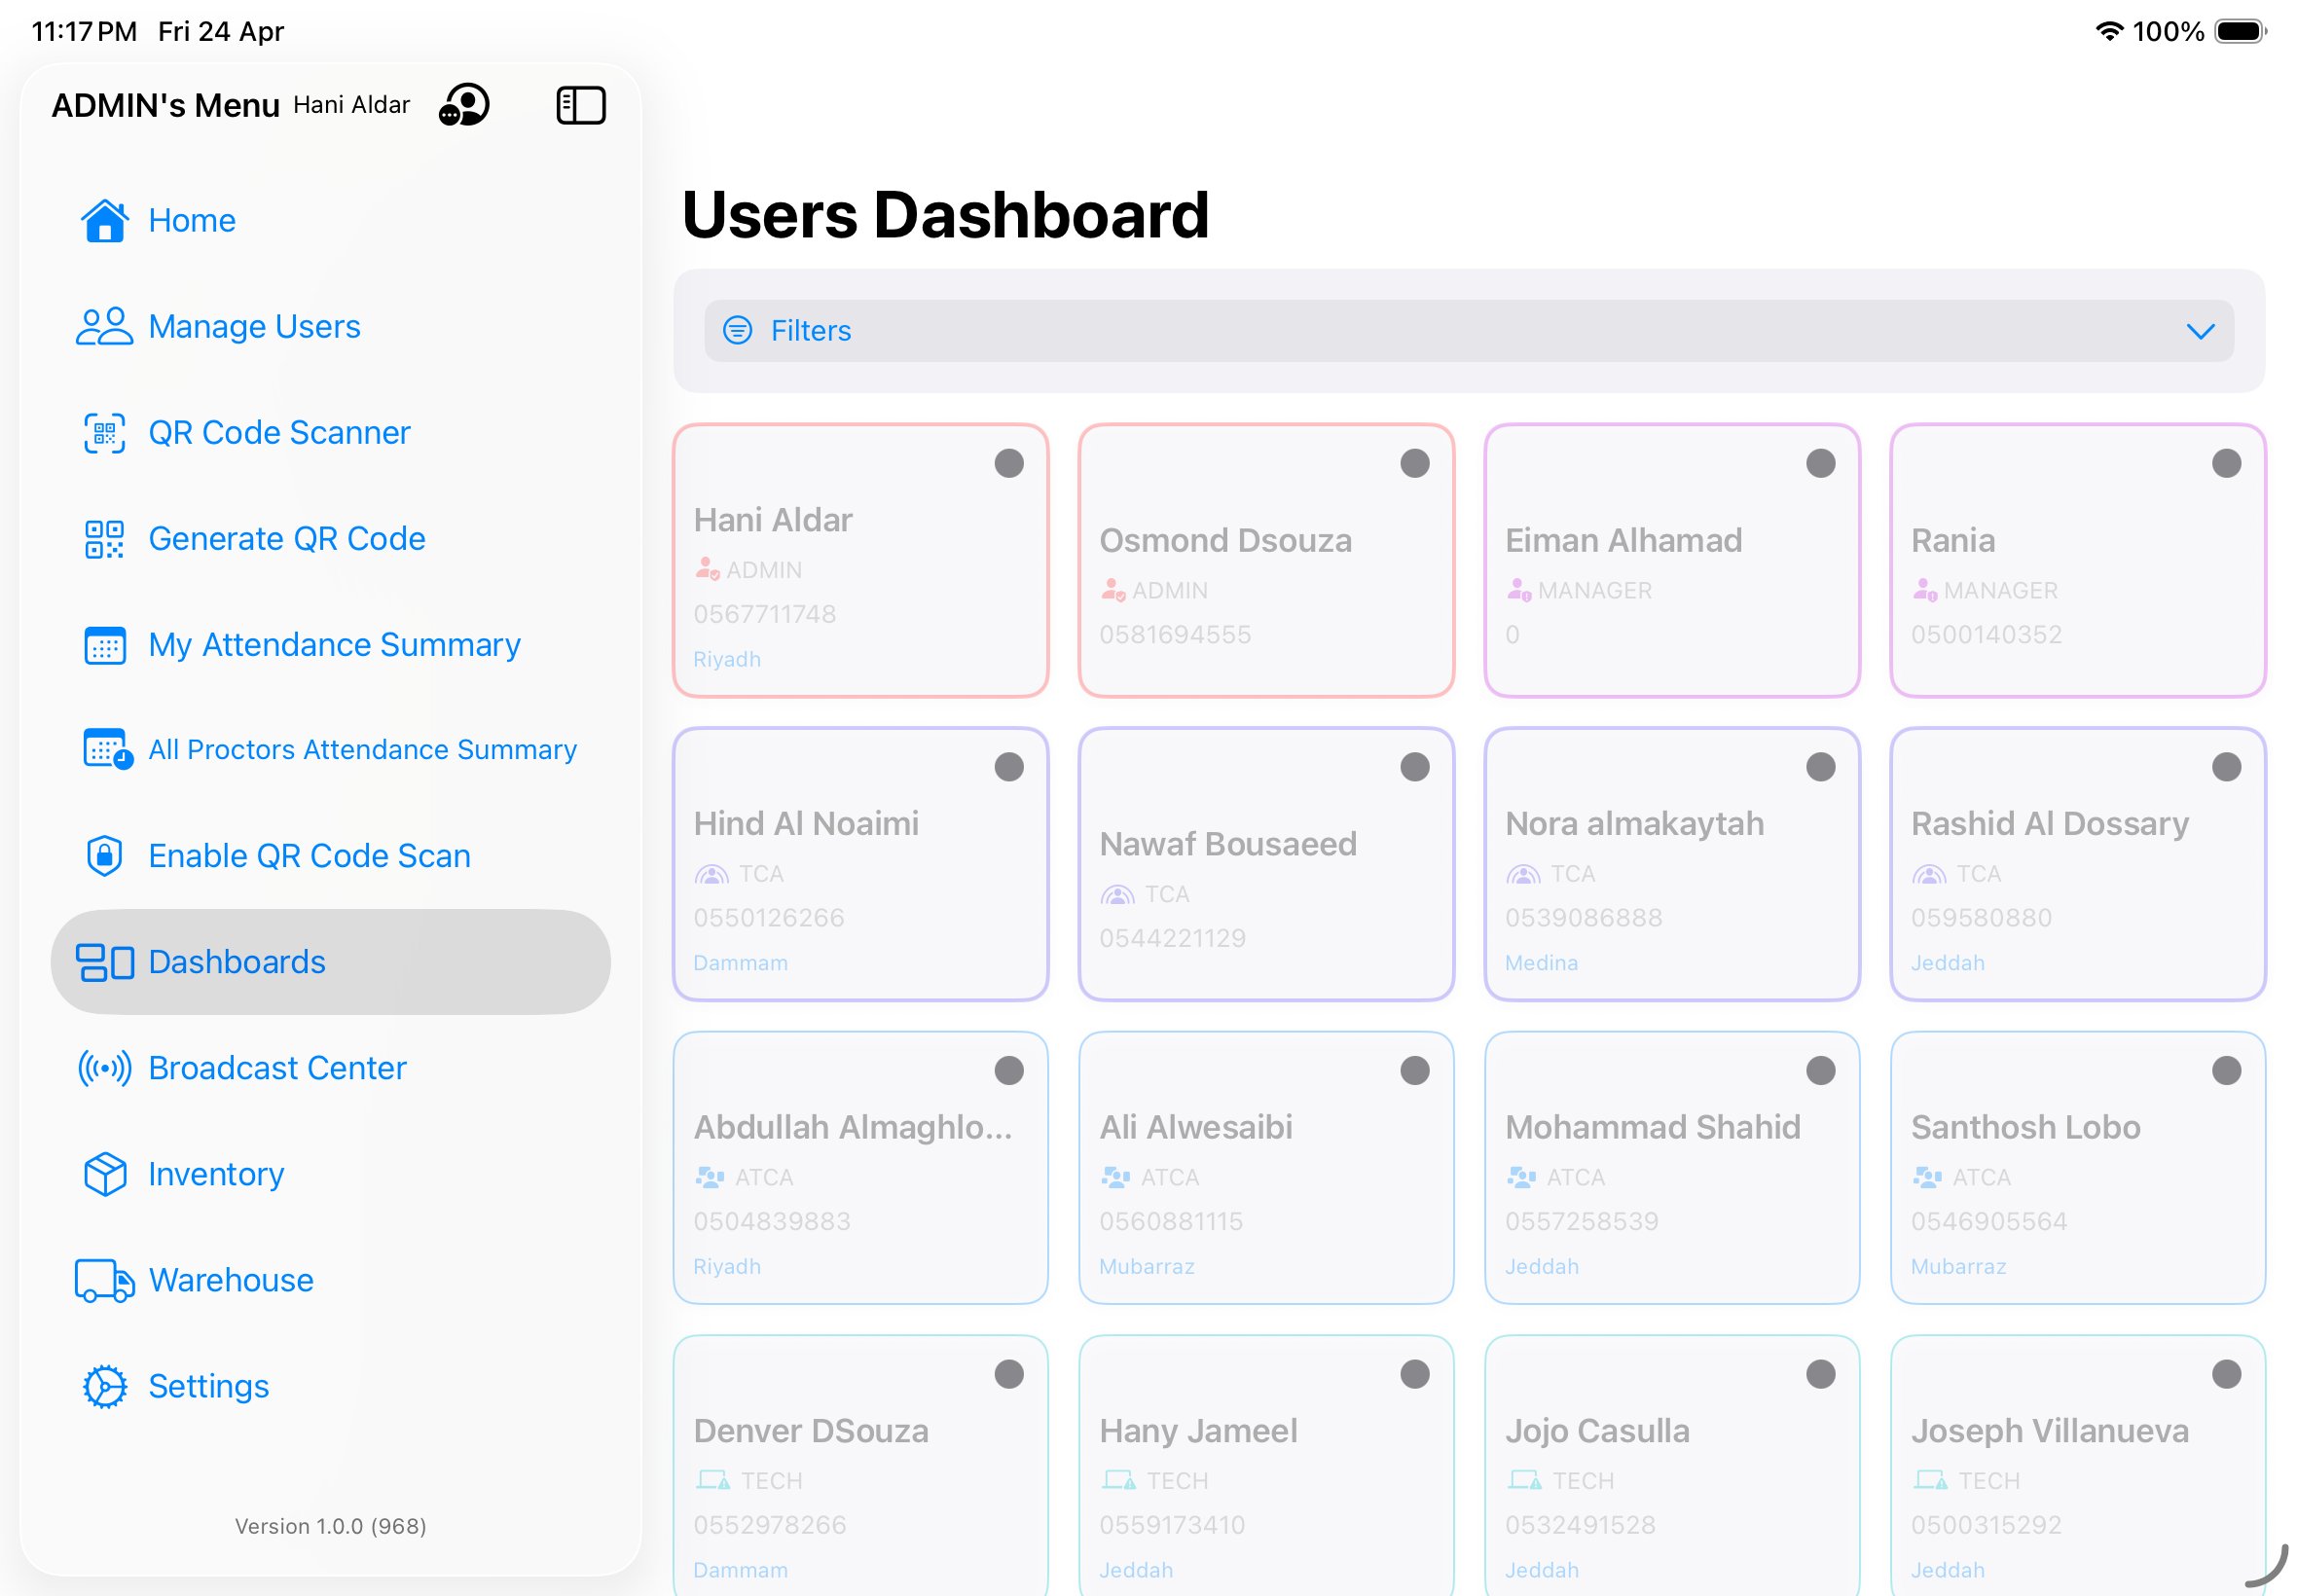
Colors below are authoritative — they come from User.UserRole.roleColors in Swift. Ranks drive default broadcast eligibility and approval chains.
| Role | Rank | City scope | Primary responsibility |
|---|---|---|---|
| Admin | 100 | Assigned city | Full configuration and operations. The only role that can masquerade. |
| Manager | 90 | Region (multi-city) | Regional oversight. Can send Password and Executive broadcasts. |
| TCA | 50 | Single venue | Test centre administrator. Handles handovers and on-day support routing. |
| ATCA | 40 | Single venue | Assistant TCA. Can send Direction broadcasts, help with attendance corrections. |
| Tech | 30 | Assigned city | Technical support. Receives Tech support tickets and handles inventory enrollment. |
| Warehouse | 25 | Assigned city | Warehouse operator. Handles boxing, labeling, and logistics stages. |
| Moderator | 20 | Assigned event | Event moderator. Can send General info broadcasts. |
| Proctor | 10 | Assigned venue | In-room proctor. Checks in/out. Submits Support tickets. |
| Helper | 5 | Assigned venue | Support crew for logistics, crowd management. |
| Student | 1 | n/a | Test-taker (seed role). Does not use the app. |
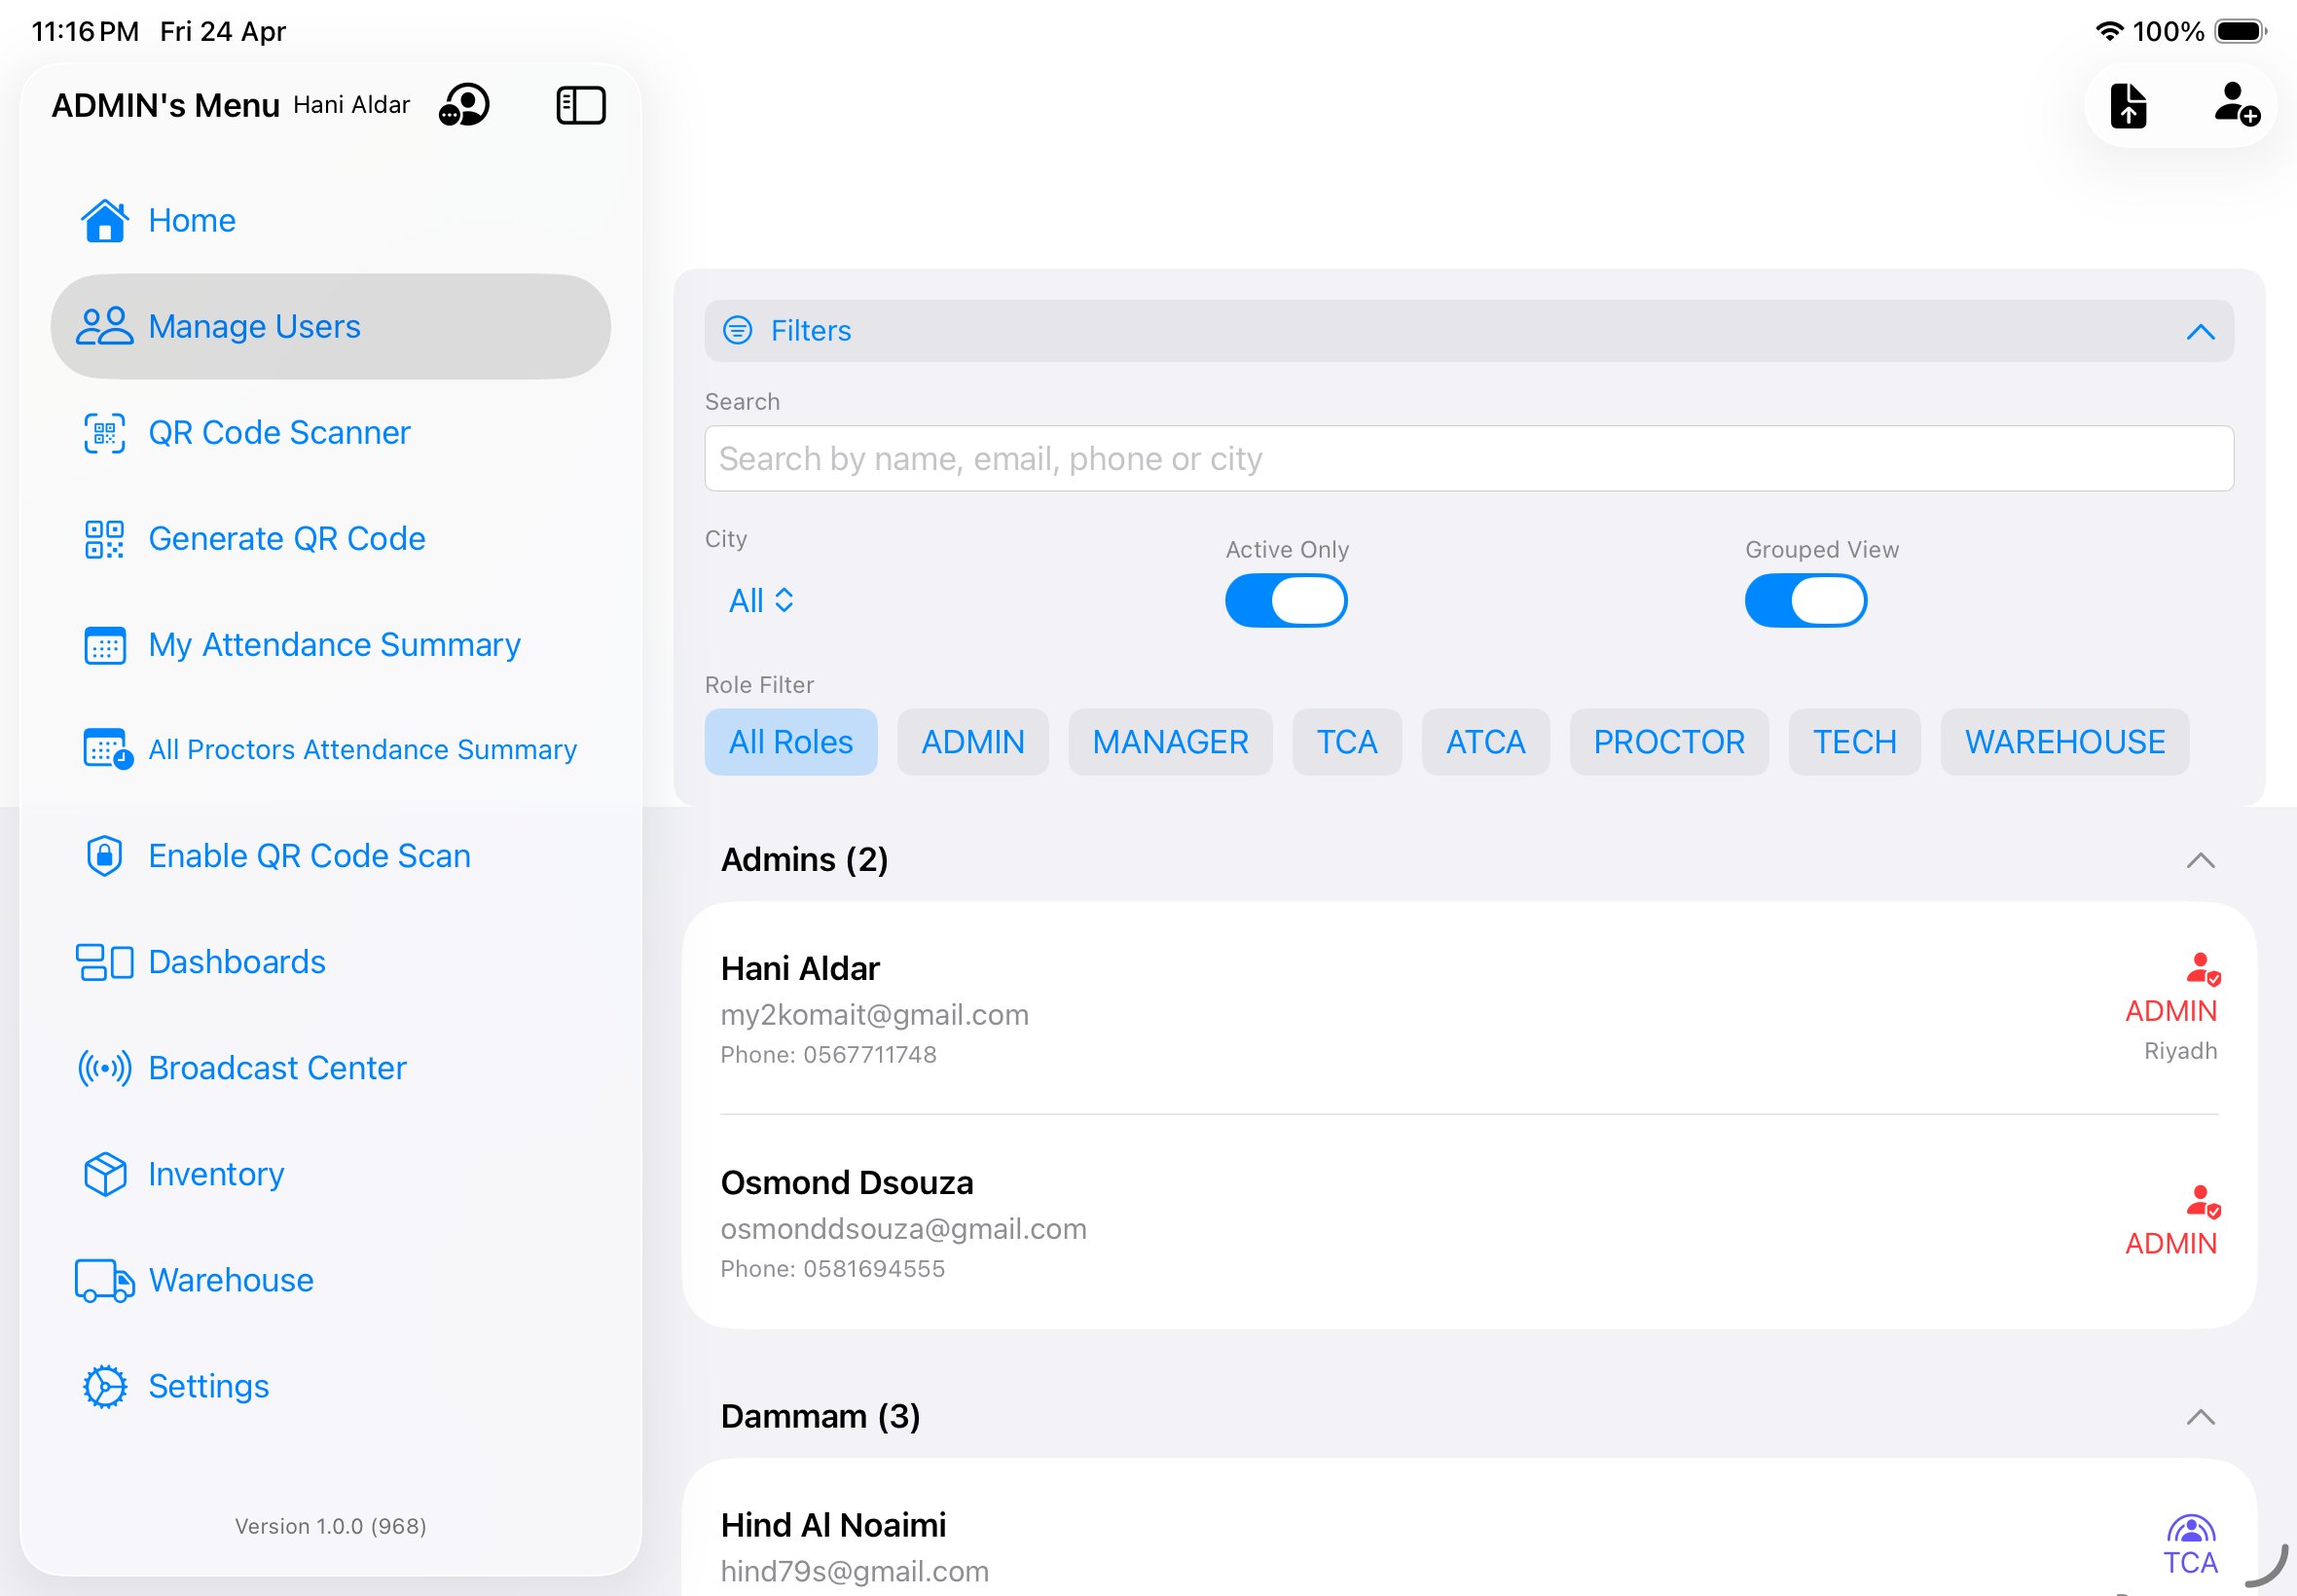
City scoping
The system is configured for 12 cities (5 of which are currently inactive — they're available to be activated when needed), each with a three-letter authoritative code used throughout the app. Managers have a region (set of cities); everyone else is scoped to exactly one city:
- RIY
- Riyadh — Active · 500 seats · central region
- JED
- Jeddah — Active · 500 seats · western region
- DAM
- Dammam — Active · 400 seats · eastern region
- ABH
- Abha — Active · 250 seats · southwestern region
- MUB
- Mubarraz — Active · 250 seats · eastern region
- MAD
- Medina — Active · 225 seats · western region
- RAH
- Ras Tanura — Active · 225 seats · eastern region
- TBK
- Tabuk — Inactive · northwestern region
- DHA
- Dhahran — Inactive · eastern region
- ABQ
- Abqiaq — Inactive · eastern region
- SYH
- Sayhat — Inactive · eastern region
- YAN
- Yanbu — Inactive · western region
Admins can add new cities from Settings → Cities. The three-letter code is authoritative — it's used in QR payloads, box labels, and seat assignments. Changing it for an existing city will break historic records.
Seeing roles in practice
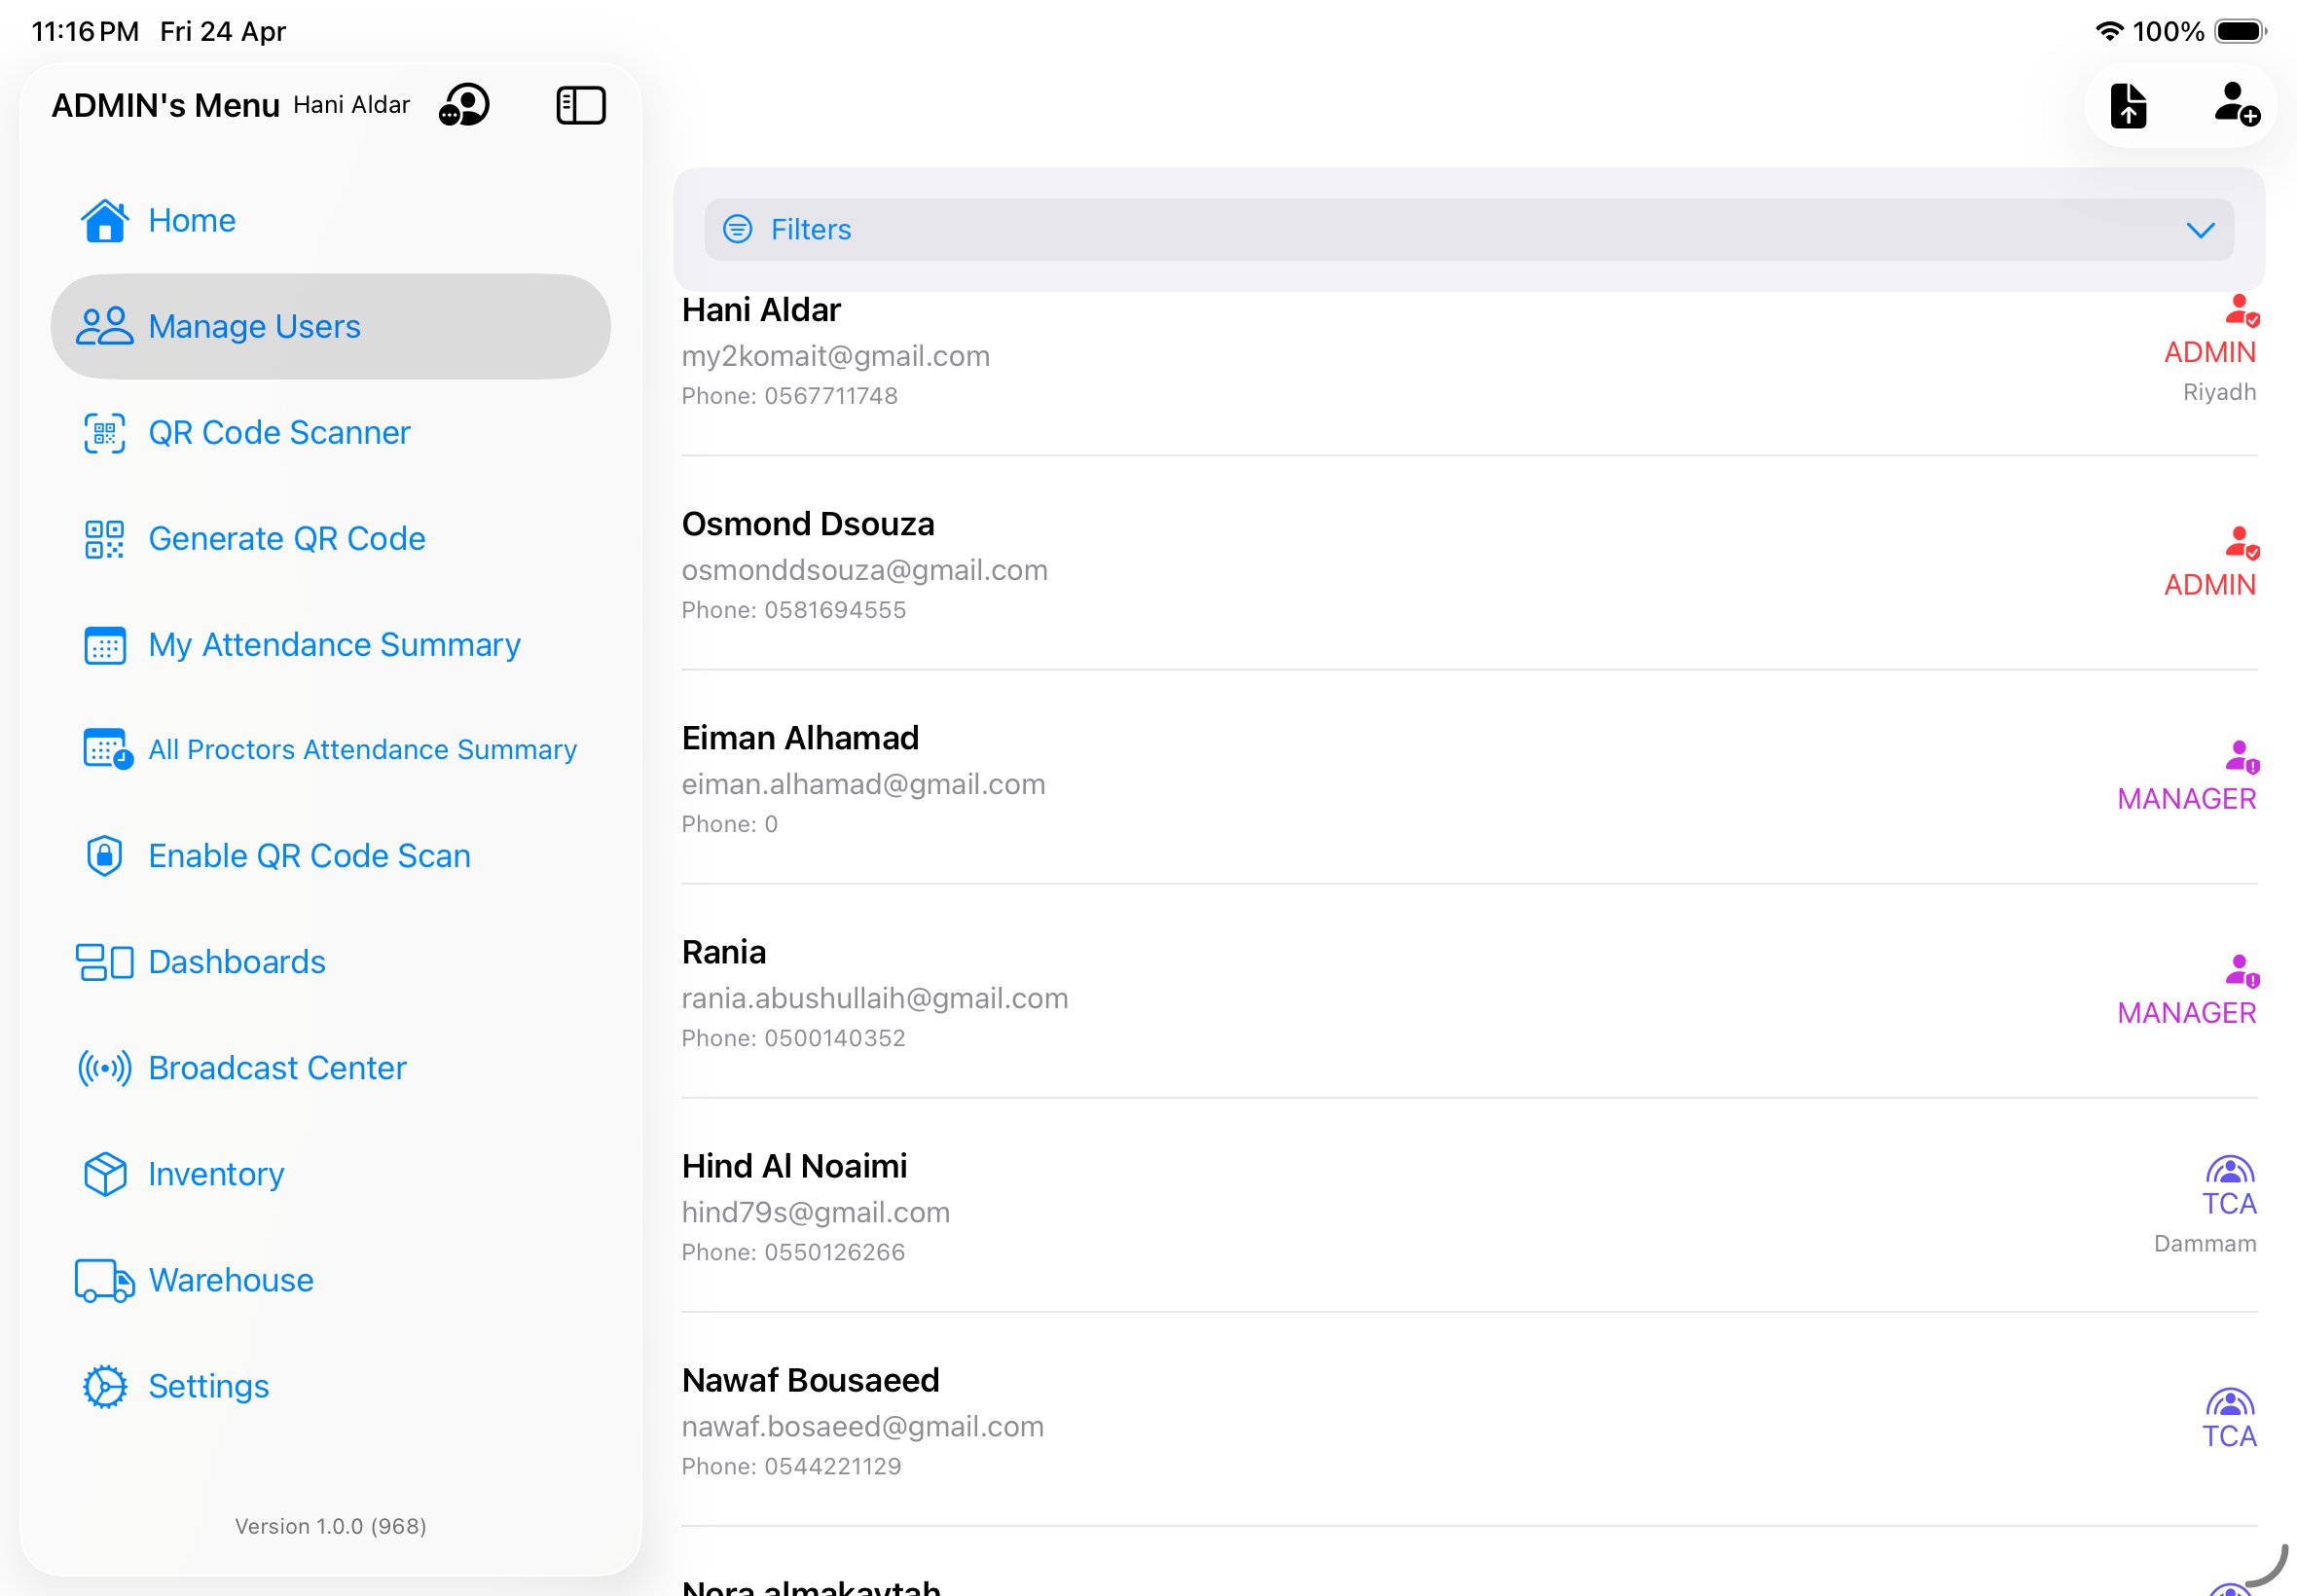
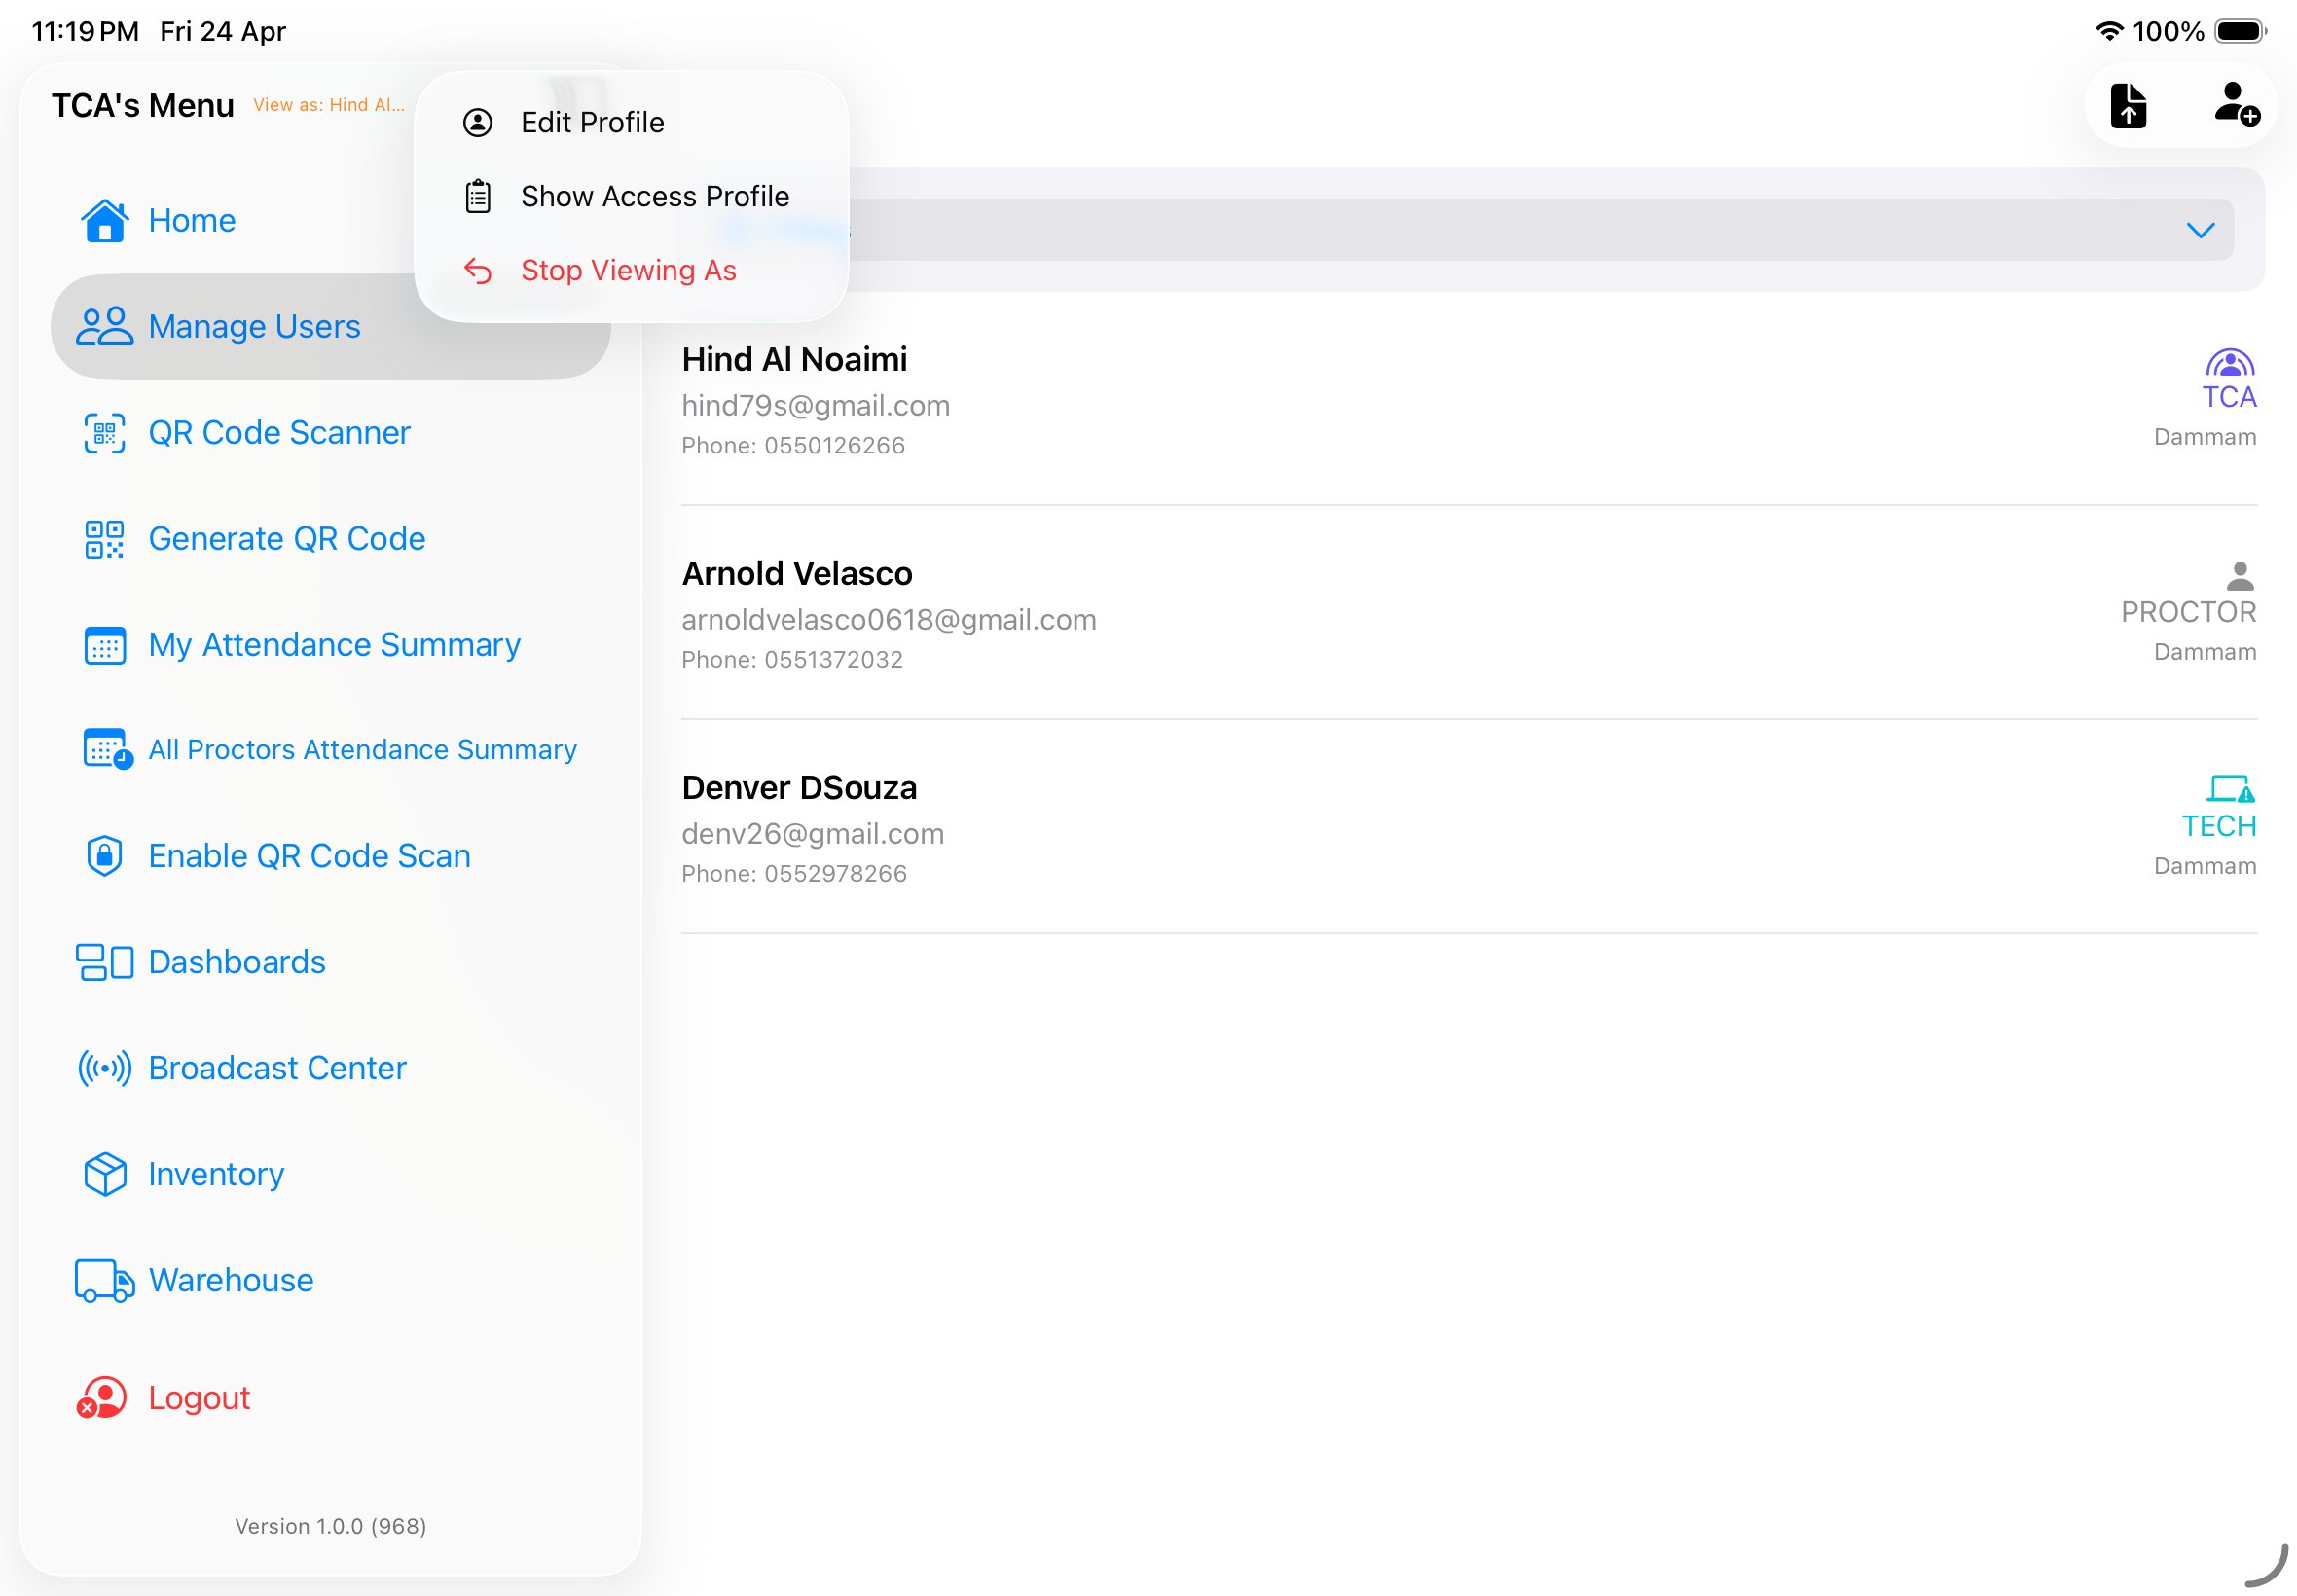
The Manage Users screen is where Admins (and TCAs, within their venue) see every team member with their role chip and city. Each chip uses the authoritative role color — easy to scan a long list and spot the Managers or TCAs at a glance. Filters let you narrow by city, role, or active status, and a grouped view organises users by city header.
Staffing model
Headcount has two layers. The first is a formula-derived minimum that scales with seat capacity. The second is operational headroom — additional Tech users for multi-venue cities and absence cover, plus floating staff deployed across cities as the event demands. The formula gives the floor; the actual roster always sits above it.
The formula in one breath
For each city: lines = ceil(seats / 20), and each line is managed by 1 Proctor. Add 1 TCA, 1 ATCA, 1 Tech per city. Add 3 Admins and 3 Managers globally (not per city). That's the baseline minimum.
Per-city headcount
Applied to the seven active cities, this gives:
| City | Seats | Lines | Proctors | TCA | ATCA | Tech | Per-city total |
|---|---|---|---|---|---|---|---|
| Riyadh (RIY) | 500 | 25 | 25 | 1 | 1 | 1 | 28 |
| Jeddah (JED) | 500 | 25 | 25 | 1 | 1 | 1 | 28 |
| Dammam (DAM) | 400 | 20 | 20 | 1 | 1 | 1 | 23 |
| Abha (ABH) | 250 | 13 | 13 | 1 | 1 | 1 | 16 |
| Mubarraz (MUB) | 250 | 13 | 13 | 1 | 1 | 1 | 16 |
| Medina (MAD) | 225 | 12 | 12 | 1 | 1 | 1 | 15 |
| Ras Tanura (RAH) | 225 | 12 | 12 | 1 | 1 | 1 | 15 |
| Subtotal | 2,350 | 120 | 120 | 7 | 7 | 7 | 141 |
Global leadership
Independent of cities — a single shared layer of leadership oversees the whole operation:
- 3 Admins — full configuration and operations across all cities
- 3 Managers — regional oversight and executive broadcasts
Baseline minimum staffing
Dormant capacity — Tabuk and Yanbu
Two of the inactive cities — Tabuk (TBK) and Yanbu (YAN) — historically operated at 200 seats each before being deactivated. If they were reactivated tomorrow at the same capacity, the formula would add the following per city:
ceil(200 / 20) = 10 lines→ 10 Proctors- + 1 TCA + 1 ATCA + 1 Tech = 3 city support staff
- = 13 staff per dormant city
Reactivating both would add 26 staff total (20 Proctors + 6 city support), bringing the baseline from 147 up to 173. The current operational roster carries the additional headcount needed to handle this re-activation without scrambling for hires — it's reserve capacity, not just floating slack.
Beyond the baseline — additional and floating headcount
On top of both the active baseline and the dormant reserve, real operations need extra capacity for:
- Additional Tech users. The baseline assumes one Tech per city, but in practice cities frequently need more. Multi-venue cities (Jeddah currently has 2 venues) need at least one Tech per venue. Inventory, warehouse coordination, and peak-day device-failure surges all consume Tech capacity. Sick-day or shift-rotation cover prevents a city from losing all Tech support if its single assigned Tech is unavailable.
- Floating role employees. Staff who aren't bound to a specific city, deployed wherever the event needs them on a given day. Examples: spare Proctors for absence cover, Tech users who travel between nearby cities for surge support, ATCAs lent to a sister city for an unusually large session, or Admins on the ground shadowing operations rather than running them remotely.
Current operational roster
The current roster from the event champion is approximately 185 staff. Decomposing the 38 above the active 7-city baseline:
- ~26 covers dormant capacity for Tabuk and Yanbu — staff retained so re-activation doesn't trigger a hiring scramble.
- ~12 covers additional Tech (multi-venue Jeddah, redundancy) and floating role employees (absence cover, surge support).
The exact split between the two extra-Tech vs floating buckets in that ~12 varies event-to-event and is set by operational planning rather than the formula.
Why the math works this way
- 20 candidates per line is the unit of supervision — one Proctor can attend that many test-takers in their line of sight without missing a hand raise.
- Ceiling math, not floor — a city with 225 seats gets 12 lines (not 11), even though the last line only holds 5 candidates. You always round up because under-staffing a line is worse than under-utilising one.
- One TCA + one ATCA per city — the TCA runs the venue's day; the ATCA backs them up and handles attendance corrections so the TCA isn't blocked.
- One Tech per city — handles inventory and any iPad / app issues raised via Support → Technical broadcasts. For multi-venue cities (Jeddah has 2 venues), the single Tech is mobile and routes between them.
- Three Admins, three Managers — a global pool, not per city. Allows redundancy across leave / shift / off-day situations without inflating headcount per city. Managers cover regions; Admins can be assigned anywhere they're needed.
Recomputing when seat capacity changes
If the seat capacity of an existing city changes, or a new city is activated, recompute that city's row only:
- Update the city's seat capacity in Settings → Cities → Edit.
- New
lines = ceil(newSeats / 20). - Recruit (or release) Proctors so headcount matches new line count. TCA / ATCA / Tech counts are unaffected by seat changes.
- Leadership counts (3 + 3) only change for major operational scope shifts — not per-city seat tweaks.
Role vs permission
A role sets a default permission bundle. An Admin can override individual permissions per user in Manage Users → Edit Access Profile, so two Proctors can have different capabilities. The role determines starting point; permissions determine the final state.
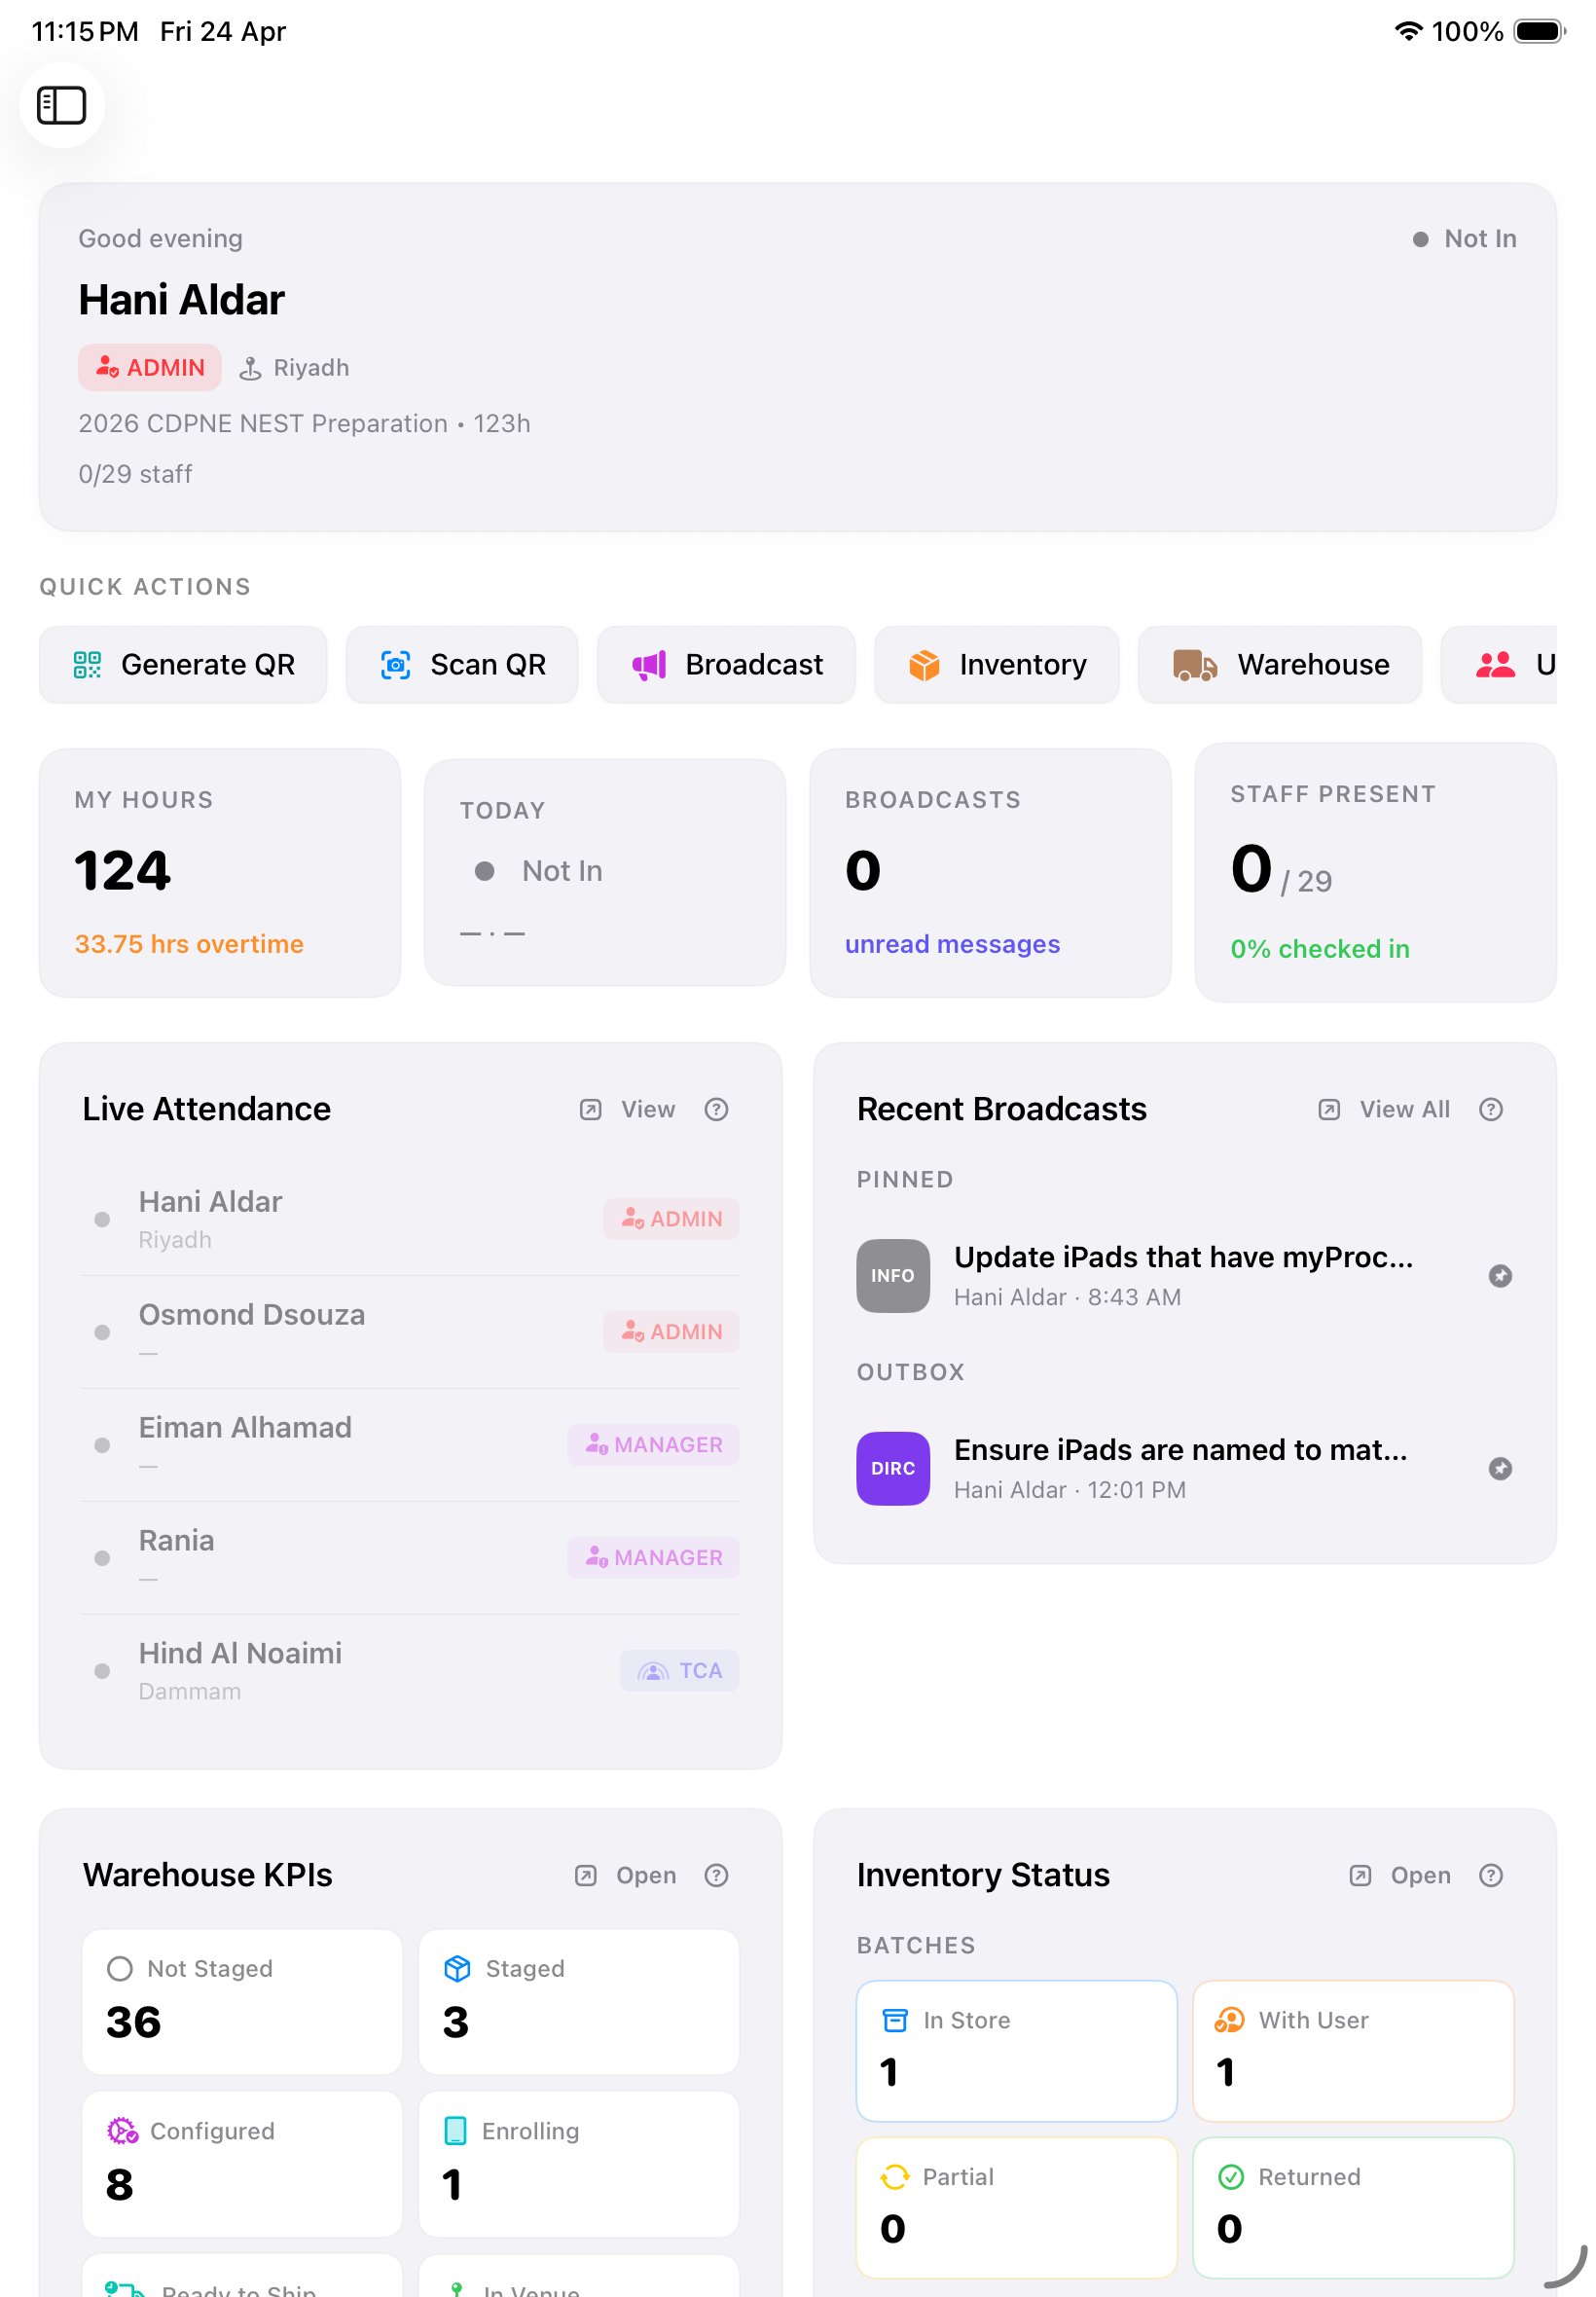
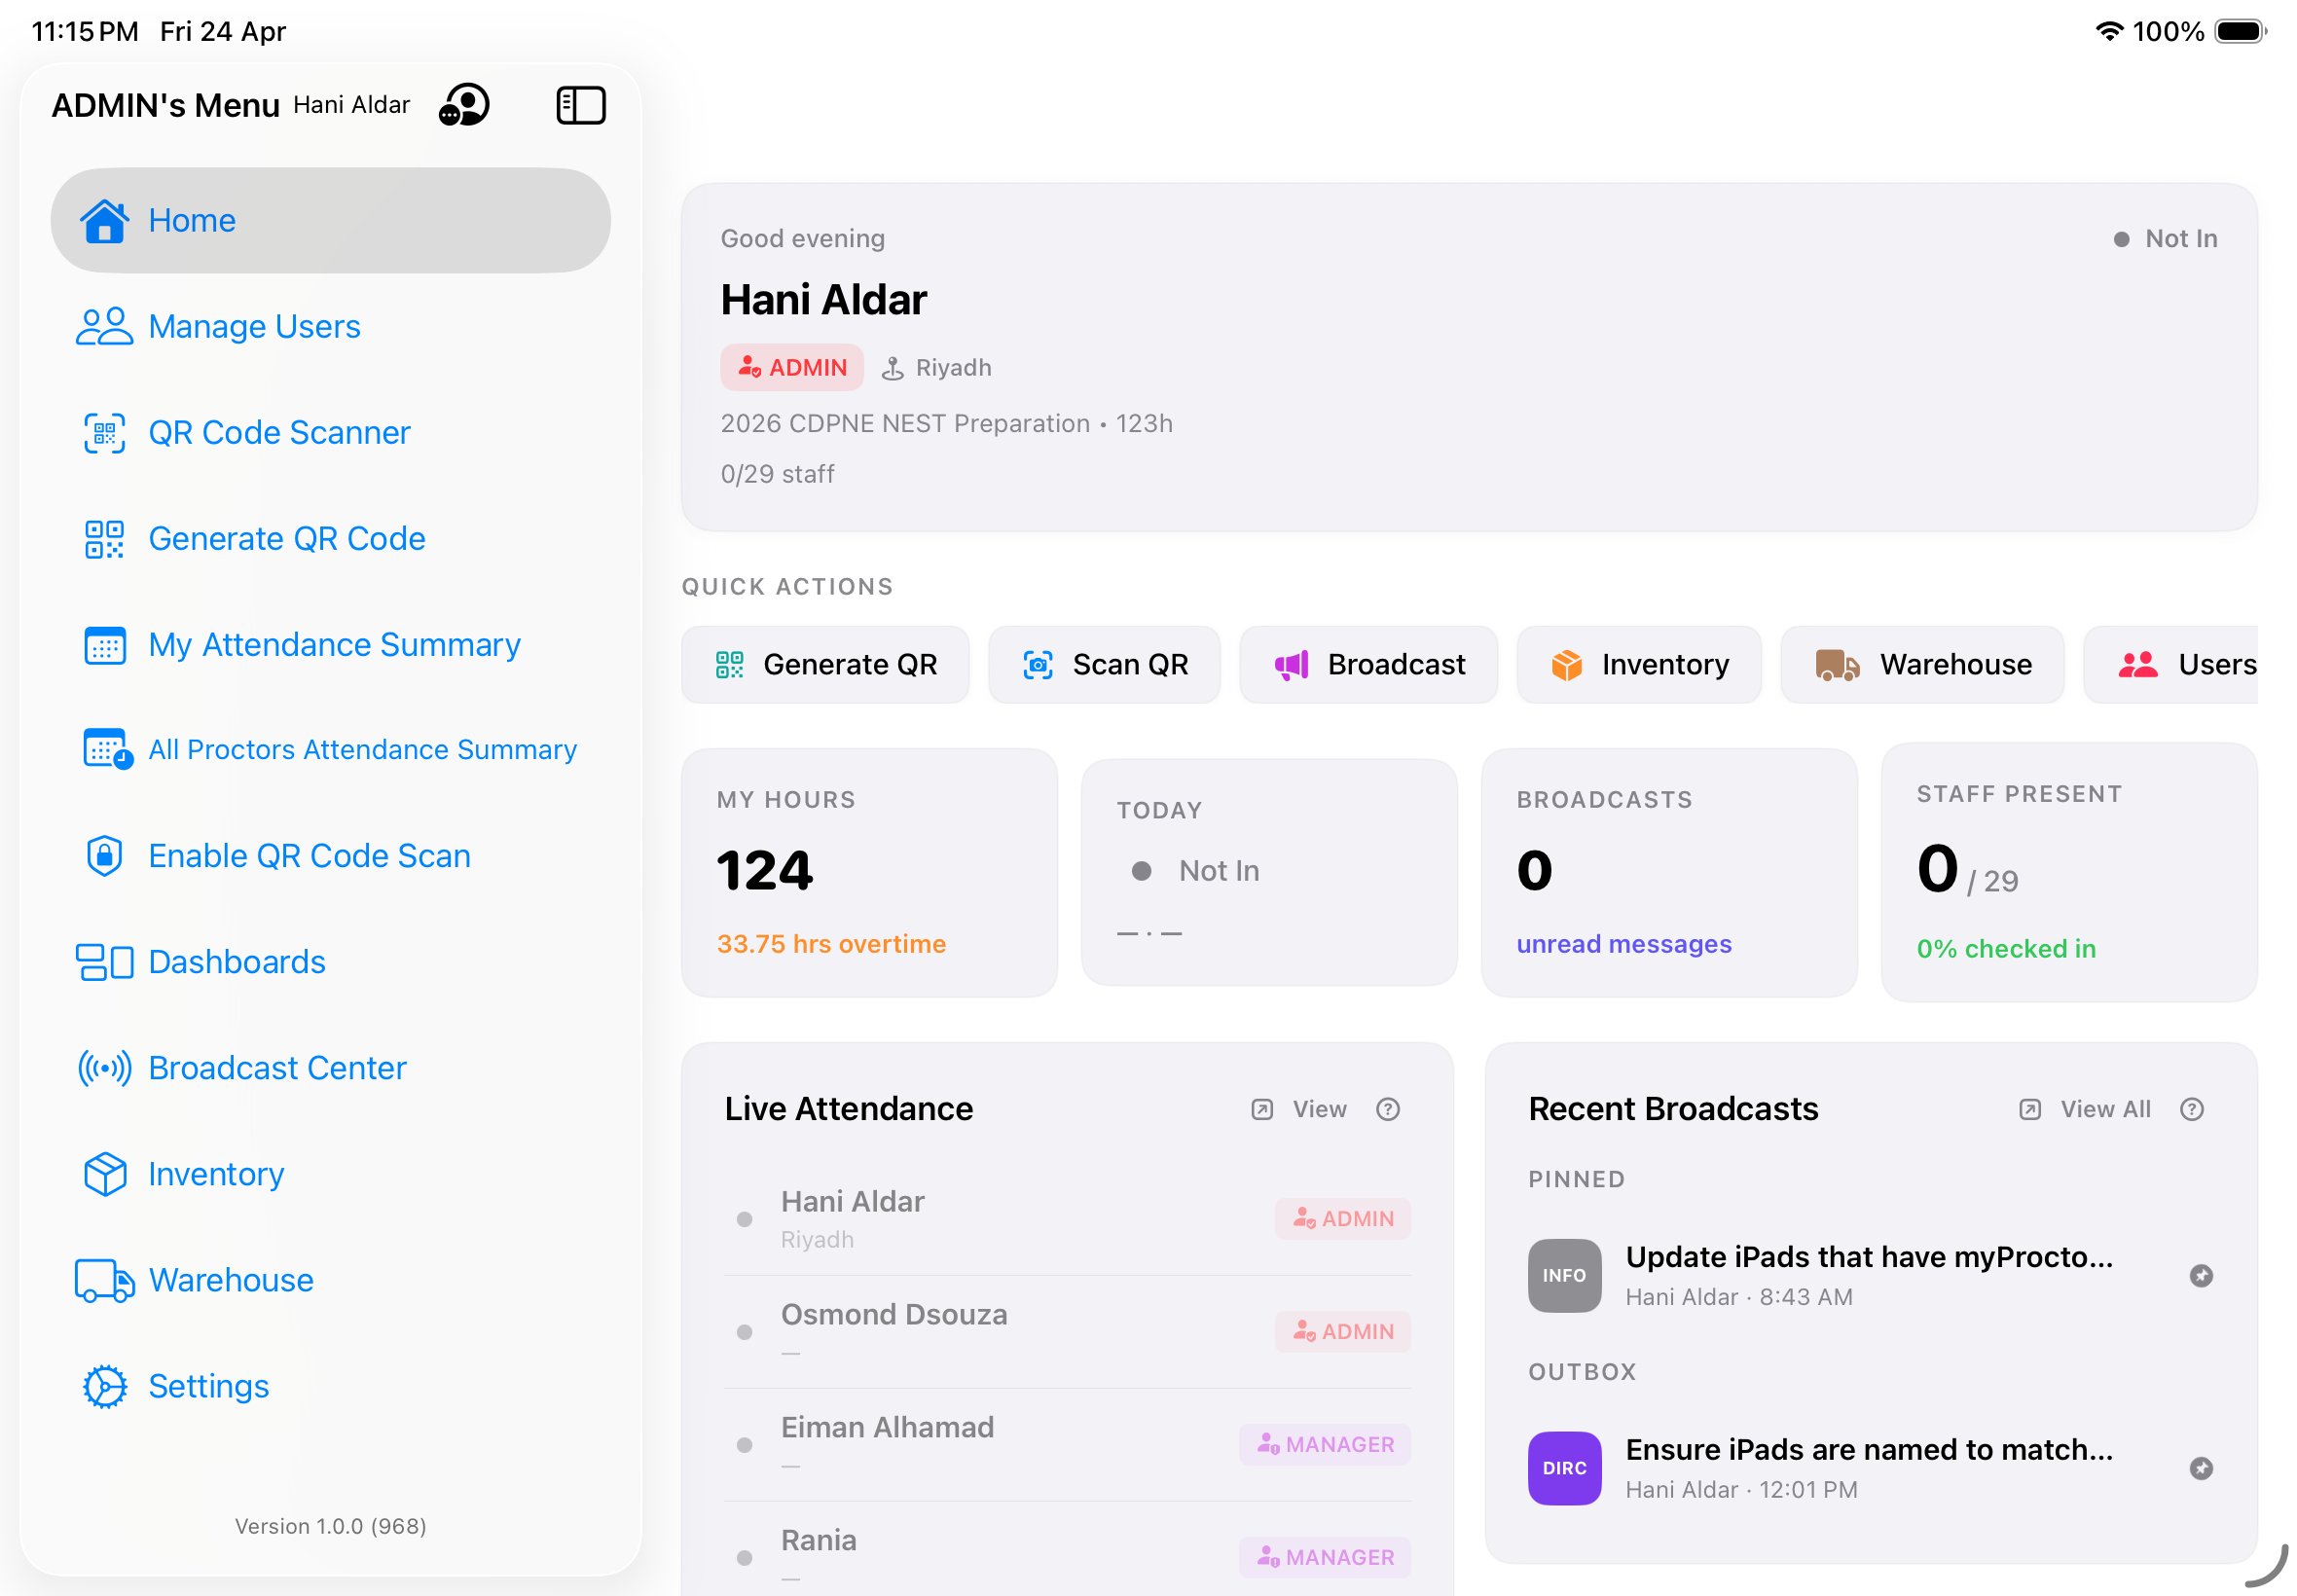
Home dashboard.
Home is role-adaptive. An Admin sees a wide view across their city; a Proctor sees their own status and today's directives. Every card is gesture-driven — long-press for context actions, drag to reorder, tap to drill in.
Anatomy of the screen
- Greeting banner — time-of-day salutation, your display name in Fraunces italic, your role chip, and the current event status.
- Live status strip — your city, live attendance count (e.g. "142/250 · Live"), and a pulsing green dot when data is flowing.
- Quick actions — six role-specific shortcuts with role-colored icons and live badge counts (e.g. open support tickets, pending handovers).
- Stats cards — "My Hours" (32:15), "Today" (08:42), "Staff" (142/167), "Broken Logs" (count with red pill if >0).
- City attendance breakdown (Admin/Manager only) — all cities with role rollups and % present.
- First 5 & Recent 5 — first five to check in today, most recent five with timestamps.
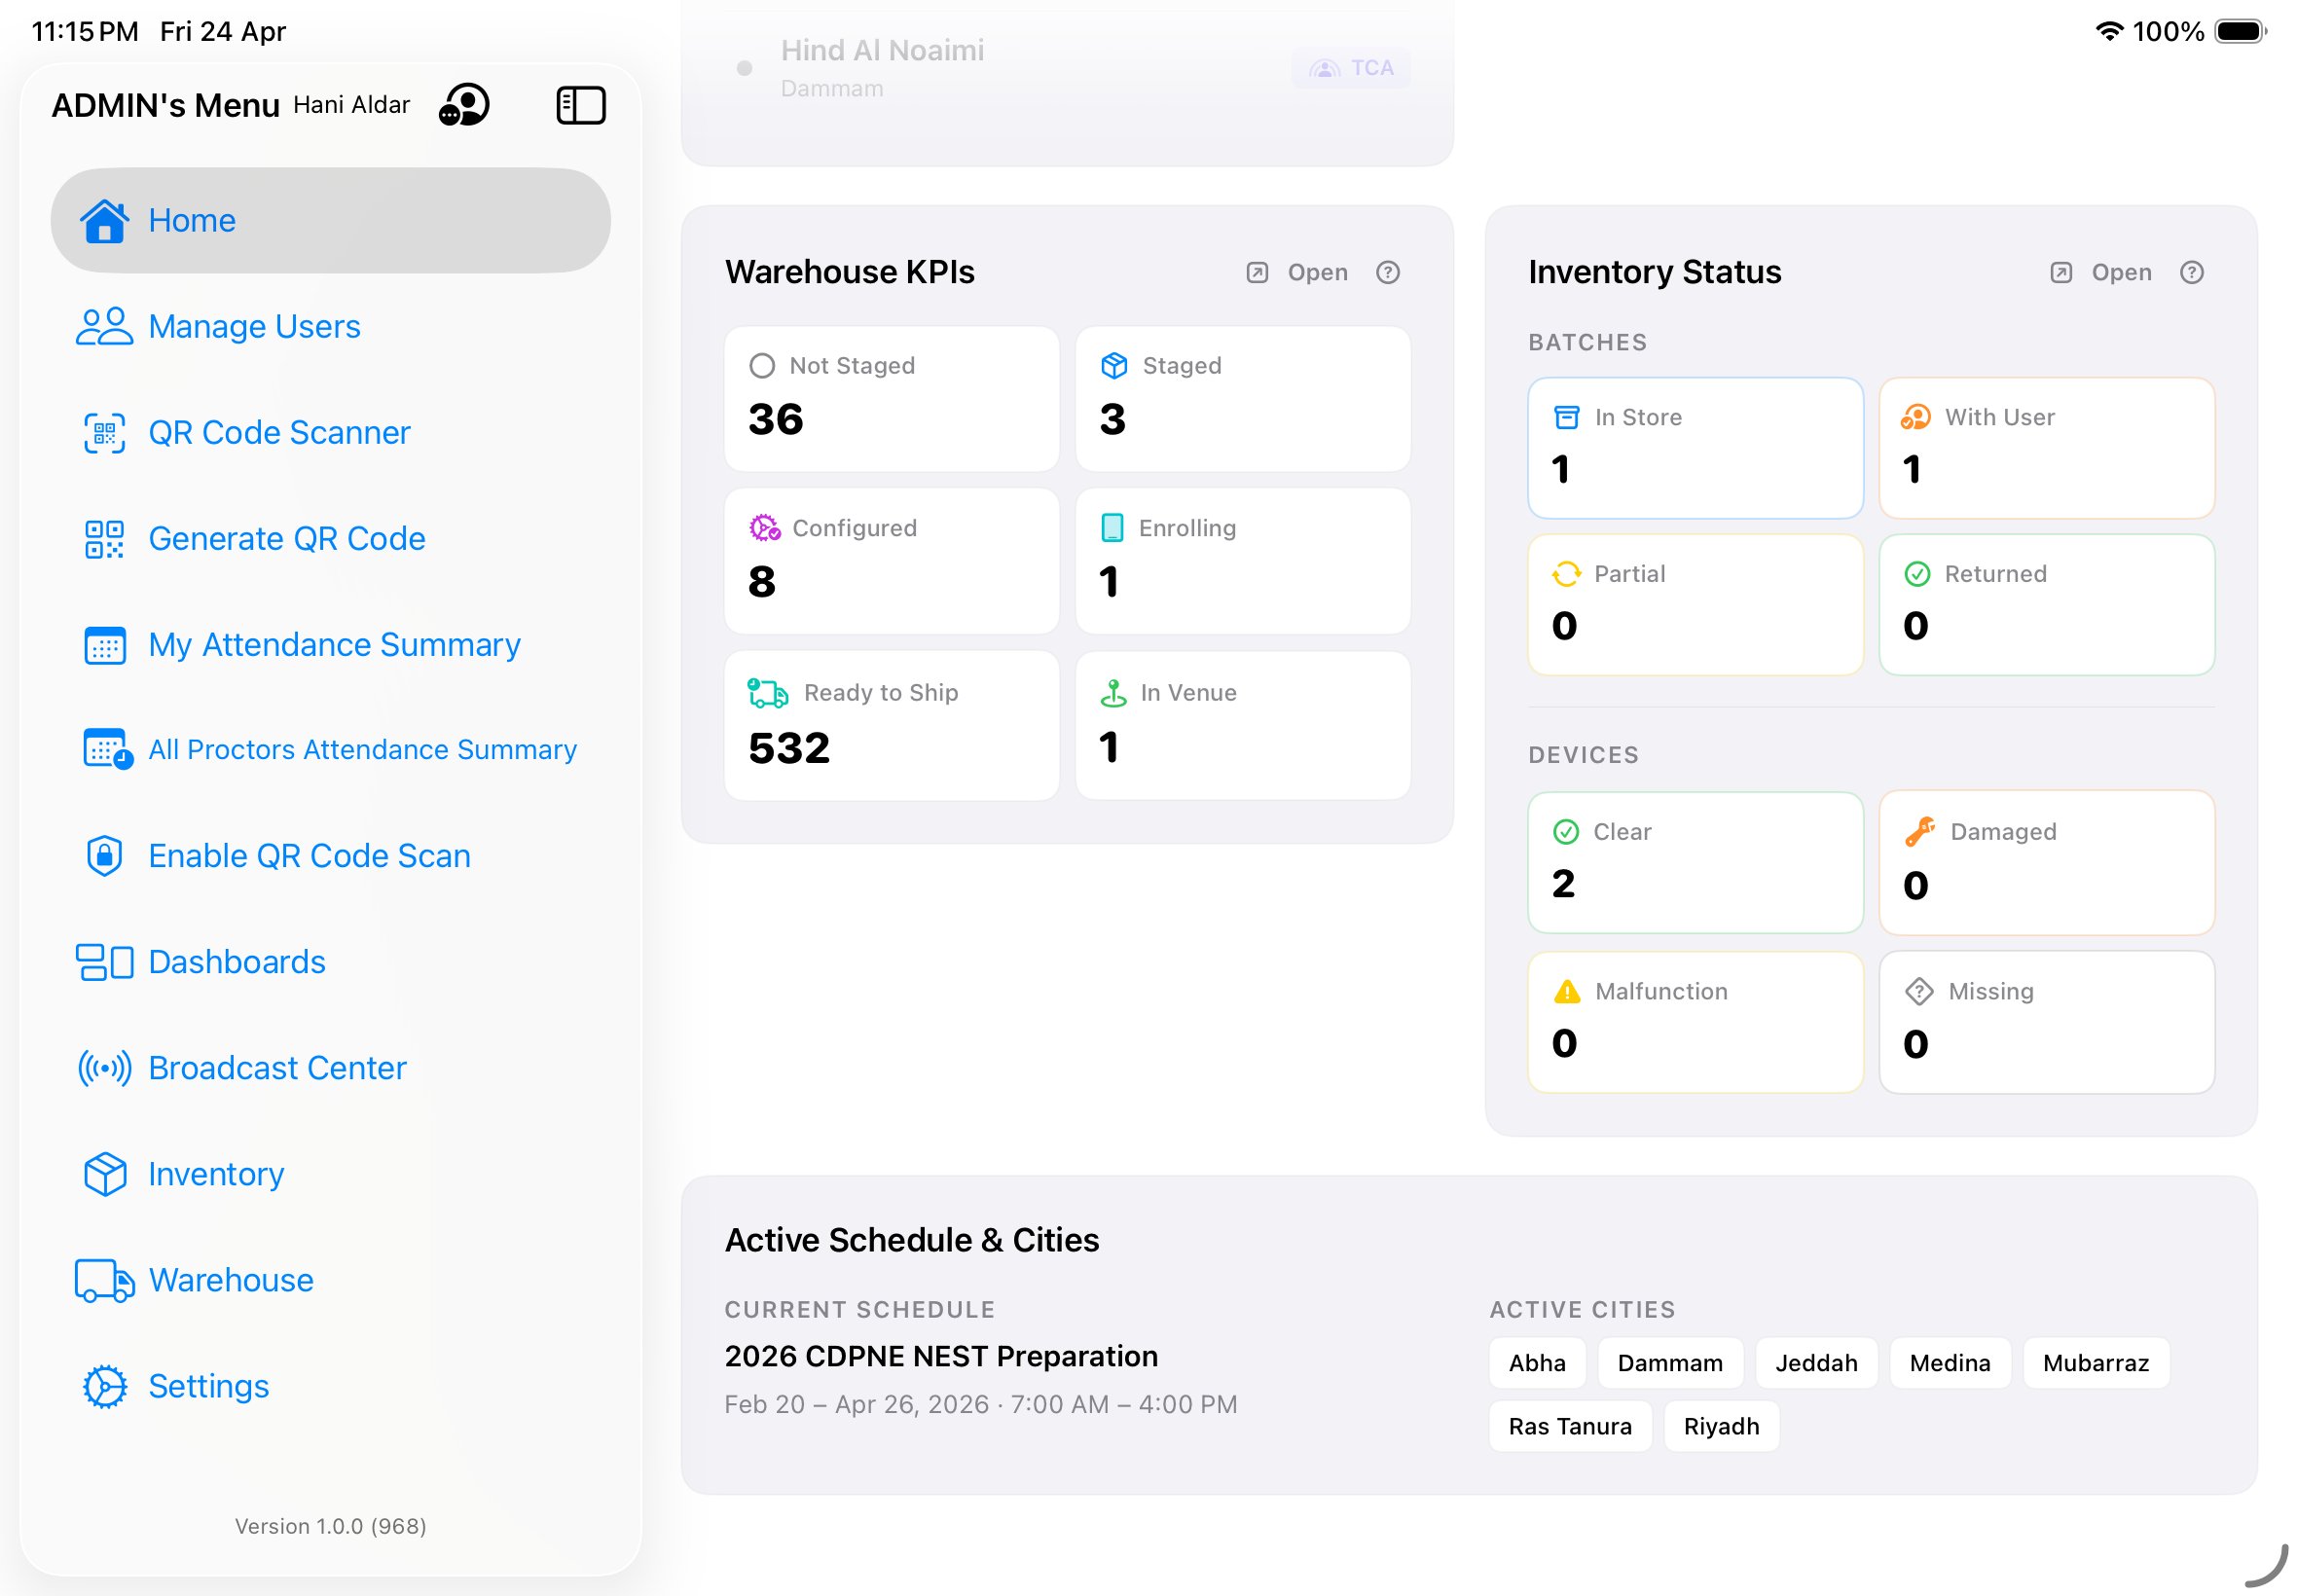
- Warehouse & Inventory strips — pipeline counts, inventory status bars, role-gated.
Role adaptations
| Role | What Home shows |
|---|---|
| Admin | Full city dashboard, all stats, punctuality leaderboard, broadcast analytics, warehouse pipeline. |
| Manager | All cities in region, city comparison, executive broadcast access. |
| TCA | Single-venue focus, support ticket inbox prioritized, pending handovers. |
| Tech | Technical support inbox, inventory scan shortcut, enrollment recovery. |
| Warehouse | Pipeline counts, labeling queue, asset/container types. |
| Proctor | Personal status, today's schedule, direction inbox, support submit button. |
Gesture menu
Long-press on most items on Home to get a contextual action sheet. Seven common gestures:
- Tap — drill into the item (e.g. tap a stats card to see the underlying list).
- Long press — open the gesture menu with edit / share / pin / remove actions.
- Draggable items — reorder quick actions. Custom order persists per user.
- Actionable items — cards with trailing buttons for quick actions (e.g. "Dismiss", "Resolve").
- Sequential tap — tap-tap-tap to advance through details (e.g. attendance: summary → daily → logs).
- Resize — pinch on a card to compact or expand (iPad only).
- More options (⋯) — opens a secondary menu for less-common actions.
Masquerade-aware
When an Admin masquerades as another user, Home fully re-renders with that user's role, permissions, and data — gesture menus included. Very useful for debugging "why can't they see X?".
Implementation notes · HomeDashboardViewModel
HomeDashboardViewModel composes 8 upstream view-models (users, attendance, broadcasts, inventory, warehouse, settings, access profile, masquerade) and merges their outputs through a HomeDashboardCache — a Swift actor for thread-safe access.
AppScheme.warehouseSchemeId = "2026" is centralized here and flows into all pipeline queries. When the scheme changes year-over-year, this is the single point of update.
Attendance & hours.
A rolling QR code refreshes every 15 seconds. Staff scan it to check in or out on the common-use iPad at the venue desk. Location is stamped to four decimal places, time to the second, and the app calculates overtime against your business schedule with special-period overrides for Ramadan, weekends, and holidays.
Checking in with QR
- Each staff member opens Generate QR on their personal device. A full-screen QR appears with the 15-second countdown visible. The QR encodes UID, location (city + GPS), the action (check-in / check-out), and a timestamp.
- They walk up to the common-use iPad at the venue desk. These shared iPads run persistent scanner mode — always on, biometric-locked between scans.
- They hold their QR in front of the iPad. The scanner reads the one-shot payload, validates its freshness against the 15-second window, and writes an attendance log.
- If the user is late (arrival timestamp past the shift start defined for them), the iPad blocks the immediate write and prompts the user to type a justification. The remark is required; once submitted, the attendance log is written with the remark attached as metadata. TCAs see the remark in the daily summary.
- A 60-second buffer prevents accidental double-scans. If you try to check in or out twice within 60 seconds, the second attempt is blocked with a friendly error.
Manual attendance (fallback)
If the camera isn't available — broken lens, denied permission, accessibility need — a user holding the manualSelfAttendance permission can log their own check-in/out through a form instead. The log is flagged manual for audit purposes, but otherwise behaves identically.
Admins and TCAs with attendance permissions can also record attendance on behalf of another user from the All Attendance dashboard — this is how last-minute arrivals or staff without devices get counted.
The five broken-log categories
The app watches your attendance log for anomalies and flags five specific patterns. You'll see the count on the Home stats card and in red pills on the All Attendance view.
| Category | What it means | Who can fix |
|---|---|---|
| Missing check-in | A check-out exists with no matching check-in earlier that day. | Self within 3 days · Admin anytime |
| Missing check-out | A check-in exists with no check-out before midnight (Asia/Riyadh). | Self within 3 days · Admin anytime |
| Out-of-order | A check-out timestamp precedes the preceding check-in (clock-skew bug). | Admin only |
| Duplicate | Two identical check-in (or check-out) events within 60 s. | Admin only (auto-dedupes on save) |
| Wrong city | GPS stamp doesn't match the user's assigned city. | Admin only — manual review |
Hours & overtime
- Quarter-hour rounding. Worked hours round to the nearest 15 minutes, always down for check-ins (so 07:52 becomes 07:45) and up for check-outs.
- Daily threshold is set in Settings → Business Schedule (default 7.5 h). Anything beyond threshold counts as OT.
- Weekend days are 100% OT. Friday and Saturday fall under the special-period "Weekend" bucket.
- Ramadan applies the Ramadan special-period schedule — typically 6.0-hour daily threshold. Defined in Settings → Special Periods.
- Lunch block (11:15–12:45 default) does not count toward hours unless explicitly claimed.
Editing attendance
Non-admins can edit their own logs within 3 days of the original timestamp. After that window, only an Admin can edit. Each edit is recorded in the log history with the editor's UID and the reason (free-text, required).
QR freshness
Each generated QR is valid for 15 seconds. After that, the scanner rejects it and prompts the user to regenerate. This prevents screenshot-sharing and keeps the attendance window tight.
Implementation notes · TimestampValidator & location precision
TimestampValidator defaults to 15-second validity (not 15 × 60). Accepts both Date and ISO8601 String inputs. Located at TimestampValidator.swift.
LocationManager.swift uses CLLocationManager.desiredAccuracy = kCLLocationAccuracyNearestTenMeters and stops updating after the first success. Fallback labels: UNKNOWN CITY, LOCATION DENIED, UNKNOWN LOCATION, ERROR.
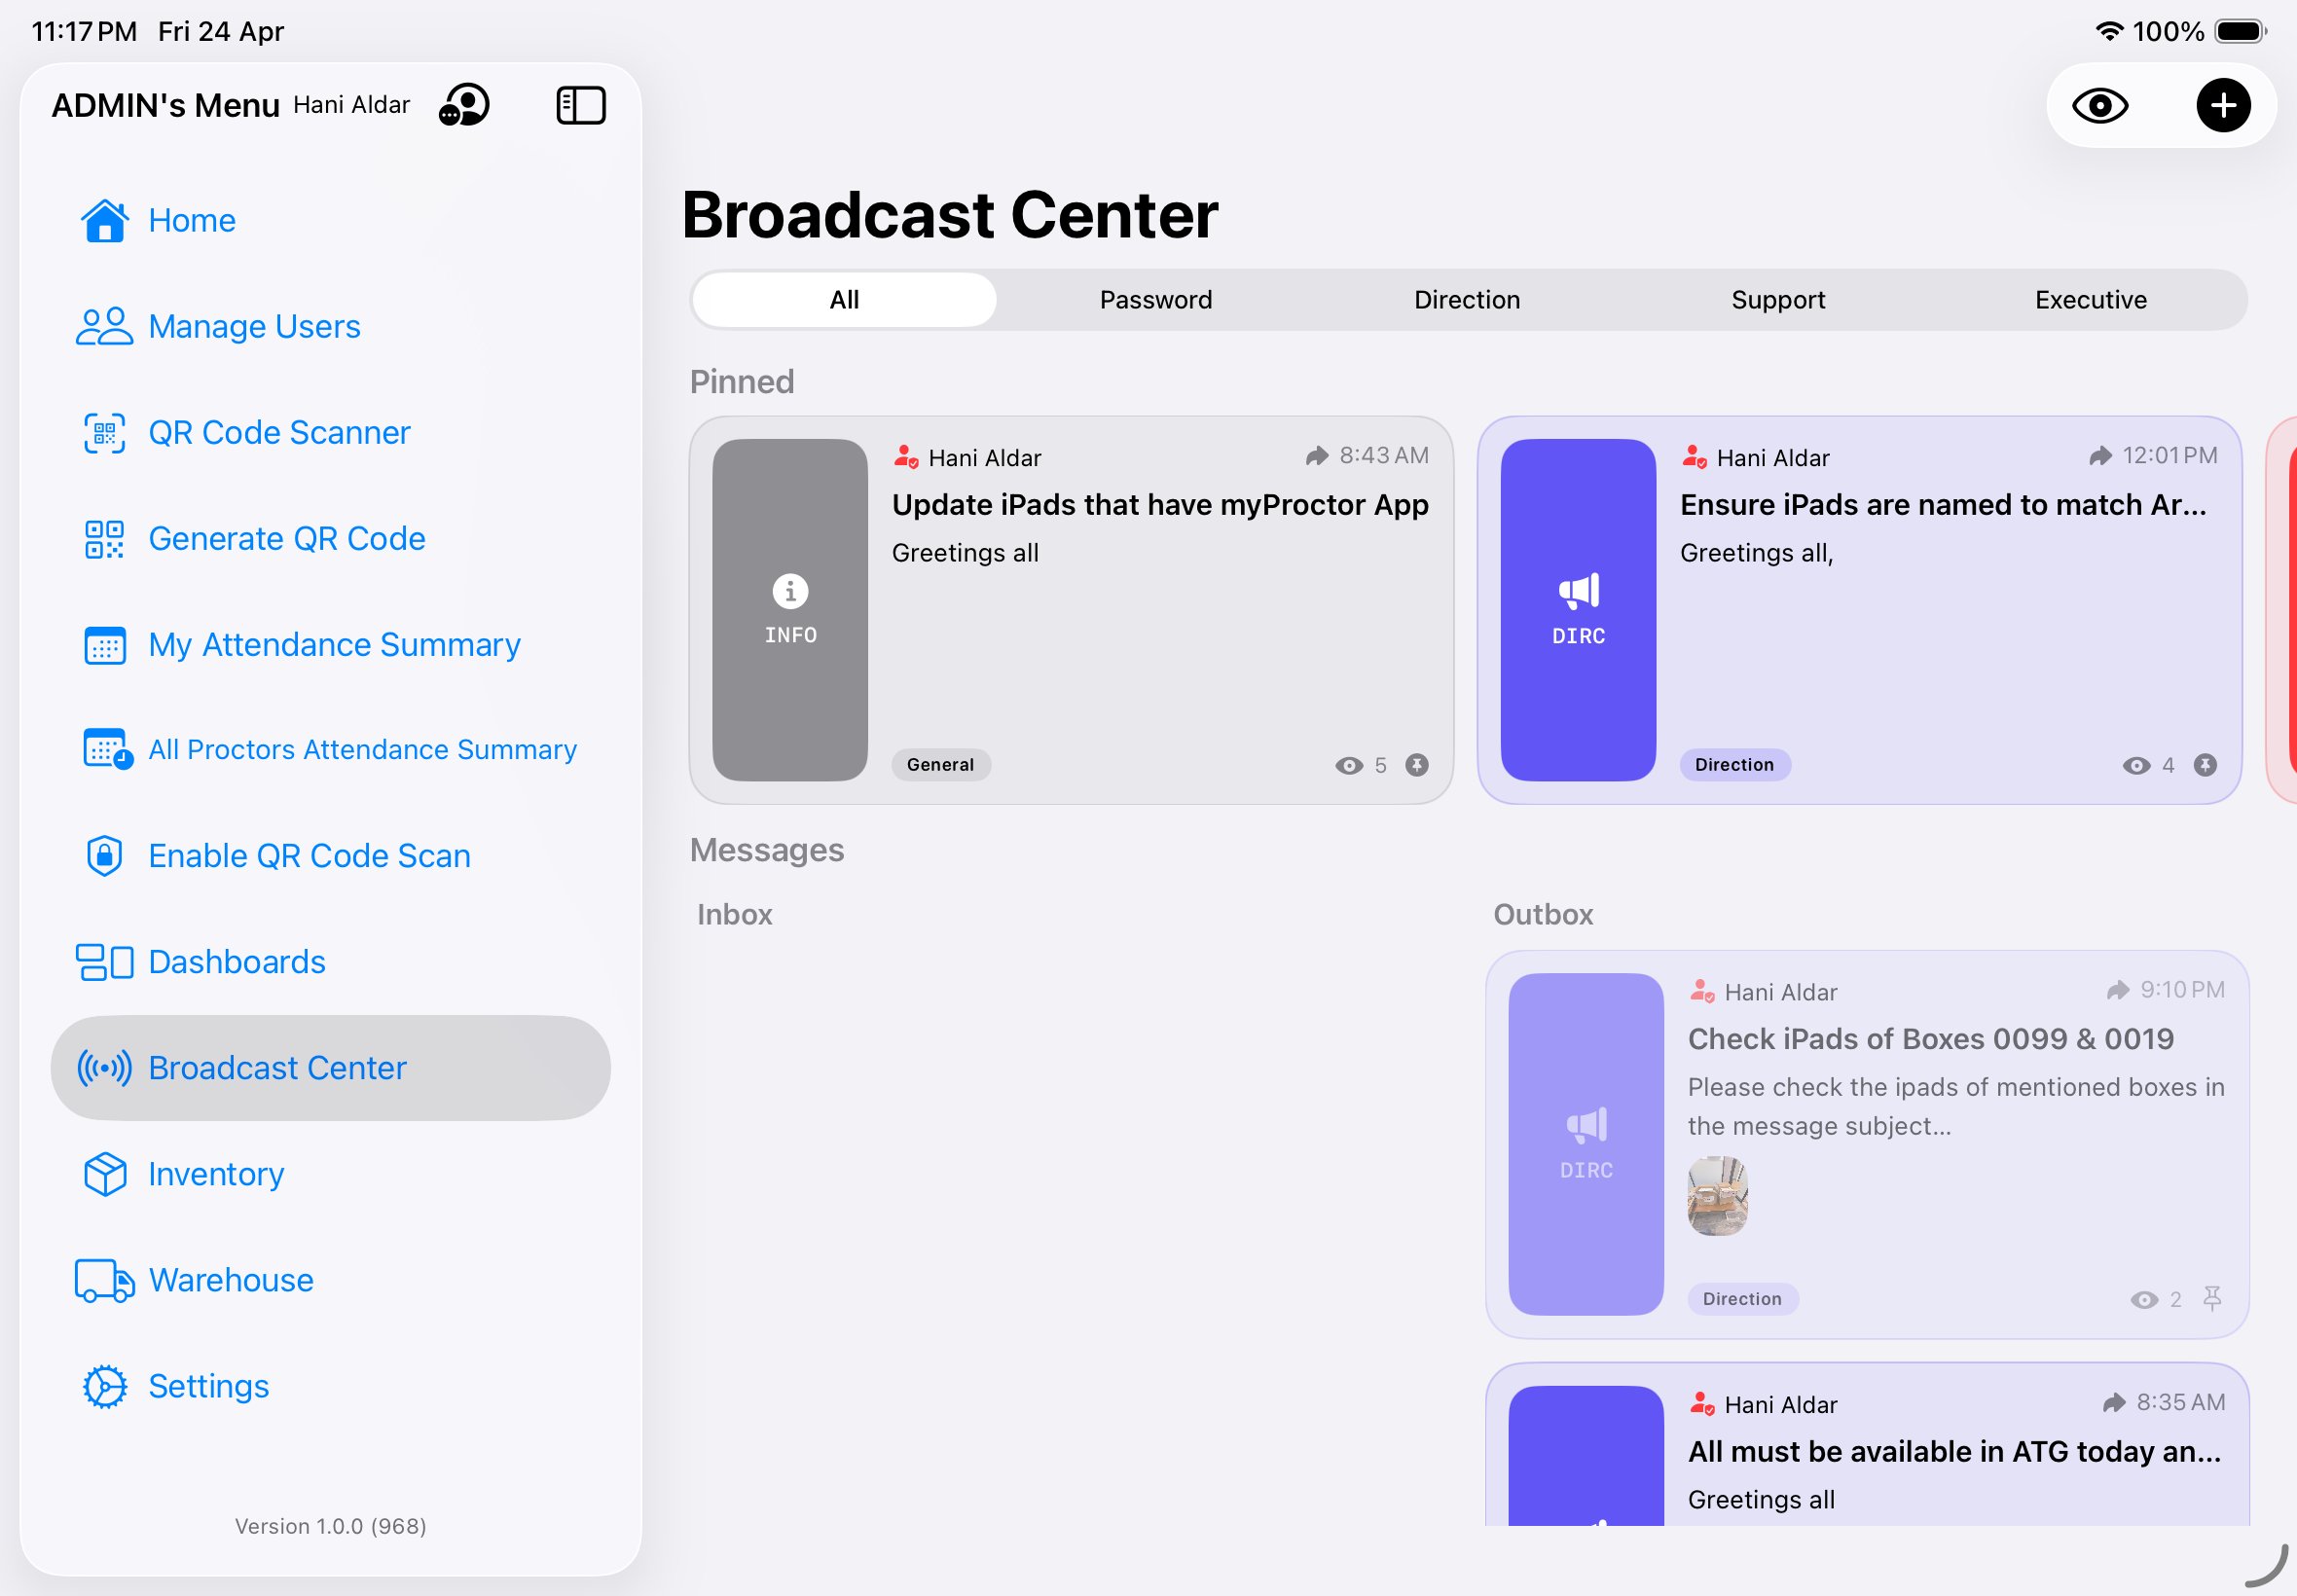
Broadcast Center.
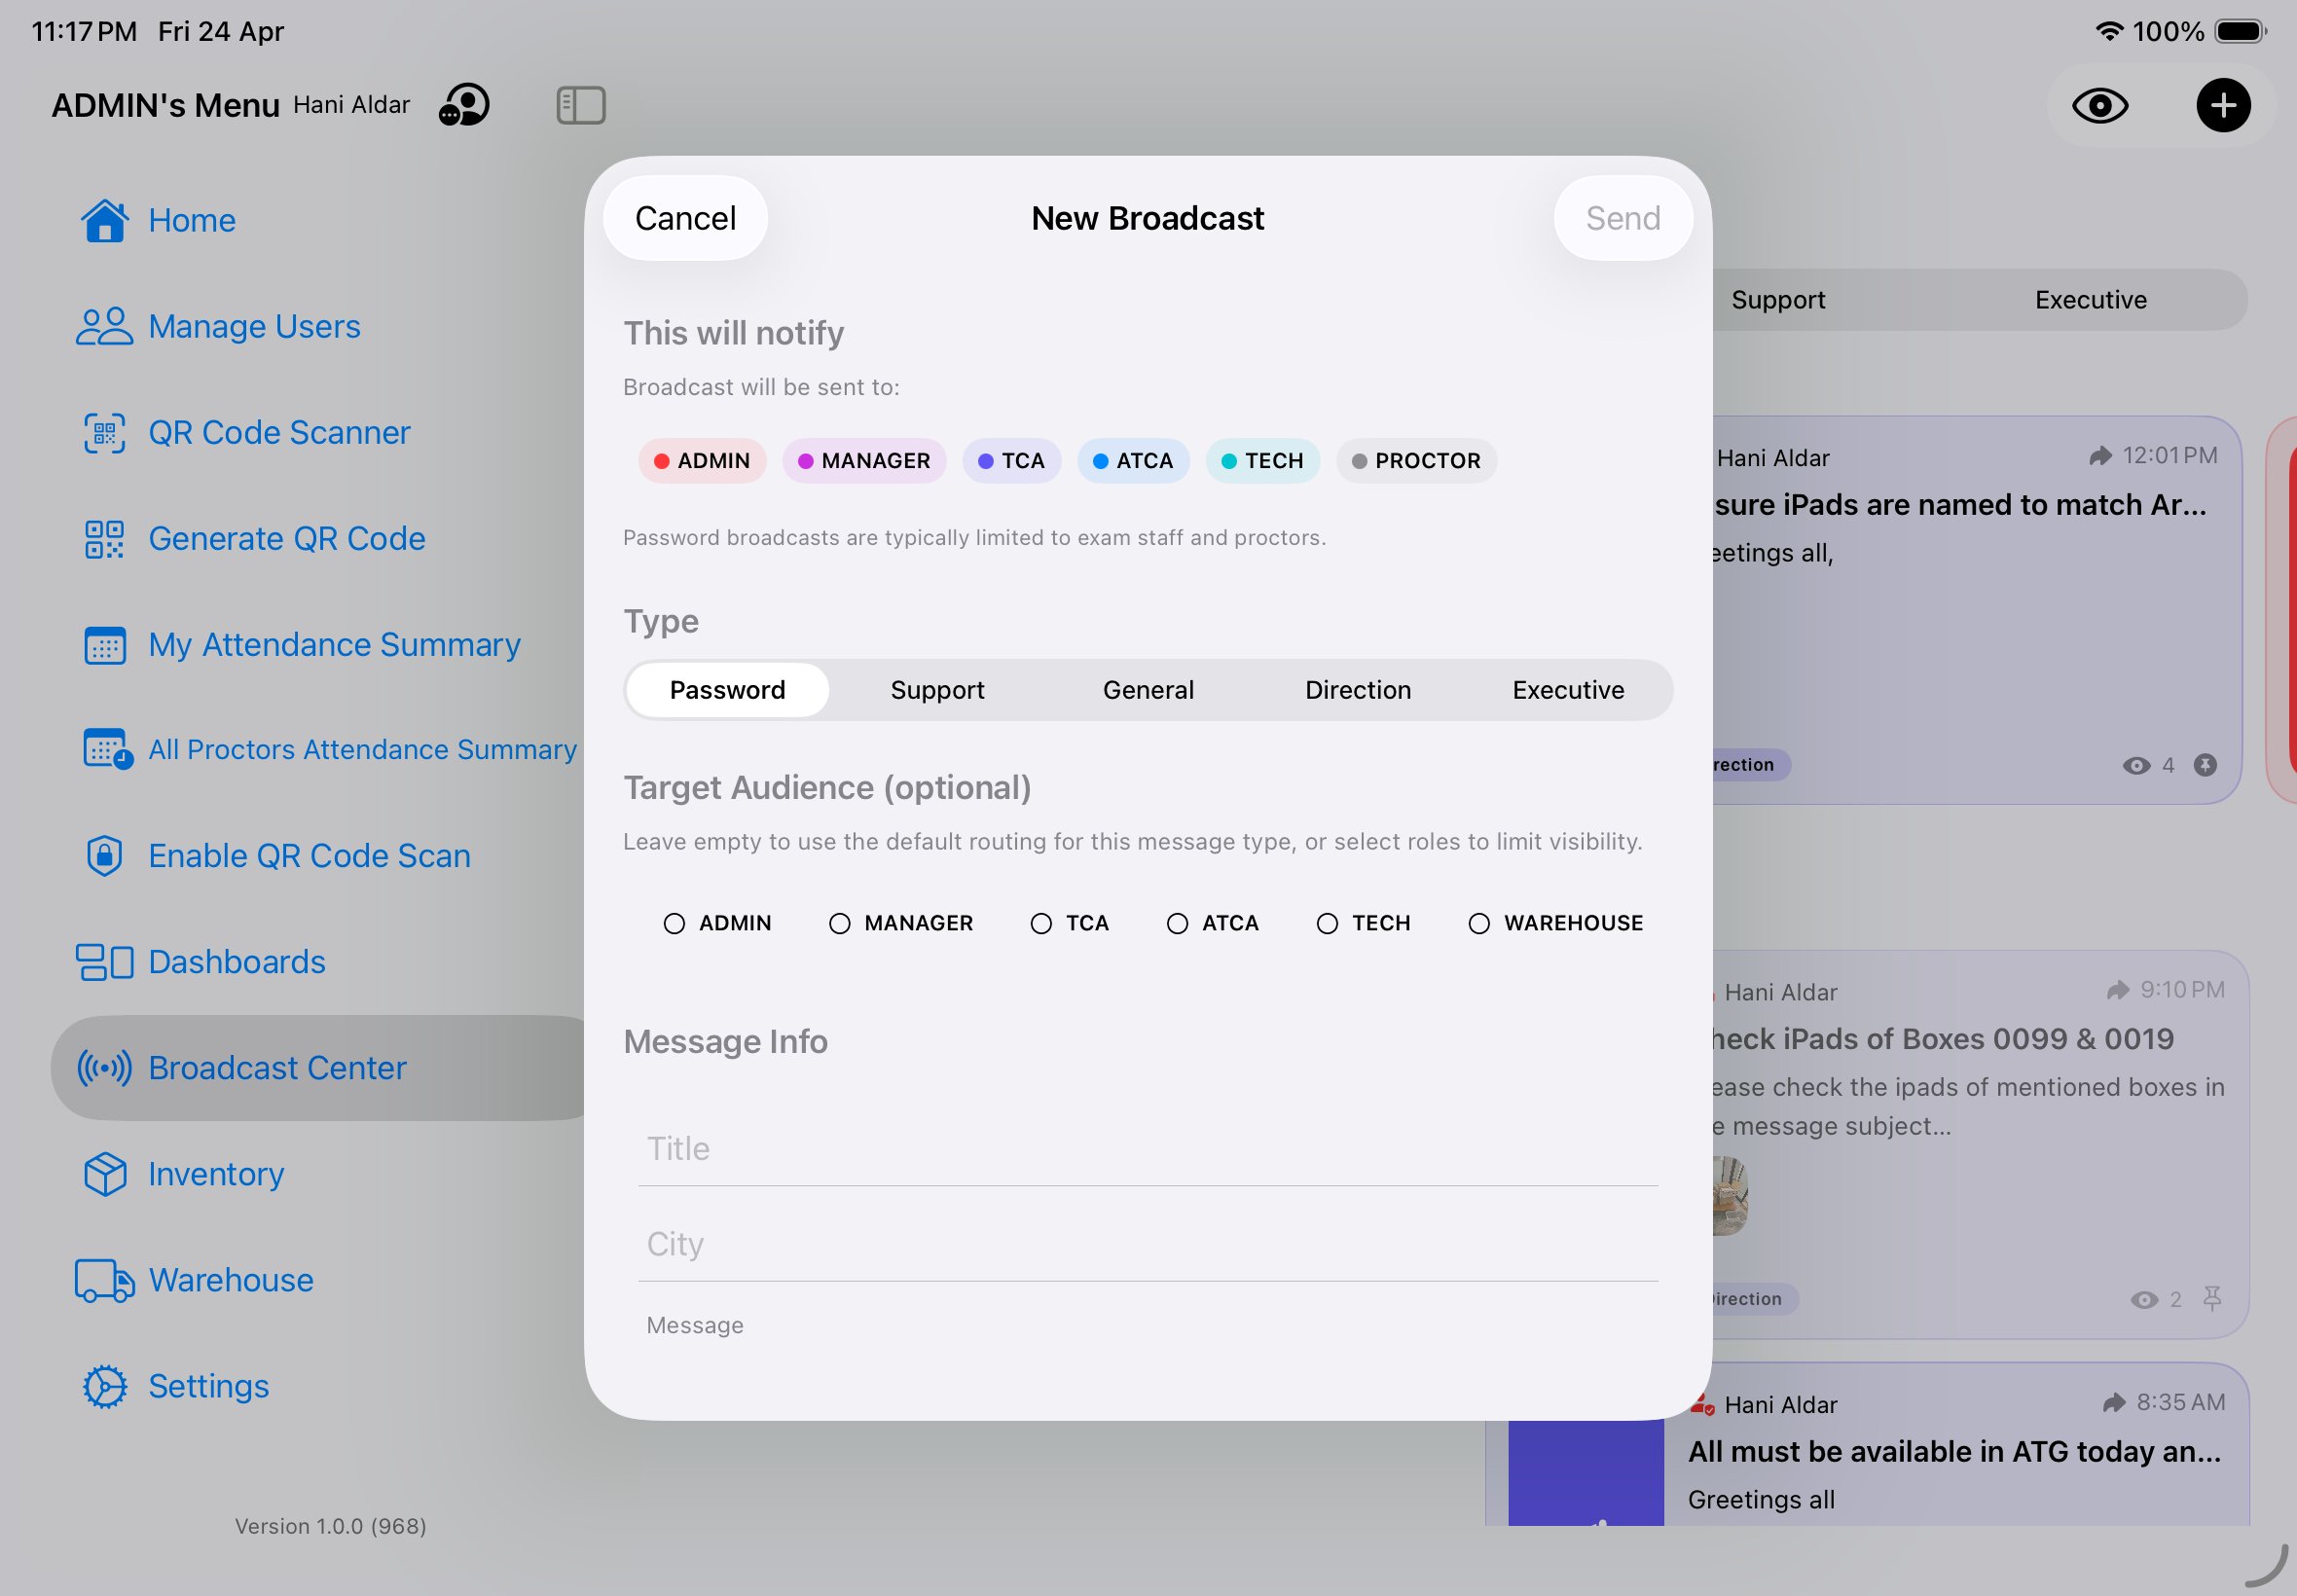
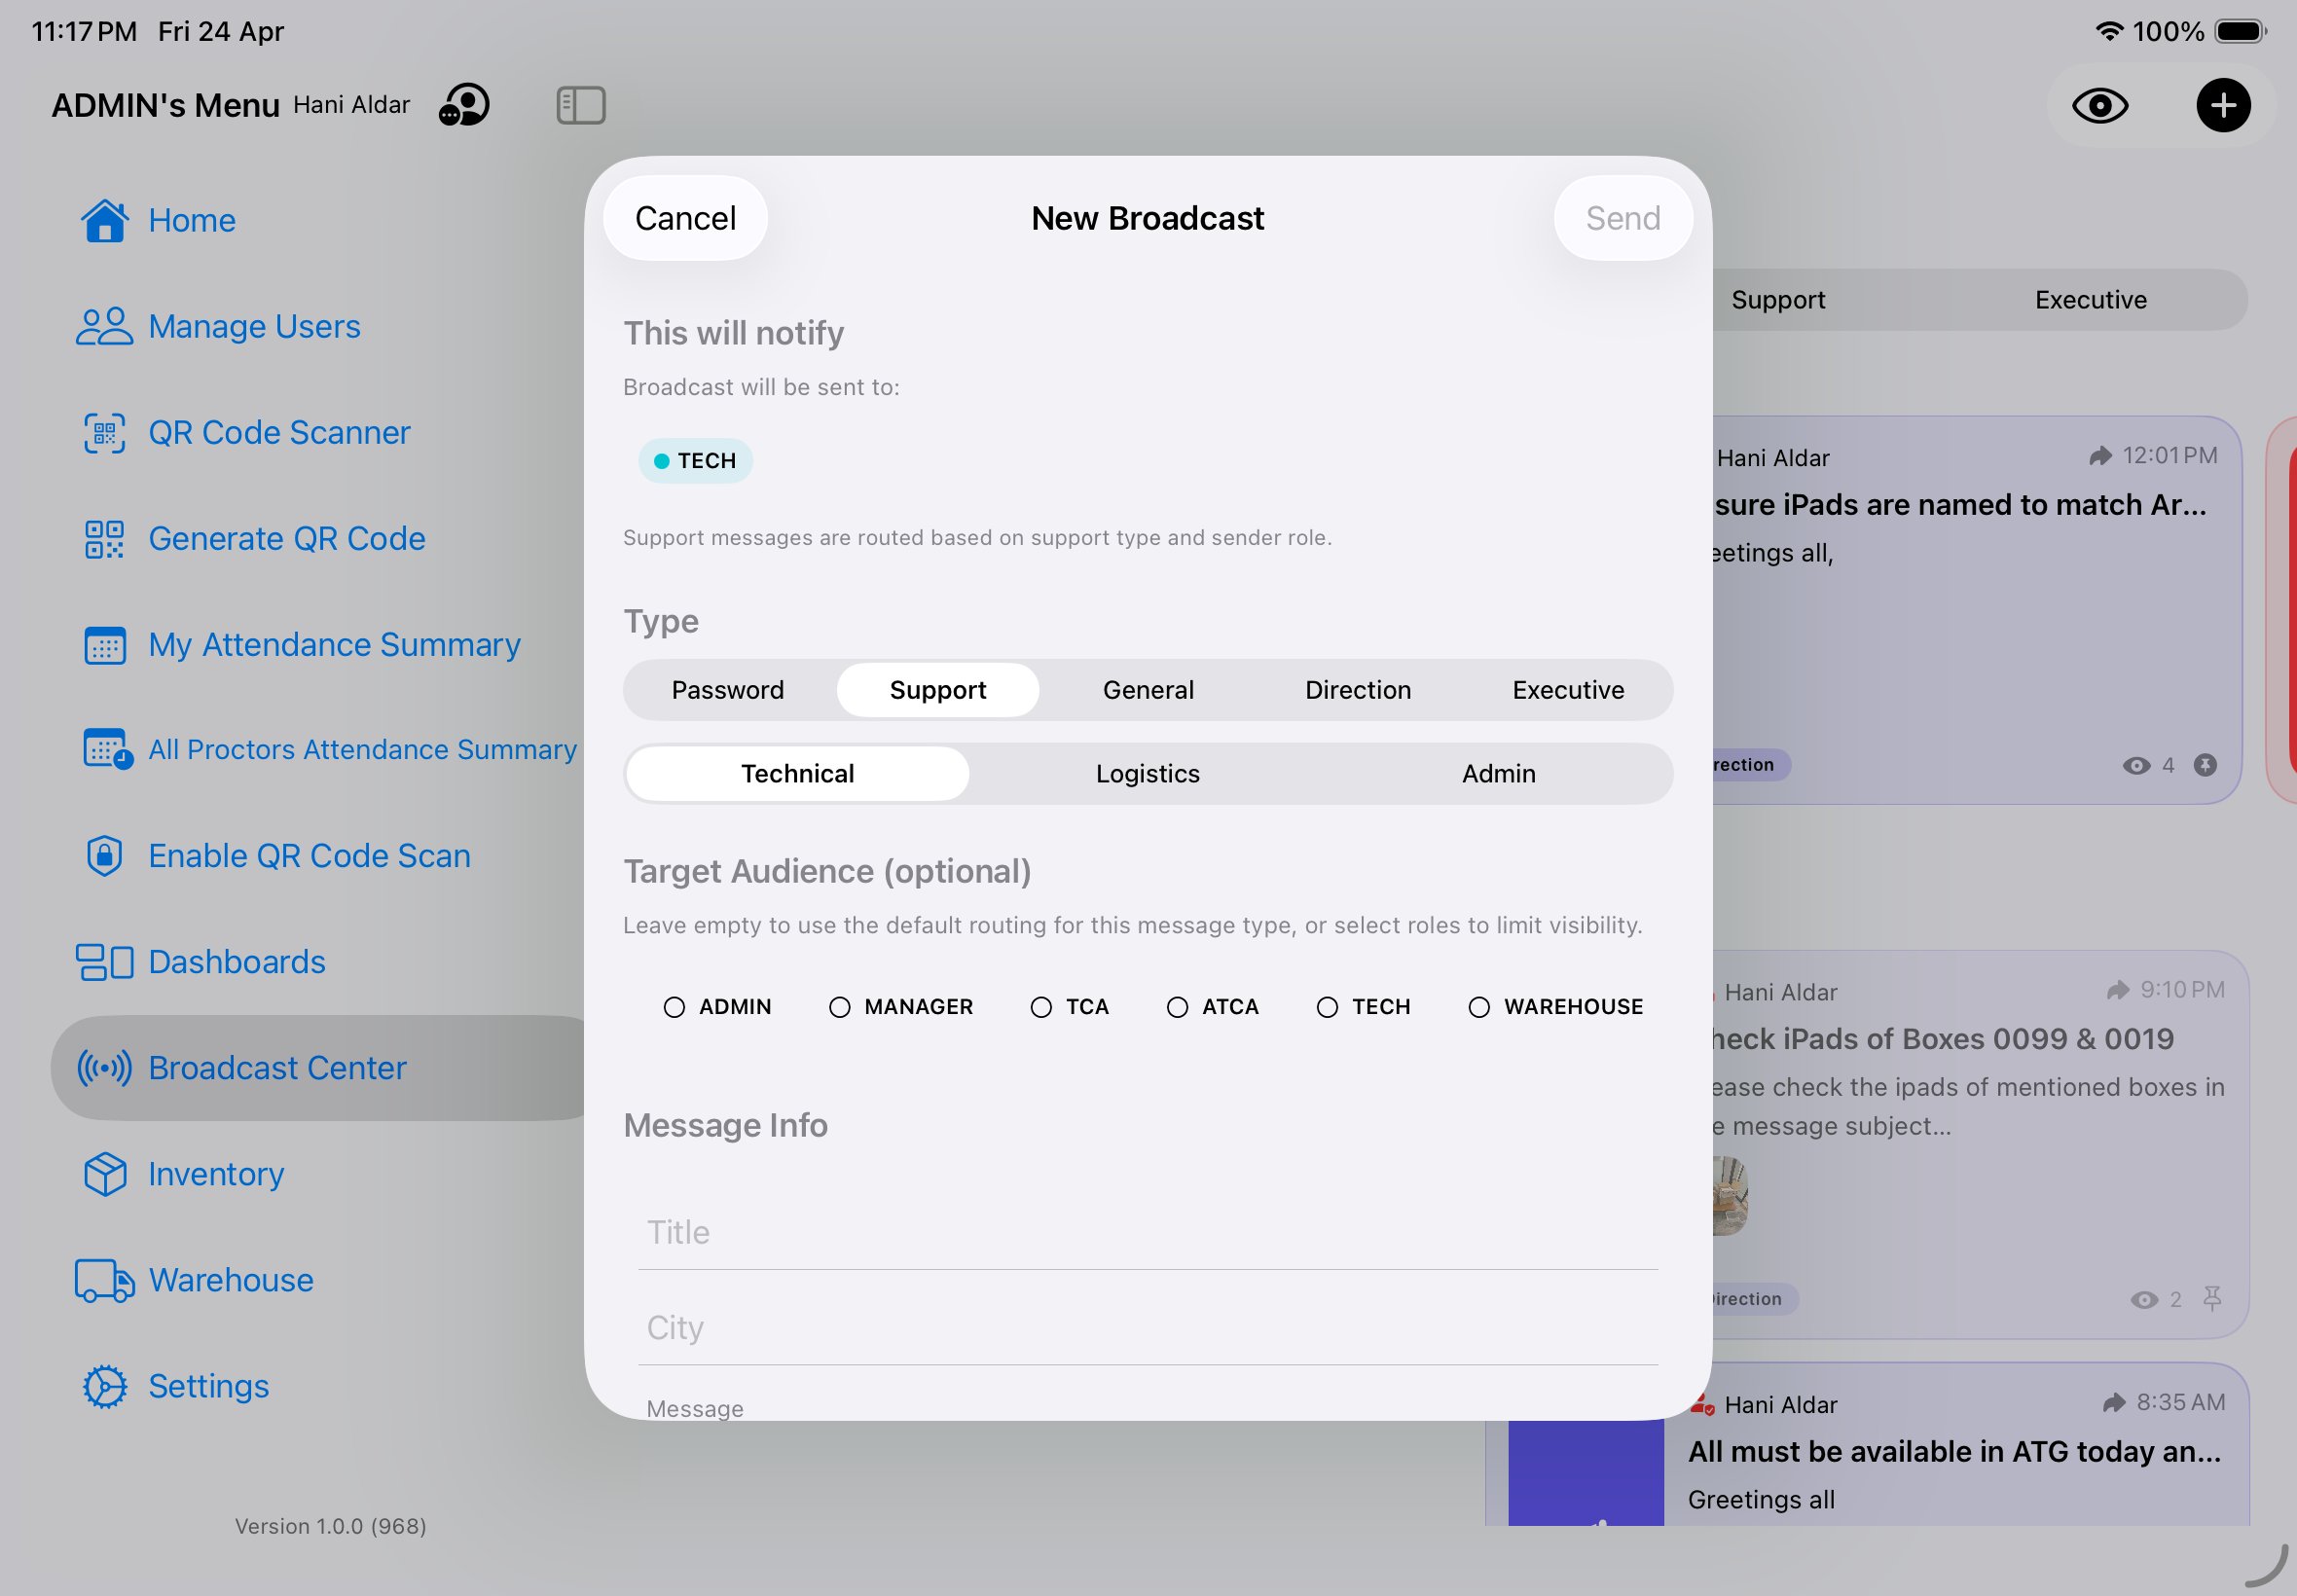
Five message types, rank-gated sending, encrypted message bodies, and a two-axis pin/delete model. The Broadcast Center is how the event talks to itself — and how support requests bubble up through the right hierarchy.
The five channels
How city scoping works in the composer
When you open a New Broadcast, the City field is auto-filled with your assigned city. Anyone outside that city won't receive the message. To deliberately broadcast to all cities, clear the City field before tapping Send. To target a different city, replace the value with that city's name. The auto-fill keeps the safe default (your own city) without forcing extra taps; the explicit clear/change is the deliberate broader broadcast.
| Channel | Code | Send rank | Purpose |
|---|---|---|---|
| Password | PSWD | ≥ 90 | Highest-priority operational broadcast tier, reserved for Admin and Manager. Used for any leadership-level urgent dispatch. |
| Direction | DIRC | ≥ 40 | Crowd-control & staging directions. Admin / TCA / ATCA. |
| Executive | EXEC | ≥ 90 | High-priority pinned messages from leadership. |
| General | INFO | ≥ 20 | Day-of announcements, timing changes, FYI messages. |
| Support | SUPR | any | Sender-aware routing — see below. |
Support routing
Support is the only channel with sender-aware routing. The category is chosen by the sender, but who receives it depends on the sub-type — and in one case, who sent it. All routing is also city-scoped: the composer auto-fills the City field with your assigned city, so a Support message from someone in Riyadh is delivered only to Riyadh recipients. Clear the City field before sending to broadcast to every city.
| Support sub-type | Routed to | Typical sender |
|---|---|---|
| Technical | All users with tech role in the sender's city | Proctor reports broken iPad |
| Logistics (default) | Admin + Manager of the sender's city | Proctor reports missing printouts, supplies, room issues |
| Administrative (default) | Admin + Manager of the sender's city | Escalation, complaint, policy question |
| Logistics / Administrative when sent by a Tech user | TCA + ATCA of the sender's city only (not Admin/Manager) | Tech needs venue support without escalating to leadership |
Composing a broadcast
Tap the + button in the top-right of Broadcast Center to open the New Broadcast sheet. The sheet is adaptive — the "This will notify" preview and the optional Target Audience selectors change as you switch Type.
Pin & delete — two axes
Pinning and deletion both operate on two axes — personal (just you) and global (everyone who received the message). The sender has a 120-second window in which global delete works; after that, only a personal delete is possible.
- Pin personal — sticky at the top of your inbox. Visible only to you.
- Pin global — sticky at the top of everyone's inbox. Available to original sender + Admin.
- Delete personal — removes from your inbox. Others still see it.
- Delete global — retracts from everyone's inbox. Sender within 120 s, Admin anytime.
Support lifecycle
Every support ticket moves through four states. State changes are broadcast back to the sender as status updates.
- none
- Sent, not yet acknowledged. Shows as red dot in recipient inbox.
- open
- Acknowledged by a responder. Shows as orange dot.
- inProgress
- Being worked on. The responder has pinned it to their Home.
- resolved
- Marked done. Sender sees a confirmation toast and an audit log entry.
Message tag format
Every broadcast carries a compact routing tag that encodes how it should be fanned out. The format is versioned:
v1::CATCODE::SCOPE::CITY=X::R=ROLESExample: v1::DIRC::VENUE::CITY=JED::R=proctor,helper would route a Direction broadcast scoped to a specific venue in Jeddah, delivered to all Proctors and Helpers there.
Message encryption
Each message body is encrypted with a random per-message AES-GCM key. That key is then wrapped with HKDF-SHA256 over a shared app key and the routing tag, using salt "myProctor-broadcast-wrap". Delivery is scoped by Firestore rules and role routing, not by the encryption. Messages live 300 days before aging out of the inbox query.
Implementation notes · Deliver Notification
Delivery goes through BroadcastPushAPI which calls a Cloud Function that fans out push notifications to the resolved recipient set. Read receipts are tracked per-user in BroadcastUserStateRecord.
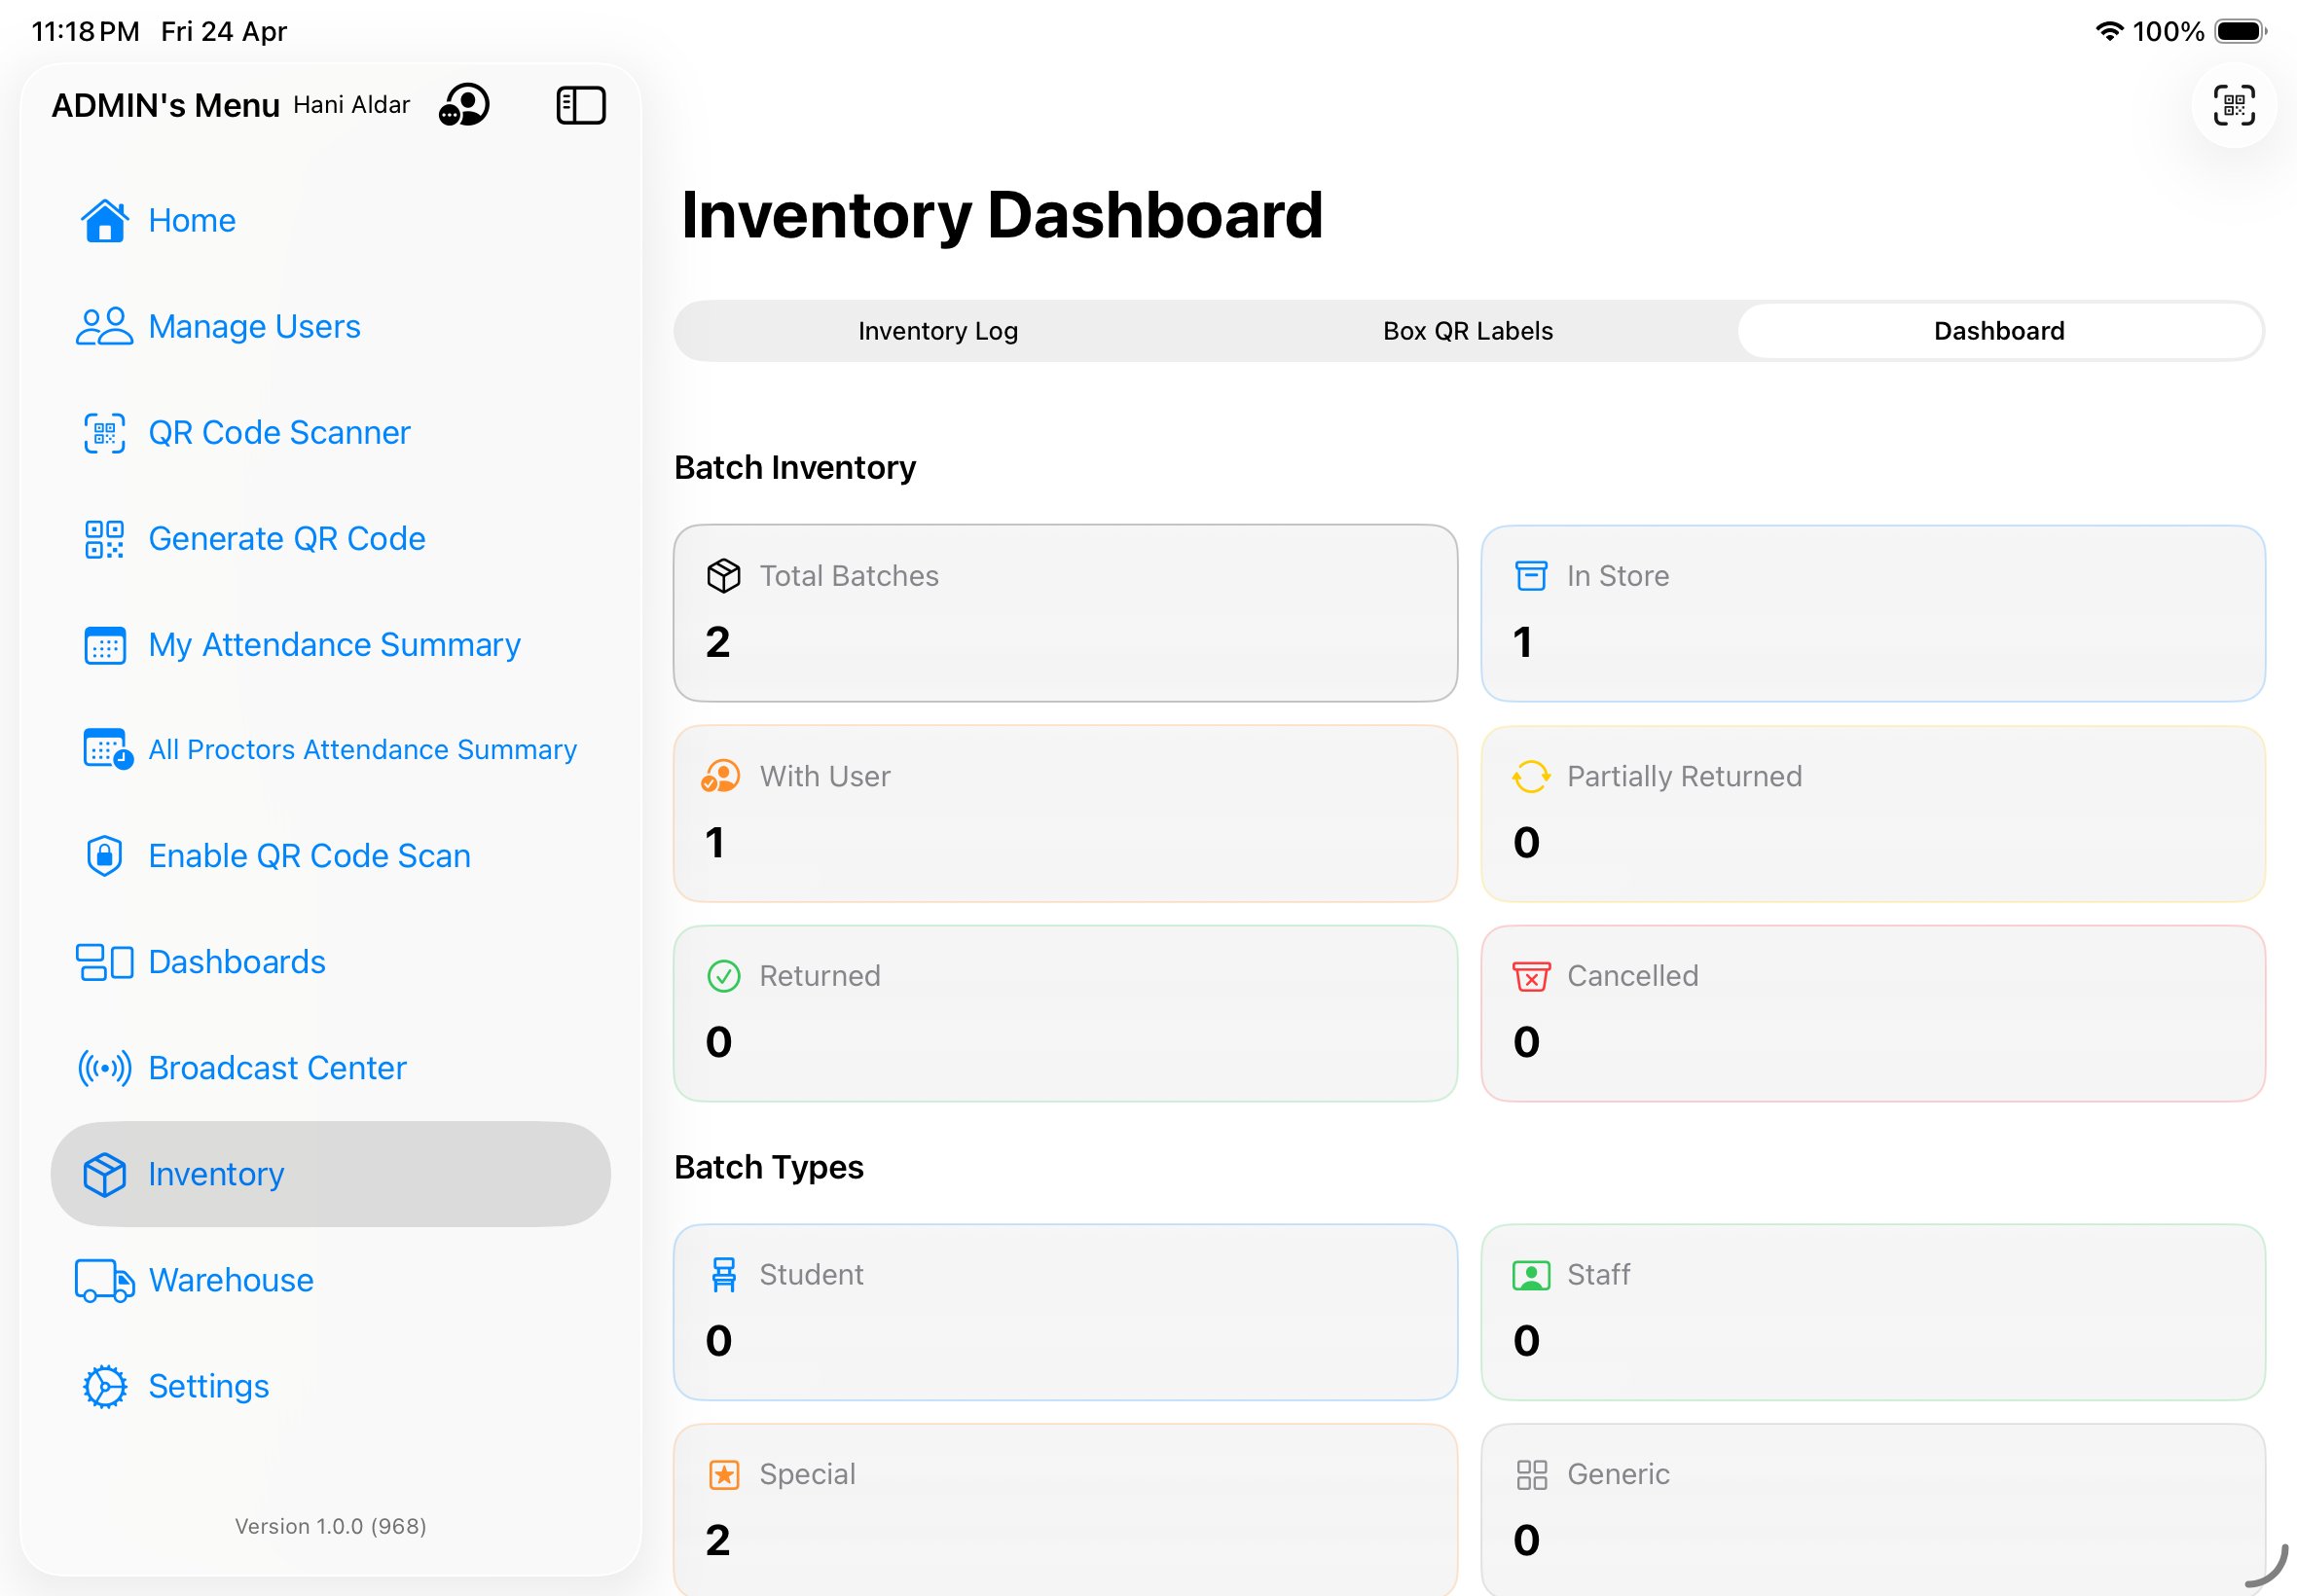
Inventory batches.
Every iPad the organization owns lives in Inventory. It has a status, a condition, a custody state, and belongs to exactly one batch at any time. Batches are how devices move from warehouse to venue to user and back.
The four batch modes
Every batch is created in one of four modes. The mode determines who the batch is for, what happens to the iPads while assigned, and the visual chip color you'll see on the Batches screen. The colors below match the SwiftUI Color tokens used by the app.
| Mode | SwiftUI color | Purpose | Cap |
|---|---|---|---|
Student (.studentSeatMapped) | .blue | iPads handed to students for the duration of an assessment session. Each iPad's wallpaper QR and Display Name are bound to a specific seat code (e.g. RIY-A-07); backup iPads (suffix BAK1, BAK2) replace primary units mid-session if needed. | 20 / batch |
Staff (.staffAssigned) | .green | An iPad with myProctor installed loaned to a Proctor or Tech who doesn't have the app on their personal iPhone/iPad. | unlimited |
Special (.specialAssigned) | .orange | An iPad with myProctor installed loaned to a TCA, ATCA, Warehouse, Manager, or Admin who doesn't have the app on their personal iPhone/iPad. | unlimited |
Generic Use (.genericUse) | .gray | An iPad assigned to a TCA/ATCA for a generic purpose — most commonly running myProctor in Scan Mode as the venue's common-use check-in terminal (Proctors walk up and scan their attendance QR), or running a separate web-app to check in students outside myProctor's scope. | unlimited |
Batch custody states
Every batch is in exactly one of five custody states at any moment. The state changes are driven by the swipe actions (Hand Out, Hand Back, Cancel) and per-device returns. Colors map to the SwiftUI Color tokens in the source.
| State | Color | Meaning |
|---|---|---|
In Store (.inStore) | .blue | Batch exists, iPads are bound to it, but custody hasn't moved to the assignee yet. Default state on creation. |
With User (.withUser) | .orange | Batch has been handed out. The assignee has physical possession; the timer for "with user" duration started at hand-out. |
Partially Returned (.partiallyReturned) | .yellow | Some — but not all — devices in the batch have been returned via the per-device Return action. The batch as a whole is still active. |
Returned to Store (.returnedToStore) | .green | All devices handed back. The batch is closed; iPads are free to be added to a new batch. |
Cancelled (.cancelled) | .red | Batch voided via Cancel Batch swipe action. iPads released back to the free pool. Stays in History but excluded from active dashboards. |

Creating a batch (step-by-step)
Batch creation is performed by users with inventoryWrites — typically a Tech, TCA, or ATCA, depending on city and event setup.
- Open Inventory from the sidebar menu, or from the Inventory tile on the Home dashboard.
- Tap the QR scan icon in the top-right corner of the toolbar. This opens the batch-creation scanner overlay.
- Pick the batch mode — Student, Staff, Special, or Generic Use. The choice is permanent for this batch and locks the cap (20 for Student, unlimited for the rest).
- Pick the assignee — the user the batch will eventually be handed to. For Student batches this is typically the Proctor running the session; for Staff/Special it's the individual receiving the loaner; for Generic Use it's the TCA/ATCA who will operate the venue terminal.
- Scan each iPad's wallpaper QR. Stay on the same scanner overlay and point the camera at each device's wallpaper in turn. The wallpaper QR encodes the device's identity (city, sequence, hardware serial) — see Wallpaper QR format below.
- Review the scanned list. Each successful scan adds a row showing the device serial and current condition.
- Tap Submit. The batch is created with status In Store; iPads are now bound to this batch but custody hasn't moved yet — they're still in the venue store waiting to be handed out.
The scan validates as you go
If a scanned device is unrecognized (not in the city's enrolled inventory), already belongs to another active batch, or is in Damaged or Missing condition, an inline alert flags the issue and that device is not added. The batch cannot be submitted until every scanned device is recognized, free, and in Clear condition. Resolve the flagged devices first (return the conflicting batch, or replace the damaged unit via Warehouse), then rescan.
Swipe actions on a batch row
Once a batch exists, every action you can take on it is reachable via a swipe on the Batches list. Swipe-left exposes outbound actions; swipe-right exposes inbound and administrative actions. Each button is tinted distinctly so the action is recognizable at a glance:
| Direction | Action | SF Symbol | Tint |
|---|---|---|---|
| Left | Add Device | plus.circle | .indigo |
| Left | Hand Out | tray.and.arrow.up.fill | .orange |
| Right | Transfer | arrow.left.arrow.right.circle | .blue |
| Right | Hand Back | arrow.uturn.backward.circle | .green |
| Right | Cancel Batch | xmark.bin | .red |
| Right | History | clock.arrow.circlepath | .gray |
Hand Out (swipe left → Hand Out)
Marks the batch as handed to the assigned user. Records the timestamp on the batch and on every iPad inside it. Custody moves from In Store to With User. After this point, the batch appears on the assignee's Home screen.
Add Device (swipe left → Add Device)
Opens the same scanner overlay used during creation, scoped to this existing batch. Use it to (a) scan a fresh iPad into a Student batch that hasn't hit its 20-cap, or (b) hand out a previously held-back iPad without creating a new batch. The cap, mode validation, and condition checks all still apply.
Hand Back (swipe right → Hand Back)
Returns the batch (and all its iPads) to the venue store. Records the return timestamp. The flow prompts the user to mark each device's final condition (Clear / Damaged / Missing) before confirming. Damaged or Missing devices are flagged for Warehouse follow-up; Clear devices become eligible to be added to a new batch the next day.
Transfer (swipe right → Transfer)
Reassigns custody of an active batch from one user to another without the intermediate hand-back step. Useful for shift changes mid-event, or when a Proctor leaves early and another picks up the same student session.
Cancel Batch (swipe right → Cancel Batch)
Voids the batch entirely. All iPads inside are released and become free to be added to another batch. Use this when a batch was created in error, or when an event is cancelled before any session begins. Cancelled batches stay in History but are excluded from active dashboards.
History (swipe right → History)
Opens the batch's full audit trail: created → handed out → handed back → cancelled, etc. Each event shows the actor, timestamp, and from/to custody. See the History screenshot below.
Per-device actions inside a batch
Tap the chevron on a batch row to expand it and see every iPad inside. Each device row has its own actions independent of the batch-level swipe:
- Edit (per-device) — change the device's condition (Clear / Damaged / Missing) without affecting the rest of the batch. Use this when, for example, a candidate reports a screen issue mid-session and you want to flag that single device without disturbing the others.
- Replace (per-device) — swap a defective or missing device for a working spare. The replacement scanner opens, you scan the new wallpaper QR, and the new device inherits the old one's slot in the batch (and seat code, in Student batches). The old device is marked Damaged or Missing on the way out.
- Return (per-device) — return a single device back to store while leaving the rest of the batch with the assignee. Useful when a candidate finishes early or leaves mid-session.
So yes — you can hand-back, replace, or change condition for a single device of a batch without touching the rest of it. The batch-level swipe actions operate on the batch as a whole; the per-device actions operate on one iPad.
Seat math
- 20 devices per line in a student batch. Lines are alphabetical: A, B, C … Z, then AA, AB, …
- Lines per city are calculated as
ceil(seatCapacity / 20). Riyadh and Jeddah at 500 seats each get 25 lines (A–Y); Dammam at 400 gets 20 lines (A–T); Abha and Mubarraz at 250 each get 13 lines (A–M) where line M holds 10 seats; Medina and Ras Tanura at 225 each get 12 lines (A–L) where line L holds 5 seats. - Backup seats use suffix
BAK1,BAK2— not counted in the 20-per-line cap. - Seat codes encode as
CITYCODE-LETTER-NN, e.g.RIY-A-07. - Replacement keeps the seat — if device
T9GN9Y37GHatRIY-A-07fails and you replace it, the new device inherits seatRIY-A-07and the batch document updates in place. The old device gets a replacement document stub.
Smart search
The Inventory search bar parses 4 inputs: a city code, a batch code, a seat code, or a device serial. The parser auto-detects which and narrows the list instantly. Partial matches work — typing RIY-A narrows to all seats in line A of Riyadh.
Scanner formats
The Inventory scanner reads QR, Code128, Code39, EAN13, EAN8, and UPCE. During a scan, the device-condition cycle is three-state: clear → damaged → missing. Tap the condition pill to advance the state before confirming the scan.
Wallpaper QR format
Each enrolled iPad carries a wallpaper QR generated by the app. The payload format is:
CITYCODE-X-SEQ(SERIAL)
Example: RIY-X-13(T9GN9Y37GH)
The X is a literal segment indicating "cross-batch mobile asset". The sequence is the numeric order in which the device was enrolled in the city. The serial in parentheses is the hardware serial — this is what warehouse scans match against.
Dashboard tabs
The Inventory Dashboard has three top tabs:
- Logs — chronological list of every inventory event. Filterable by batch, user, action type.
- Box QR Labels — launches the labeling workflow. See the Box Labeling section.
- Dashboard — aggregates: devices by status, by condition, by city, by mode. Used for end-of-event reconciliation.

Warehouse pipeline.
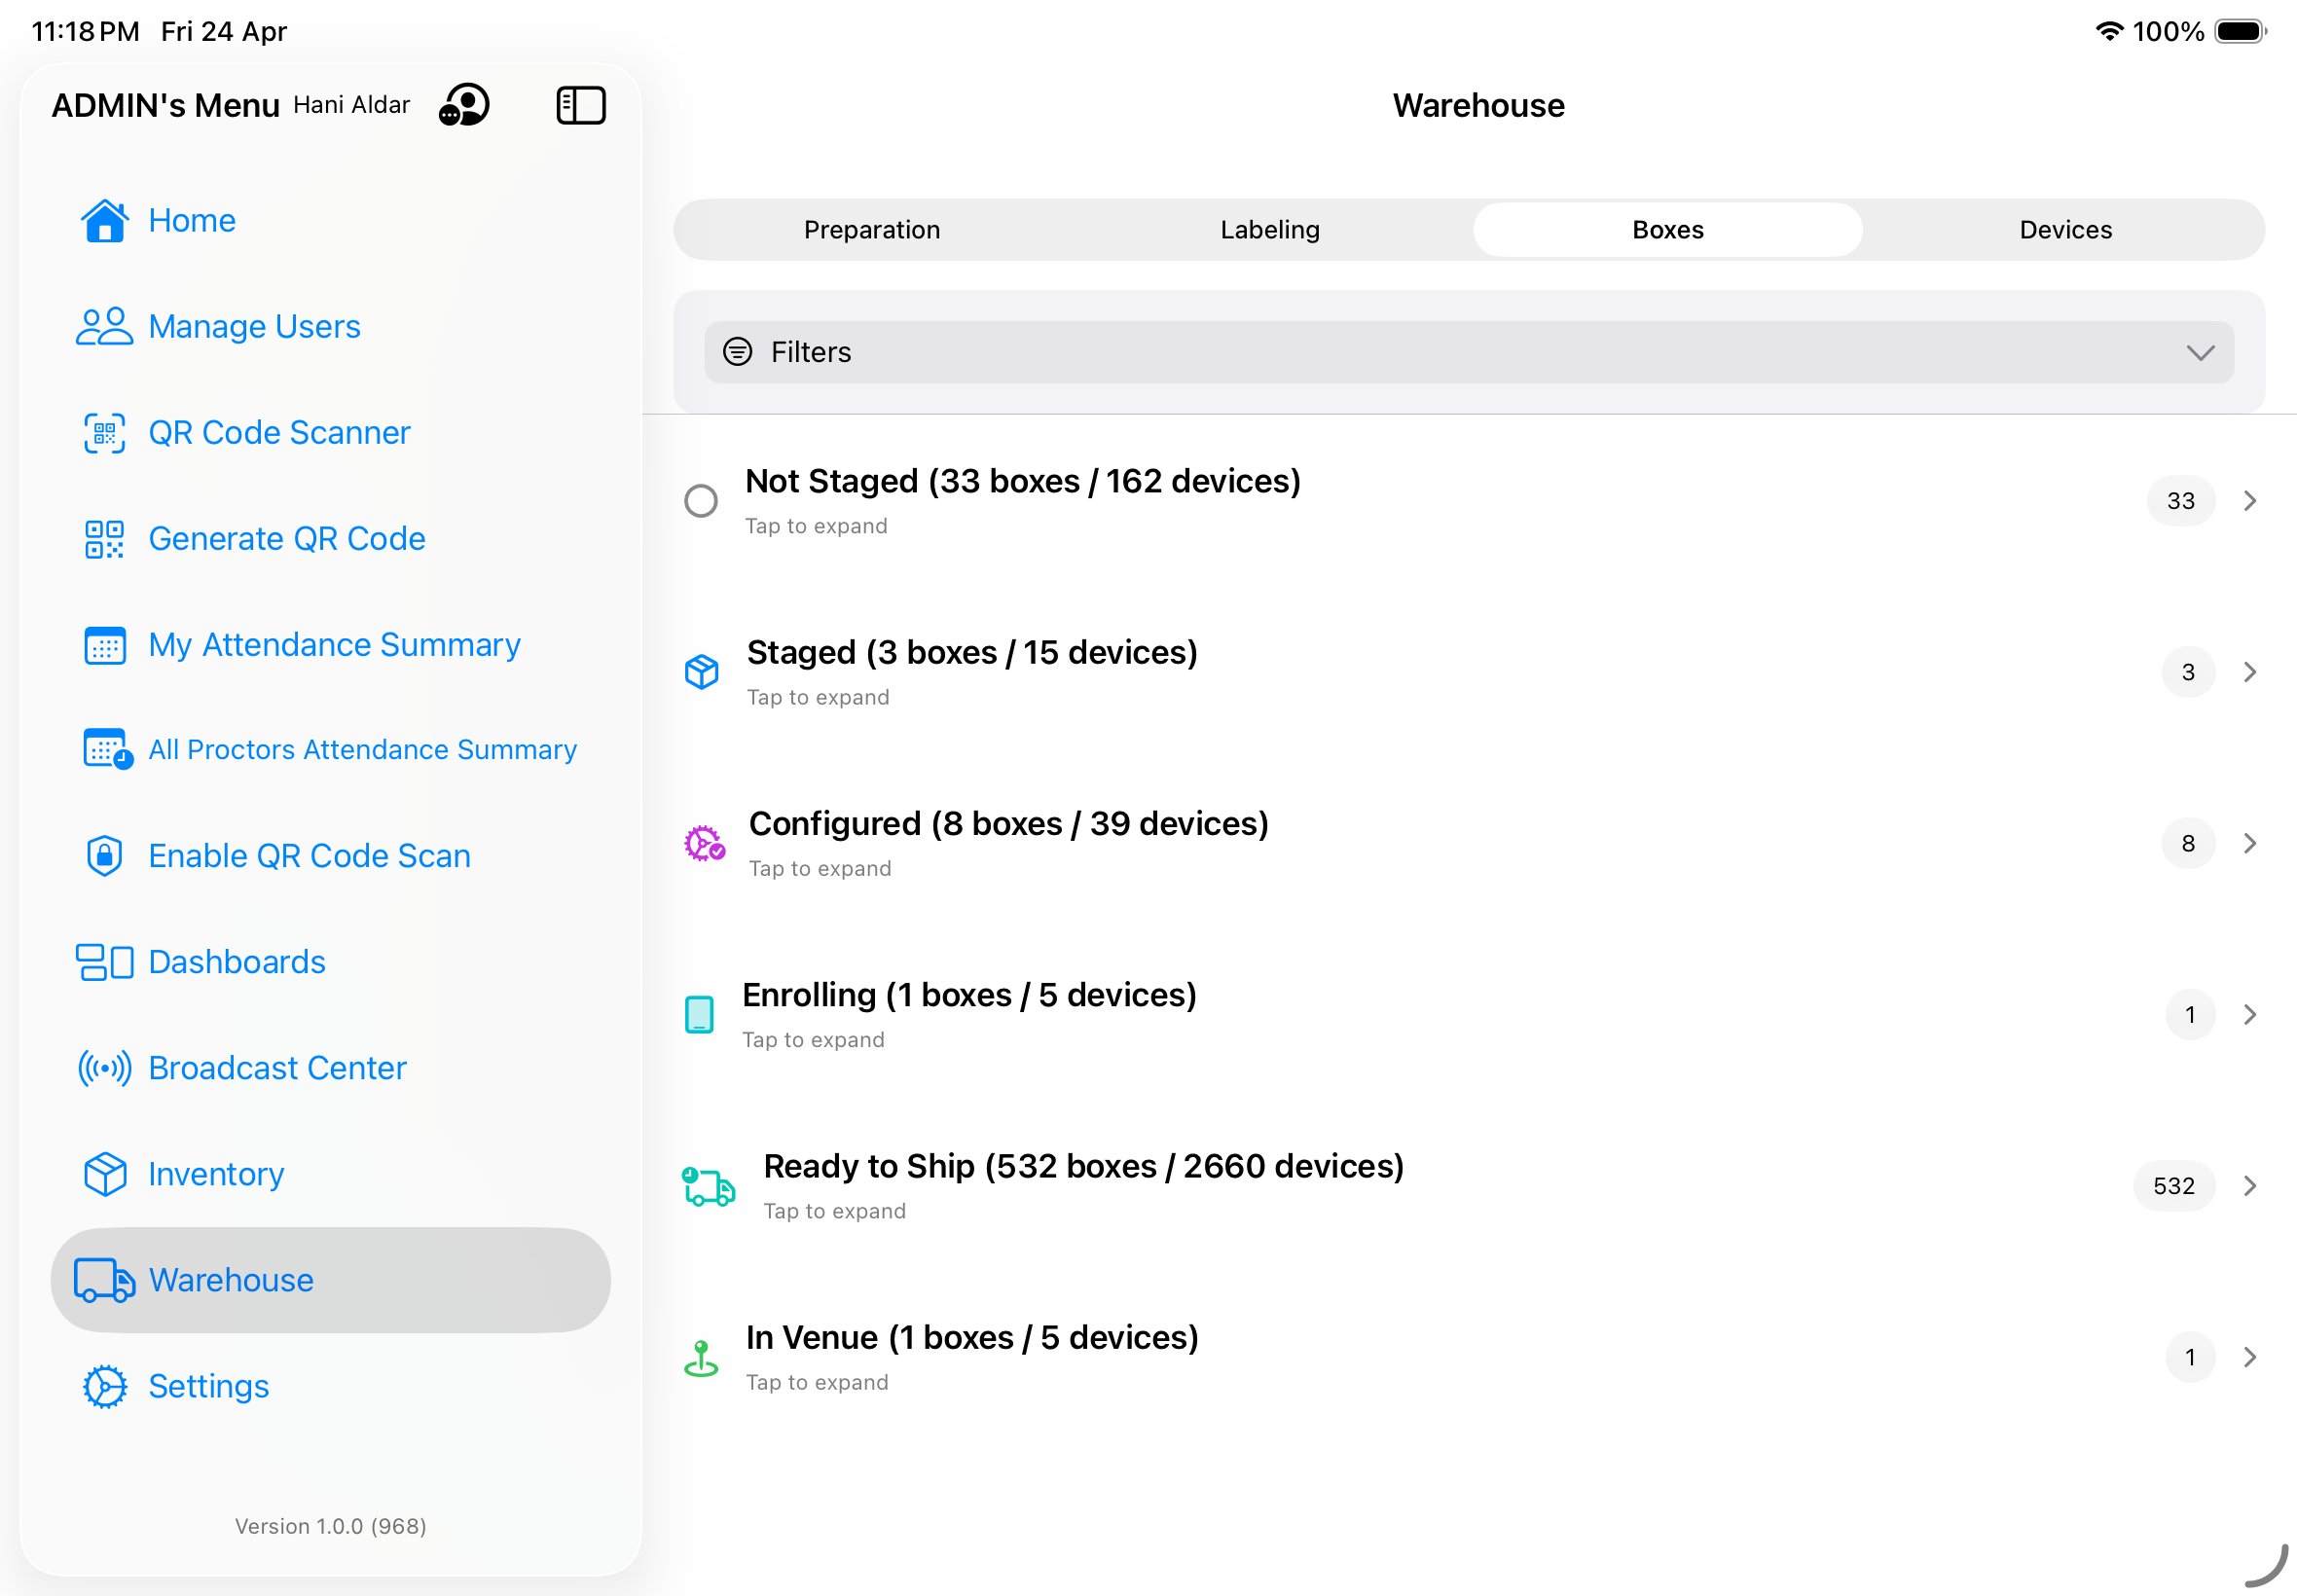
The prep flow every box travels before an event — from unstaged assets on the warehouse floor, through configuration and enrollment, out to the venue, and back for a final count. Ten stages, strict transitions, and an Admin recovery path for anomalies.
The ten stages
| Stage | Color | What happens | Who advances |
|---|---|---|---|
01 Not Staged (.notStaged) | .secondary | Devices exist in the warehouse but have not been selected for this event. | System (default state) |
02 Staged (.staged) | .blue | Devices selected and physically gathered for the event. The box has an identity, but its contents are not yet configured. | Warehouse role |
03 Configuring (.configuring) | .indigo | Device profiles, restrictions, and any custom settings are being applied. Supervised mode, MDM payload, wallpapers. | Warehouse + Tech |
04 Configured (.configured) | .purple | All settings applied and verified. Box ready to be enrolled into the event scheme. | System (auto on config complete) |
05 Enrolling (.enrolling) | .teal | Warehouse operator scans each device serial into the event scheme. The box gets its scheme tag and manifest. | Warehouse role |
06 Ready to Ship (.readyToShip) | .mint | All serials confirmed. Box sealed, labeled via the labeling wizard, and placed in the logistics queue. | Warehouse role |
07 Shipped (.shipped) | .brown | Logistics has picked up the box. Handover approval state moves pending → approved. Box is in transit. | Warehouse + TCA |
08 In Venue (.inVenue) | .green | Box delivered on-site. TCA confirms receipt with a scan. | TCA |
09 Back to WH (.returnedToWH) | .orange | Post-event return. Devices come back to the warehouse, get counted and condition-checked. Missing devices flagged. | Warehouse role |
10 Completed (.completed) | .primary (white in dark mode, black in light) | Cycle complete. Boxes reset and available for the next scheme. | System (auto) |
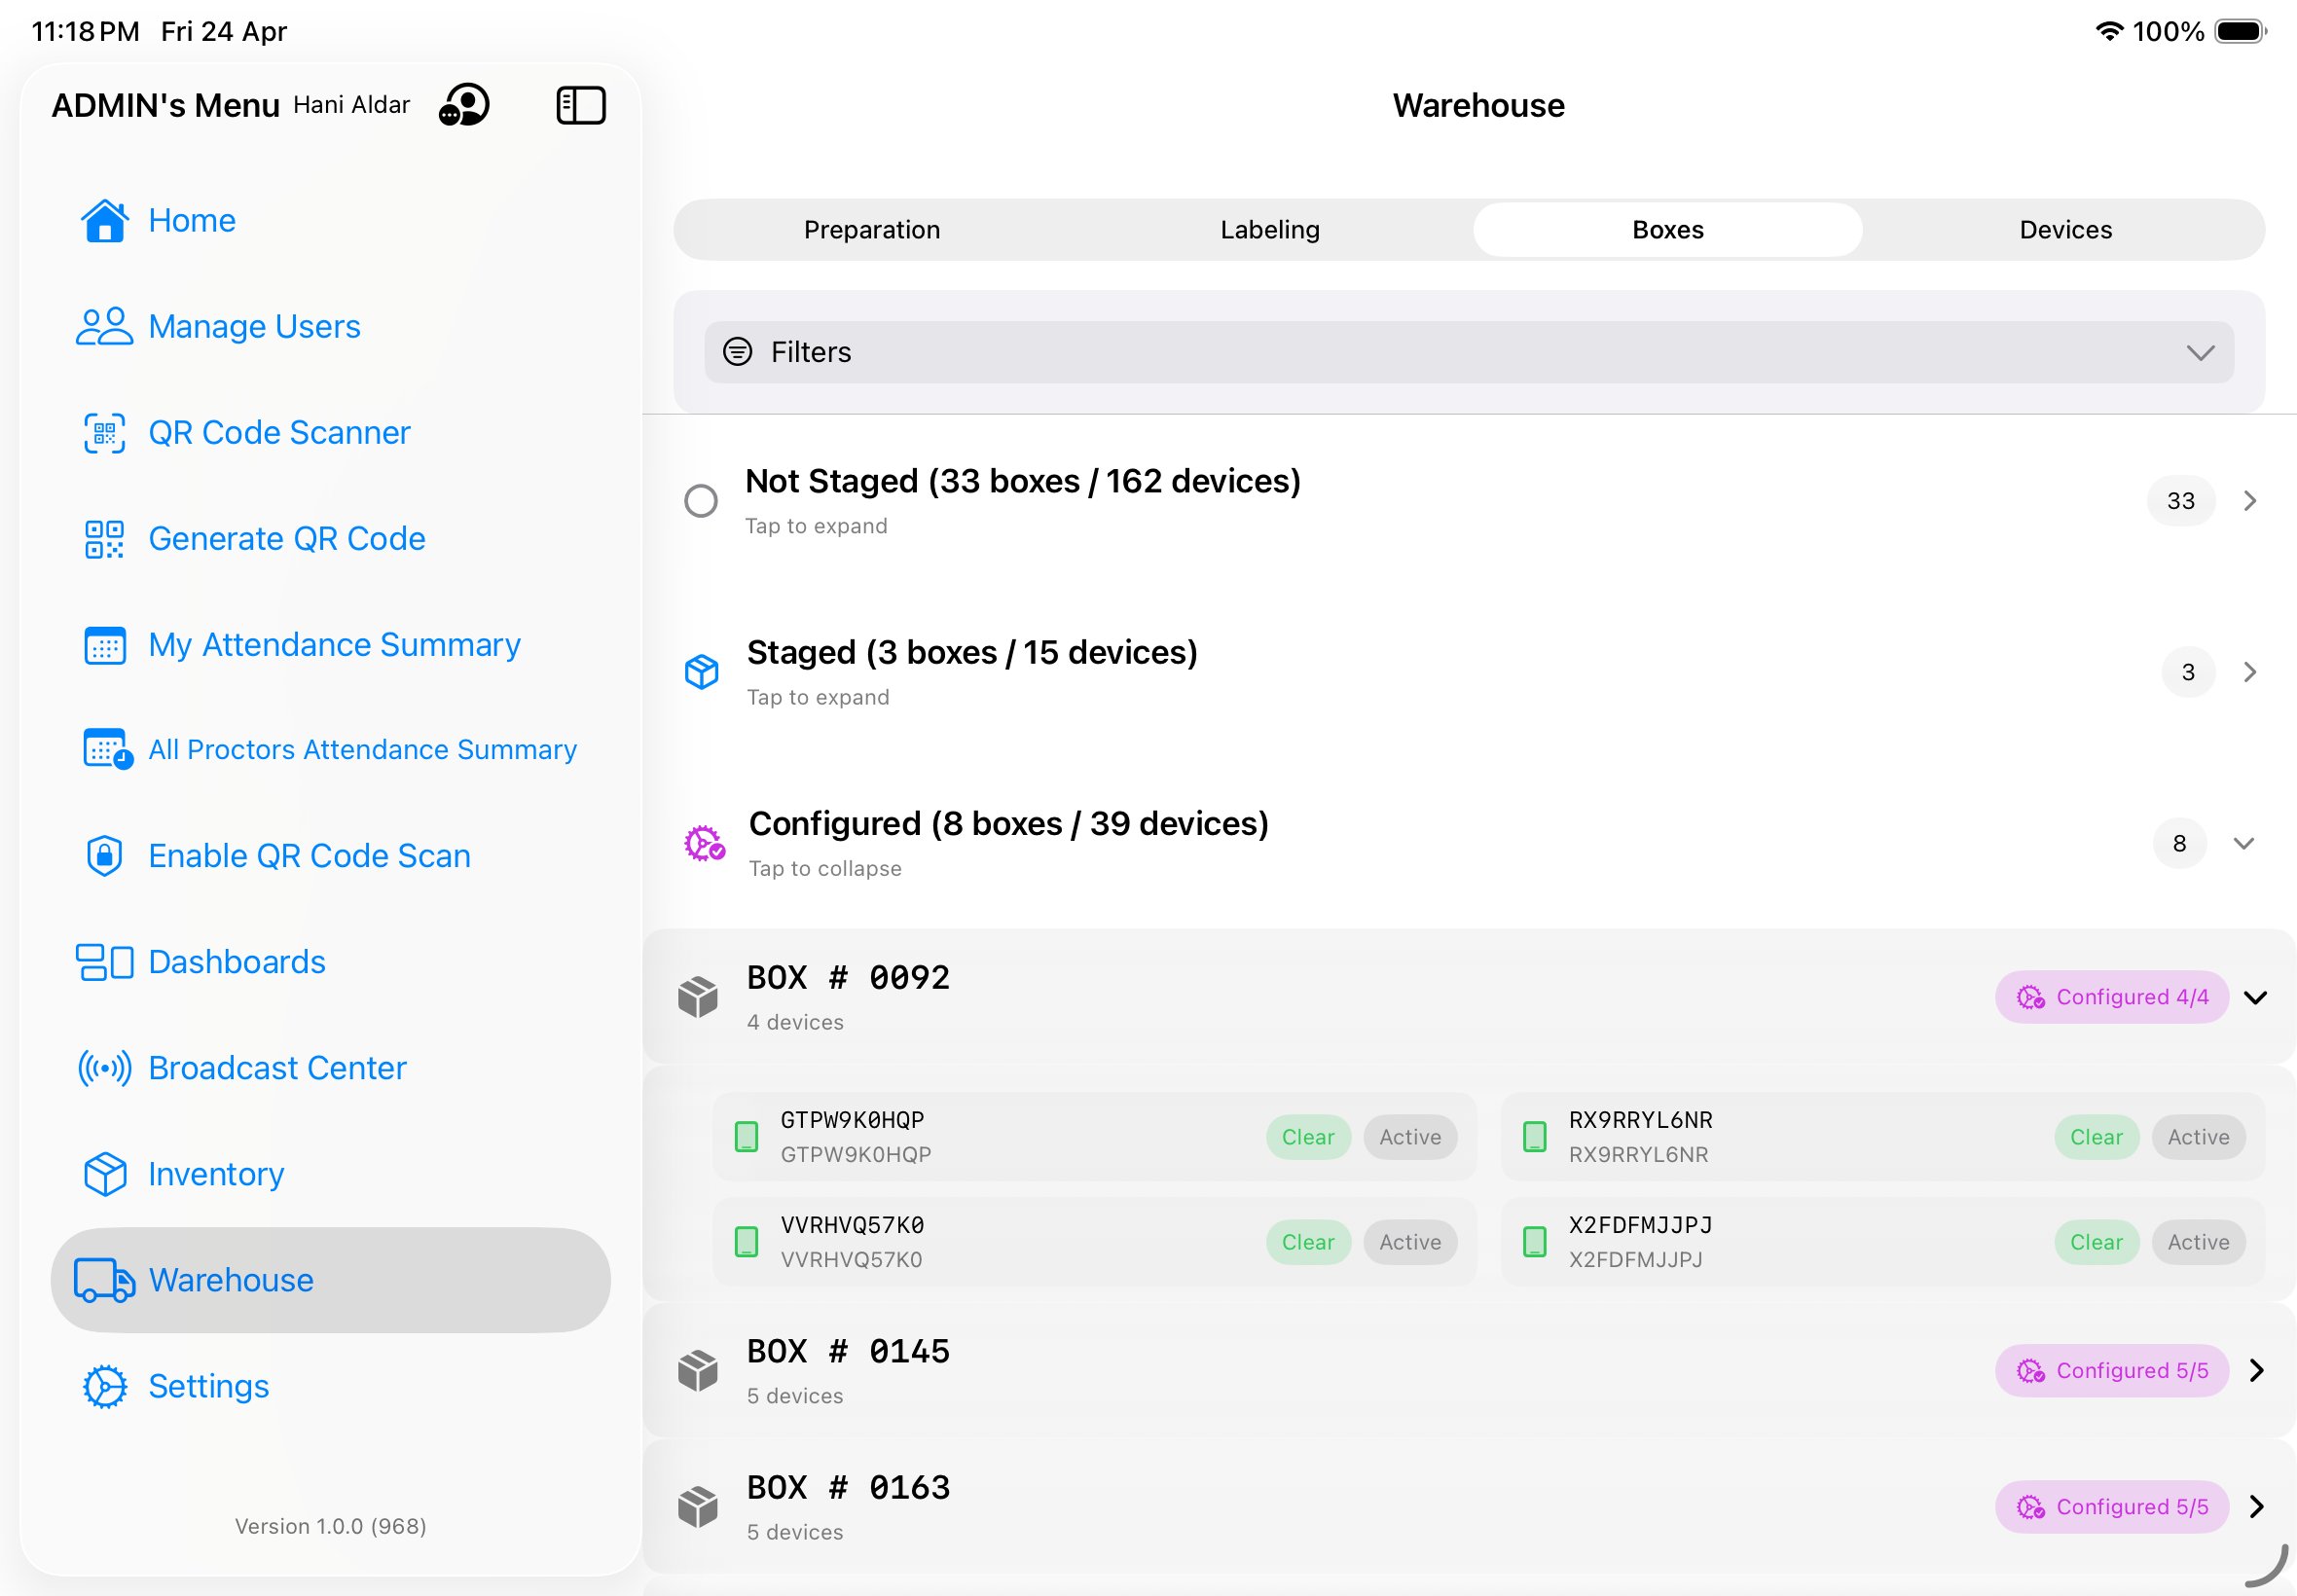
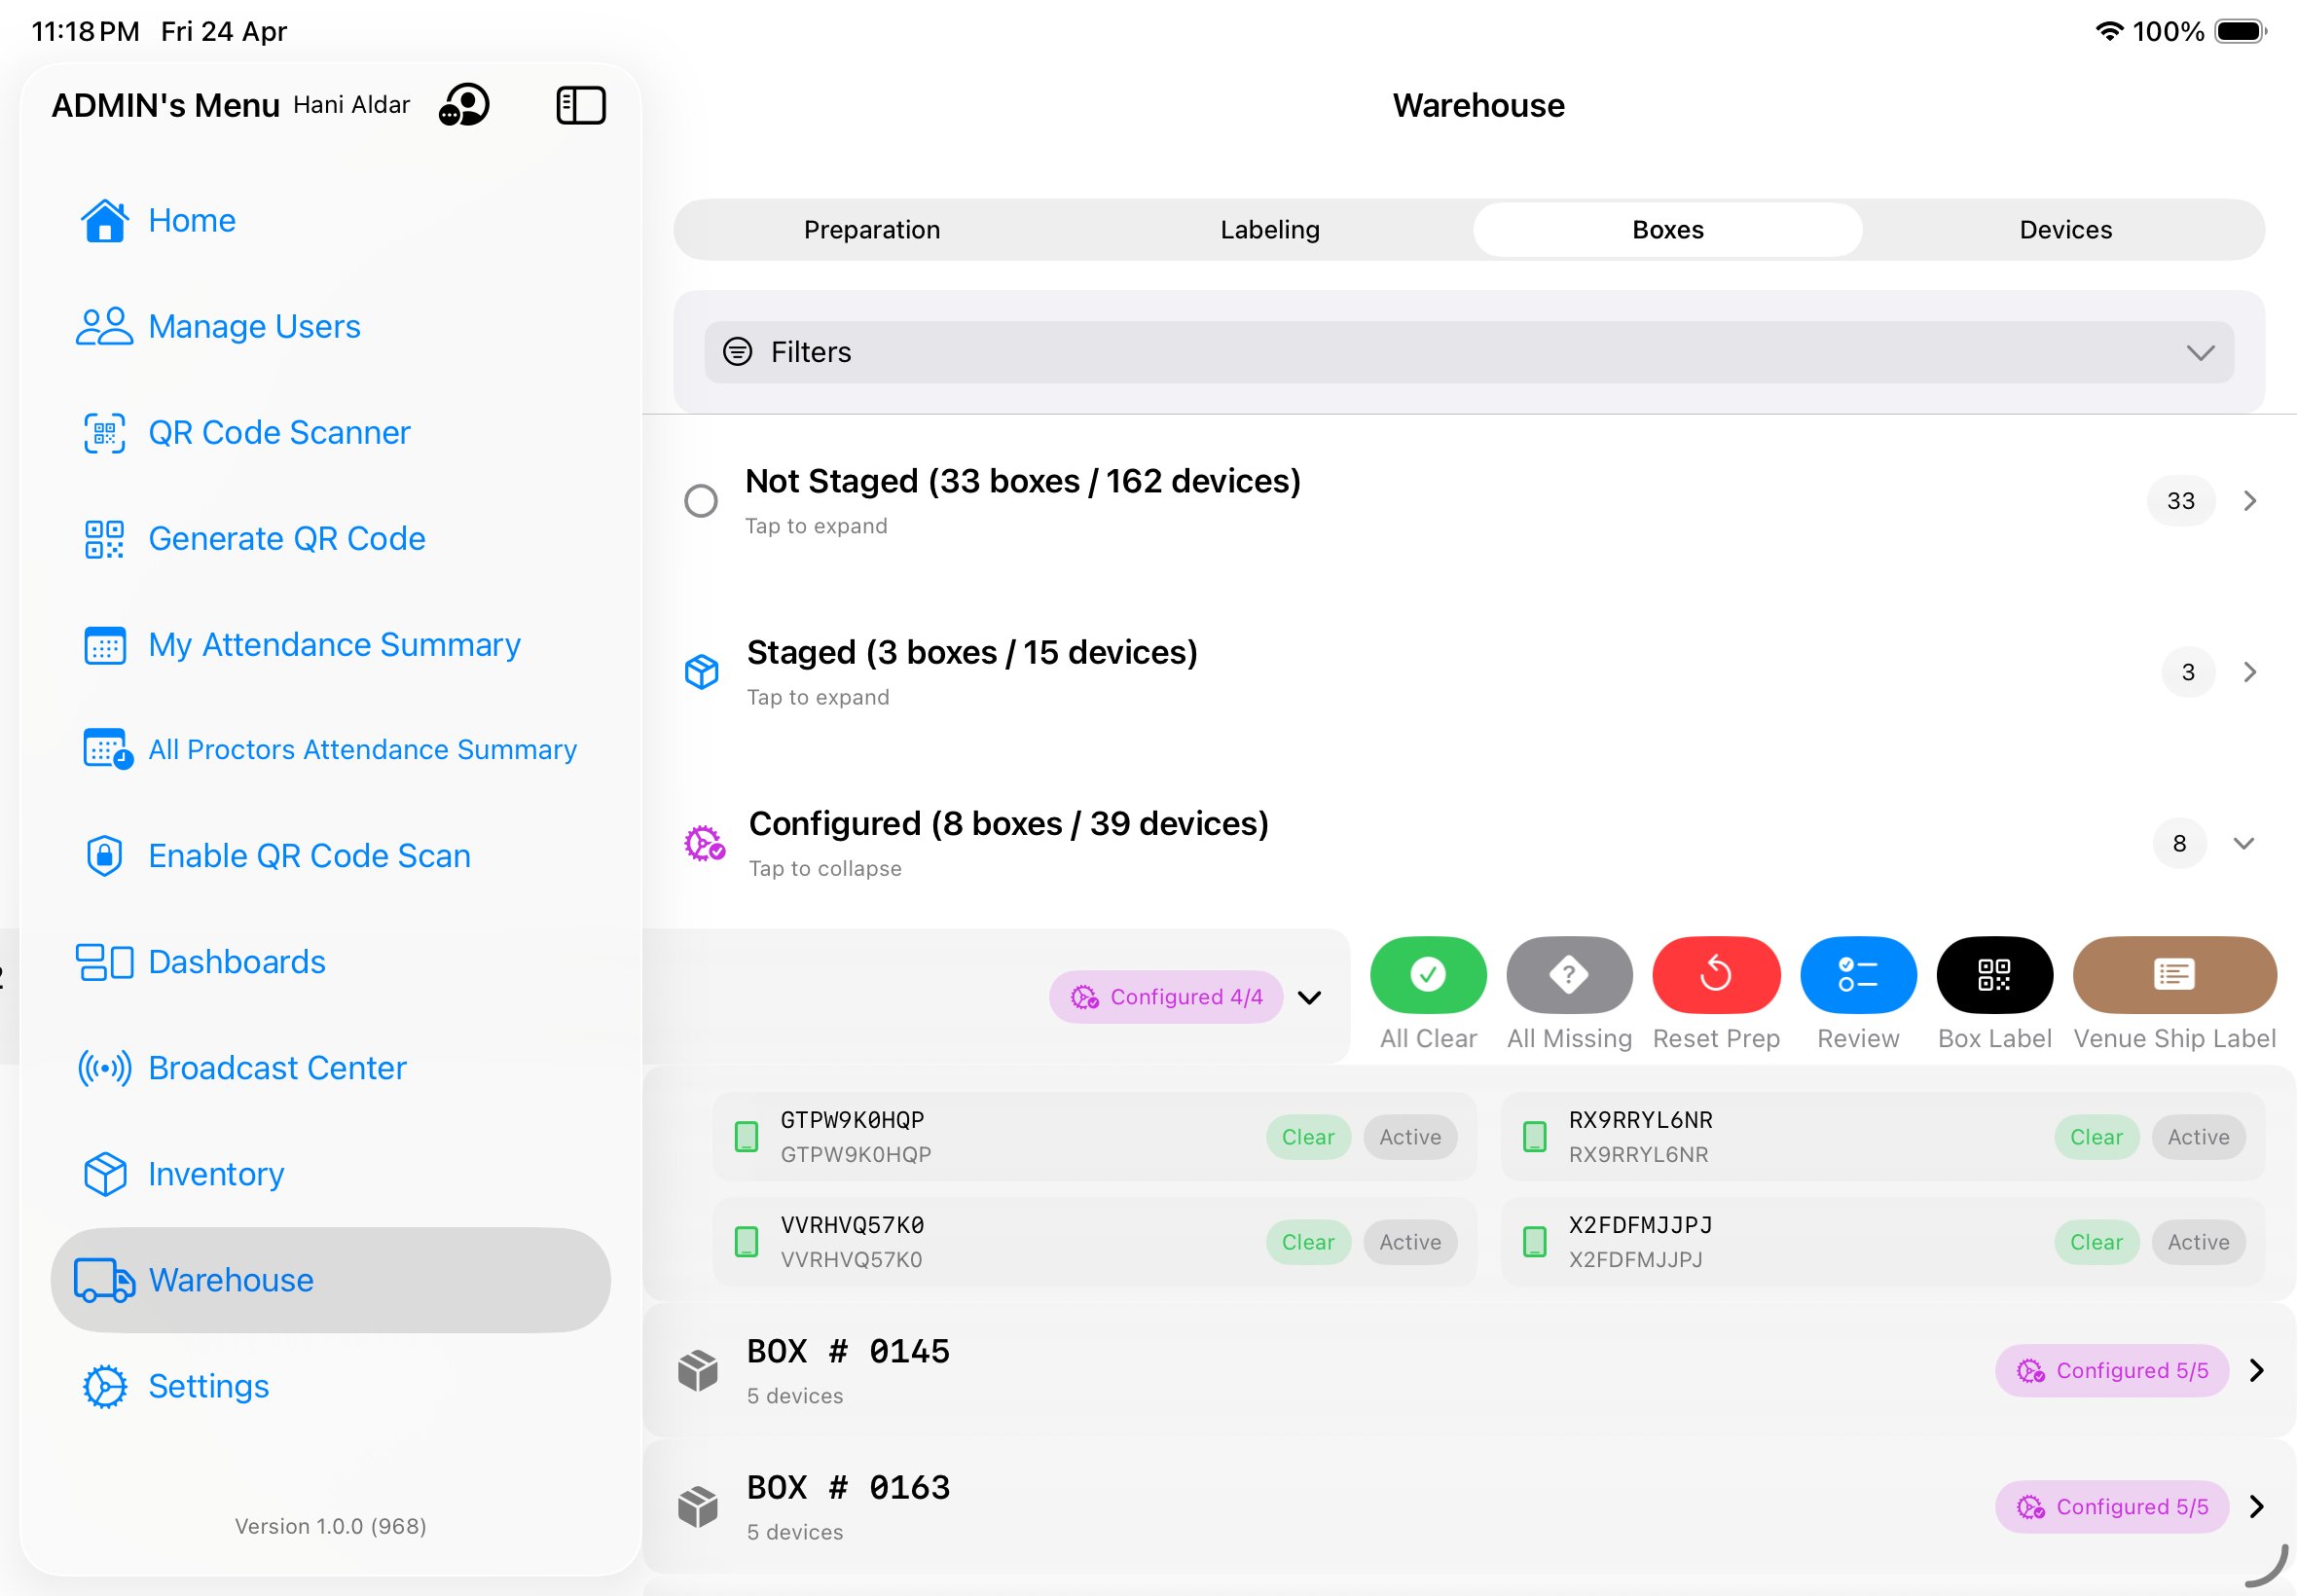
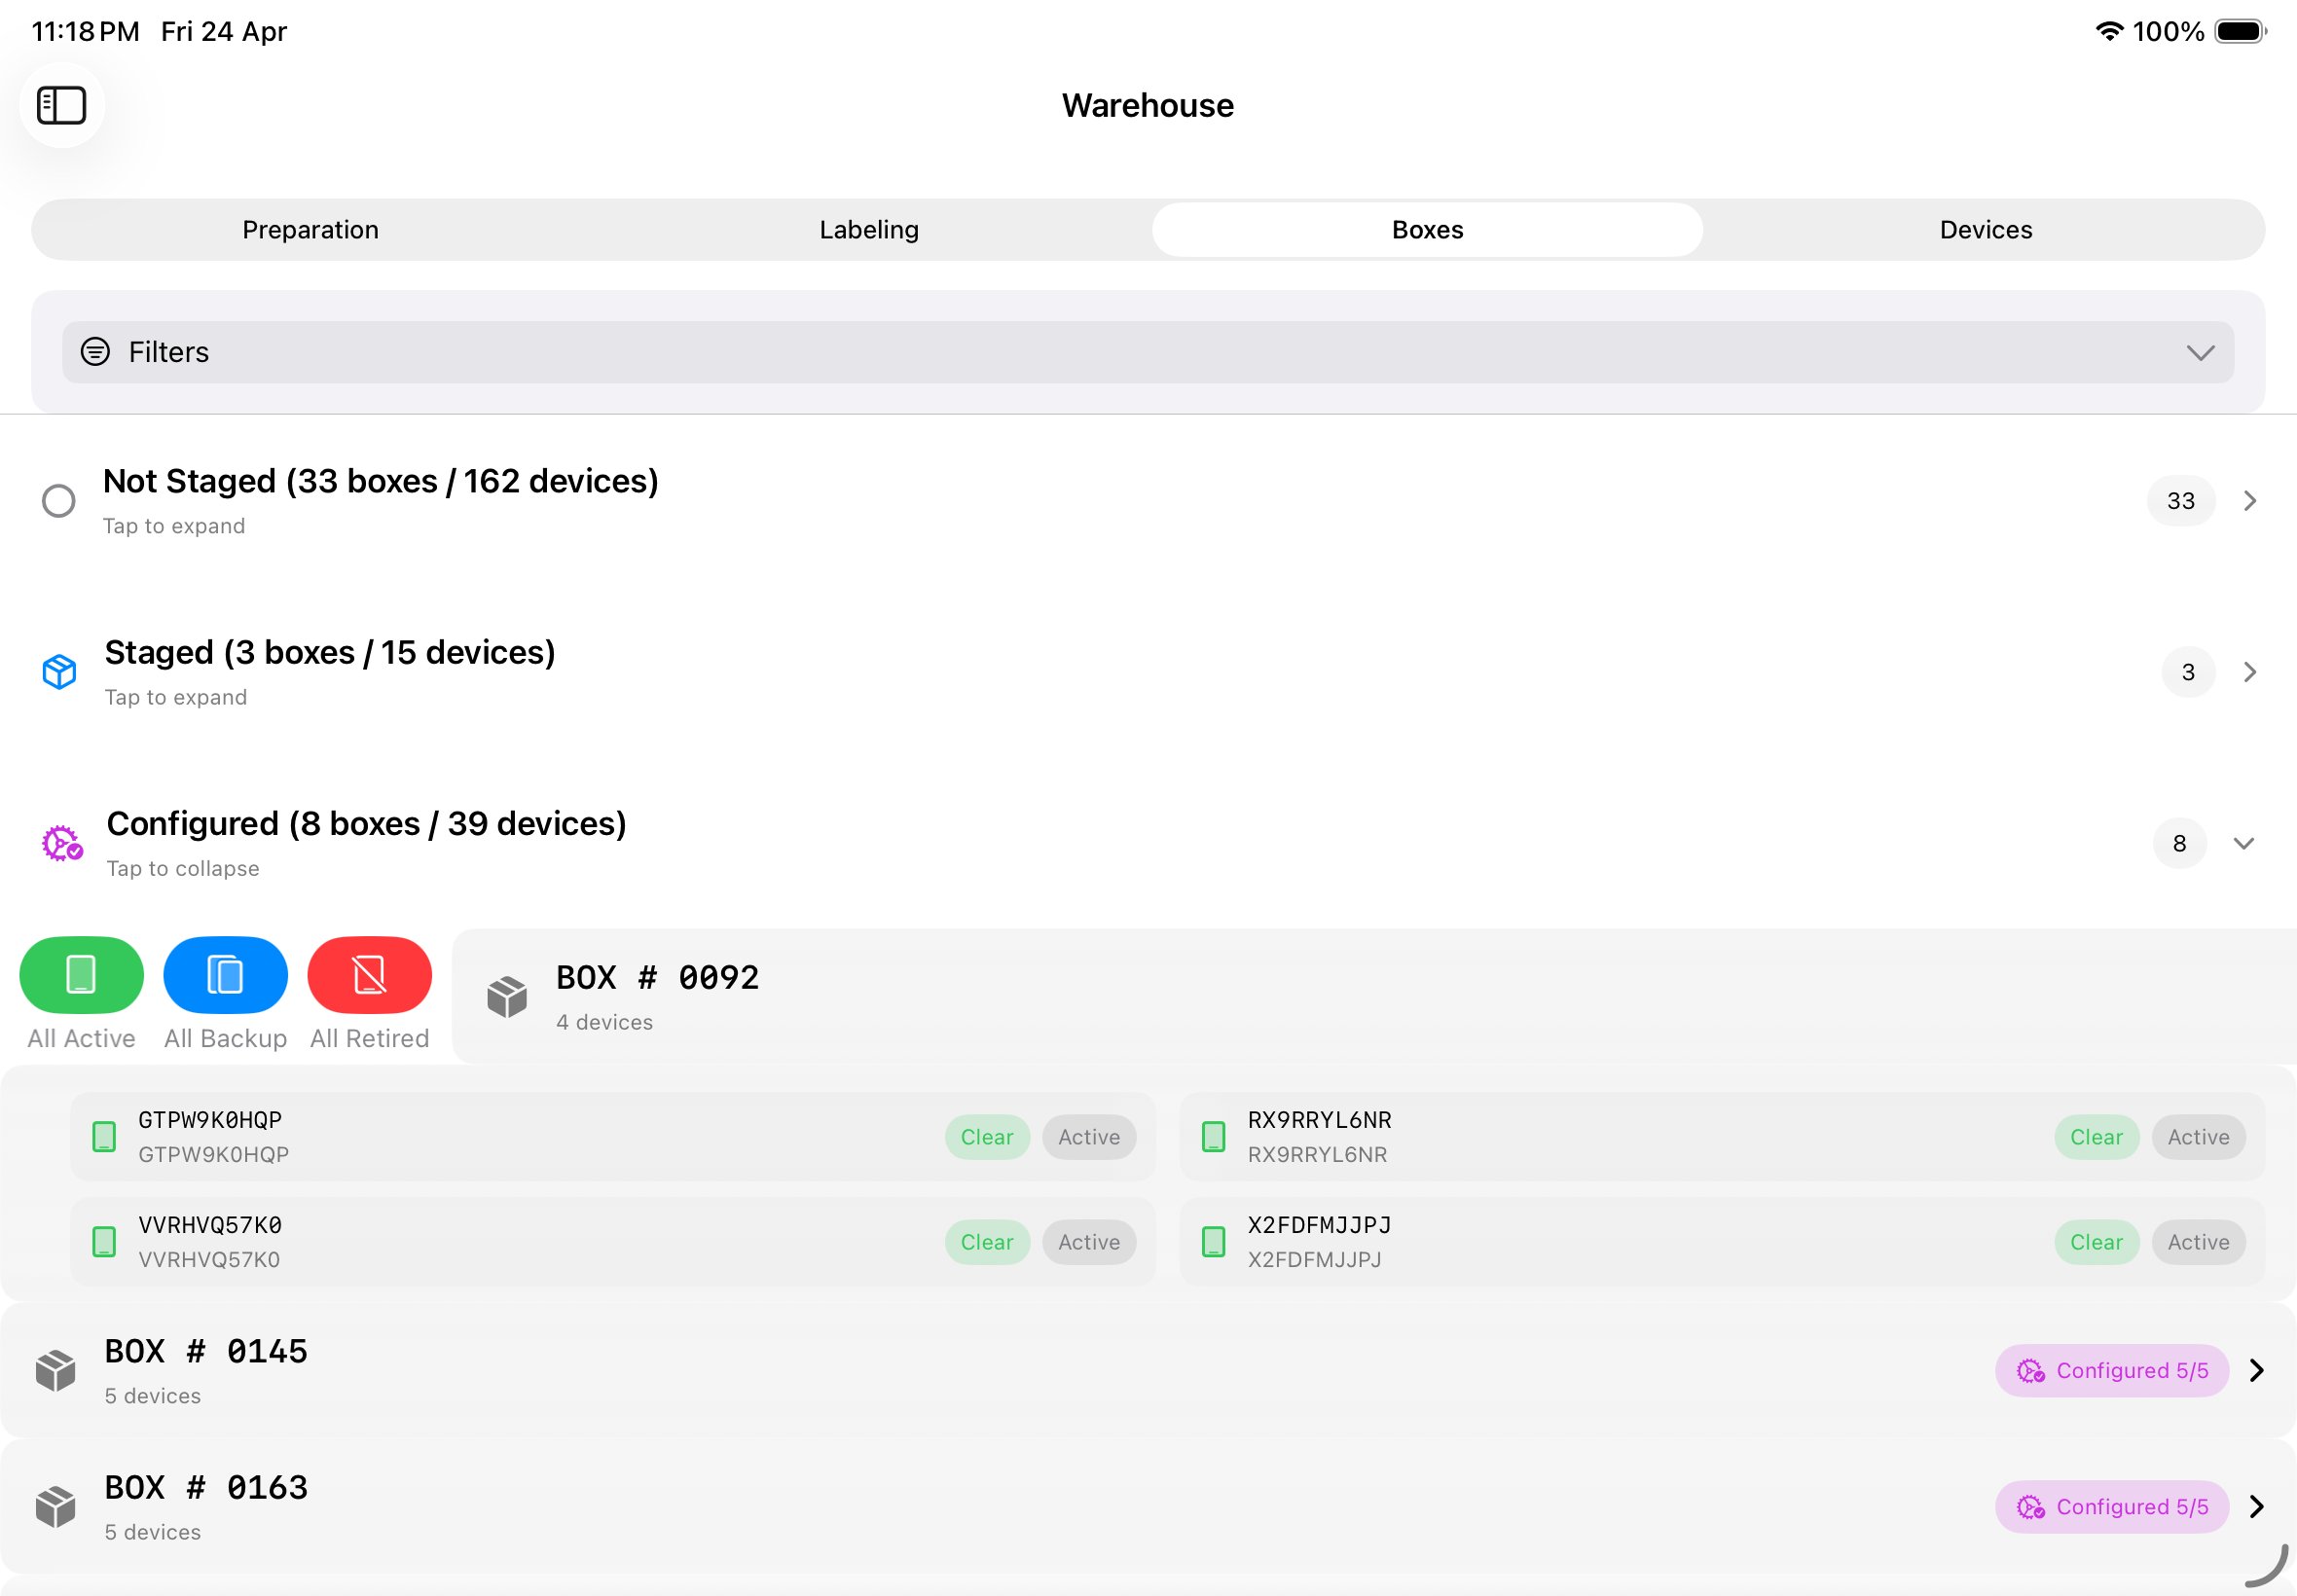
Working with boxes
The Warehouse screen's Boxes tab groups every box by stage. Tap any stage to expand its list; each box row shows its number, device count, and a stage chip (color-matched to the pipeline). Tap a box to expand device-level detail with per-device condition pills (Clear / Damaged / Missing / Malfunction) and lifecycle state (Active / Backup / Retired).
HandoverState values
The Ready to Ship → Shipped → In Venue transitions use a separate state machine for approvals:
- none
- Pre-handover. No approval pending yet.
- pending
- Warehouse has marked the box Ready to Ship; logistics / TCA has not yet acknowledged.
- approved
- TCA has scanned and confirmed receipt at the venue. Stage advances to In Venue.
- rejected
- TCA found missing or damaged boxes; warehouse must reconcile before advancing.
The start() method — four cases
Opening a box in the warehouse view triggers WarehousePrepFlowService.start() which branches into four cases based on the box's current state:
- New box — never enrolled. Creates a fresh prep flow document at stage 01.
- Label mismatch — scanned label doesn't match any box document. Surfaces a "Label not recognized" error with a suggestion to restage.
- Not-staged restage — box exists but is at stage 01. Resumes enrollment from the current scan cursor.
- Completed restage — box was fully cycled but is being reused for a new event. Prompts for confirmation, then resets to stage 01 with a fresh scheme tag.
Strict logistics transitions
The advanceLogisticsStage method enforces a transition table. You cannot skip stages or jump backward without the Admin recovery permission. Valid forward transitions:
Not Staged     → Staged
Staged         → Configuring
Configuring    → Configured
Configured     → Enrolling
Enrolling      → Ready to Ship
Ready to Ship  → Shipped         (requires handover pending)
Shipped        → In Venue        (requires handover approved)
In Venue       → Back to WH
Back to WH     → Completed       (requires reconciliation complete)
Enrollment recovery
When enrollment stalls mid-flight (e.g. app crash during serial scanning), a user with the warehouseEnrollRecovery permission can trigger the recovery flow. This is gated behind a confirmation alert to prevent accidents, and every recovery event writes an audit record.
Summary dashboard
The Warehouse → Summary tab aggregates KPIs for the current scheme: boxes by stage, operator productivity, avg stage duration, and an employee-activity drilldown that lets you click any operator and see every action they took across the event cycle.
Recovery is not reversal
Recovery resumes a stalled flow — it doesn't undo a completed stage. To reverse a stage advancement, an Admin must use Manage Settings → Warehouse to manually edit the stage field with a reason in the audit log.
Box labeling.
A three-step wizard that creates standardized PDF labels for boxes and venue shipments. Deterministic payloads ensure the same box always generates the same label, regardless of who prints it.
The three-step wizard
- Scan Box — scan the box's QR wallpaper. If the box is new, you're prompted to create a box document. If existing, you see a summary of what's currently inside.
- Scan Serials — scan each device serial going into the box. Max 5 serials per label. The wizard validates against the inventory to prevent double-boxing.
- Preview & Print — preview the generated label (A4 or Letter landscape). Confirm to print and advance the box to Ready to Ship.
Validation states
- newBox
- No prior document. Wizard creates one.
- existingClean
- Box exists with matching contents. Re-print only.
- existingInconsistent
- Box exists but contents don't match scan. Prompts to reconcile.
- locked
- Box has advanced past Ready to Ship. Labeling is blocked; contact Admin.
Venue shipping labels
For venue-wide shipping, a separate PDF template renders seat mappings: 20 seats per line, 15% margin around the edge, with city code banner at the top. Gender-mixed flag is currently a TODO — hold for the next scheme release.
Serial constraints
- Serial length: 8–14 characters.
- Alphanumeric only (A-Z, 0-9). Lowercase is auto-uppercased.
- No separators, no hyphens.
Deterministic JSON payload
Every label encodes a JSON payload that the scanner can round-trip without ambiguity:
{
  "box": "BOX-RIY-2026-0047",
  "scheme": "2026",
  "city": "RIY",
  "serials": ["T9GN9Y37GH", "T9GN9Y38GH", "T9GN9Y39GH"],
  "mode": "studentSeatMapped",
  "version": 1
}Settings & configuration.
Every rule the app follows lives here — business schedules, special periods, role activation, role permissions, cities, asset and container types. Settings is admin-only; non-admins won't see the entry in their menu.
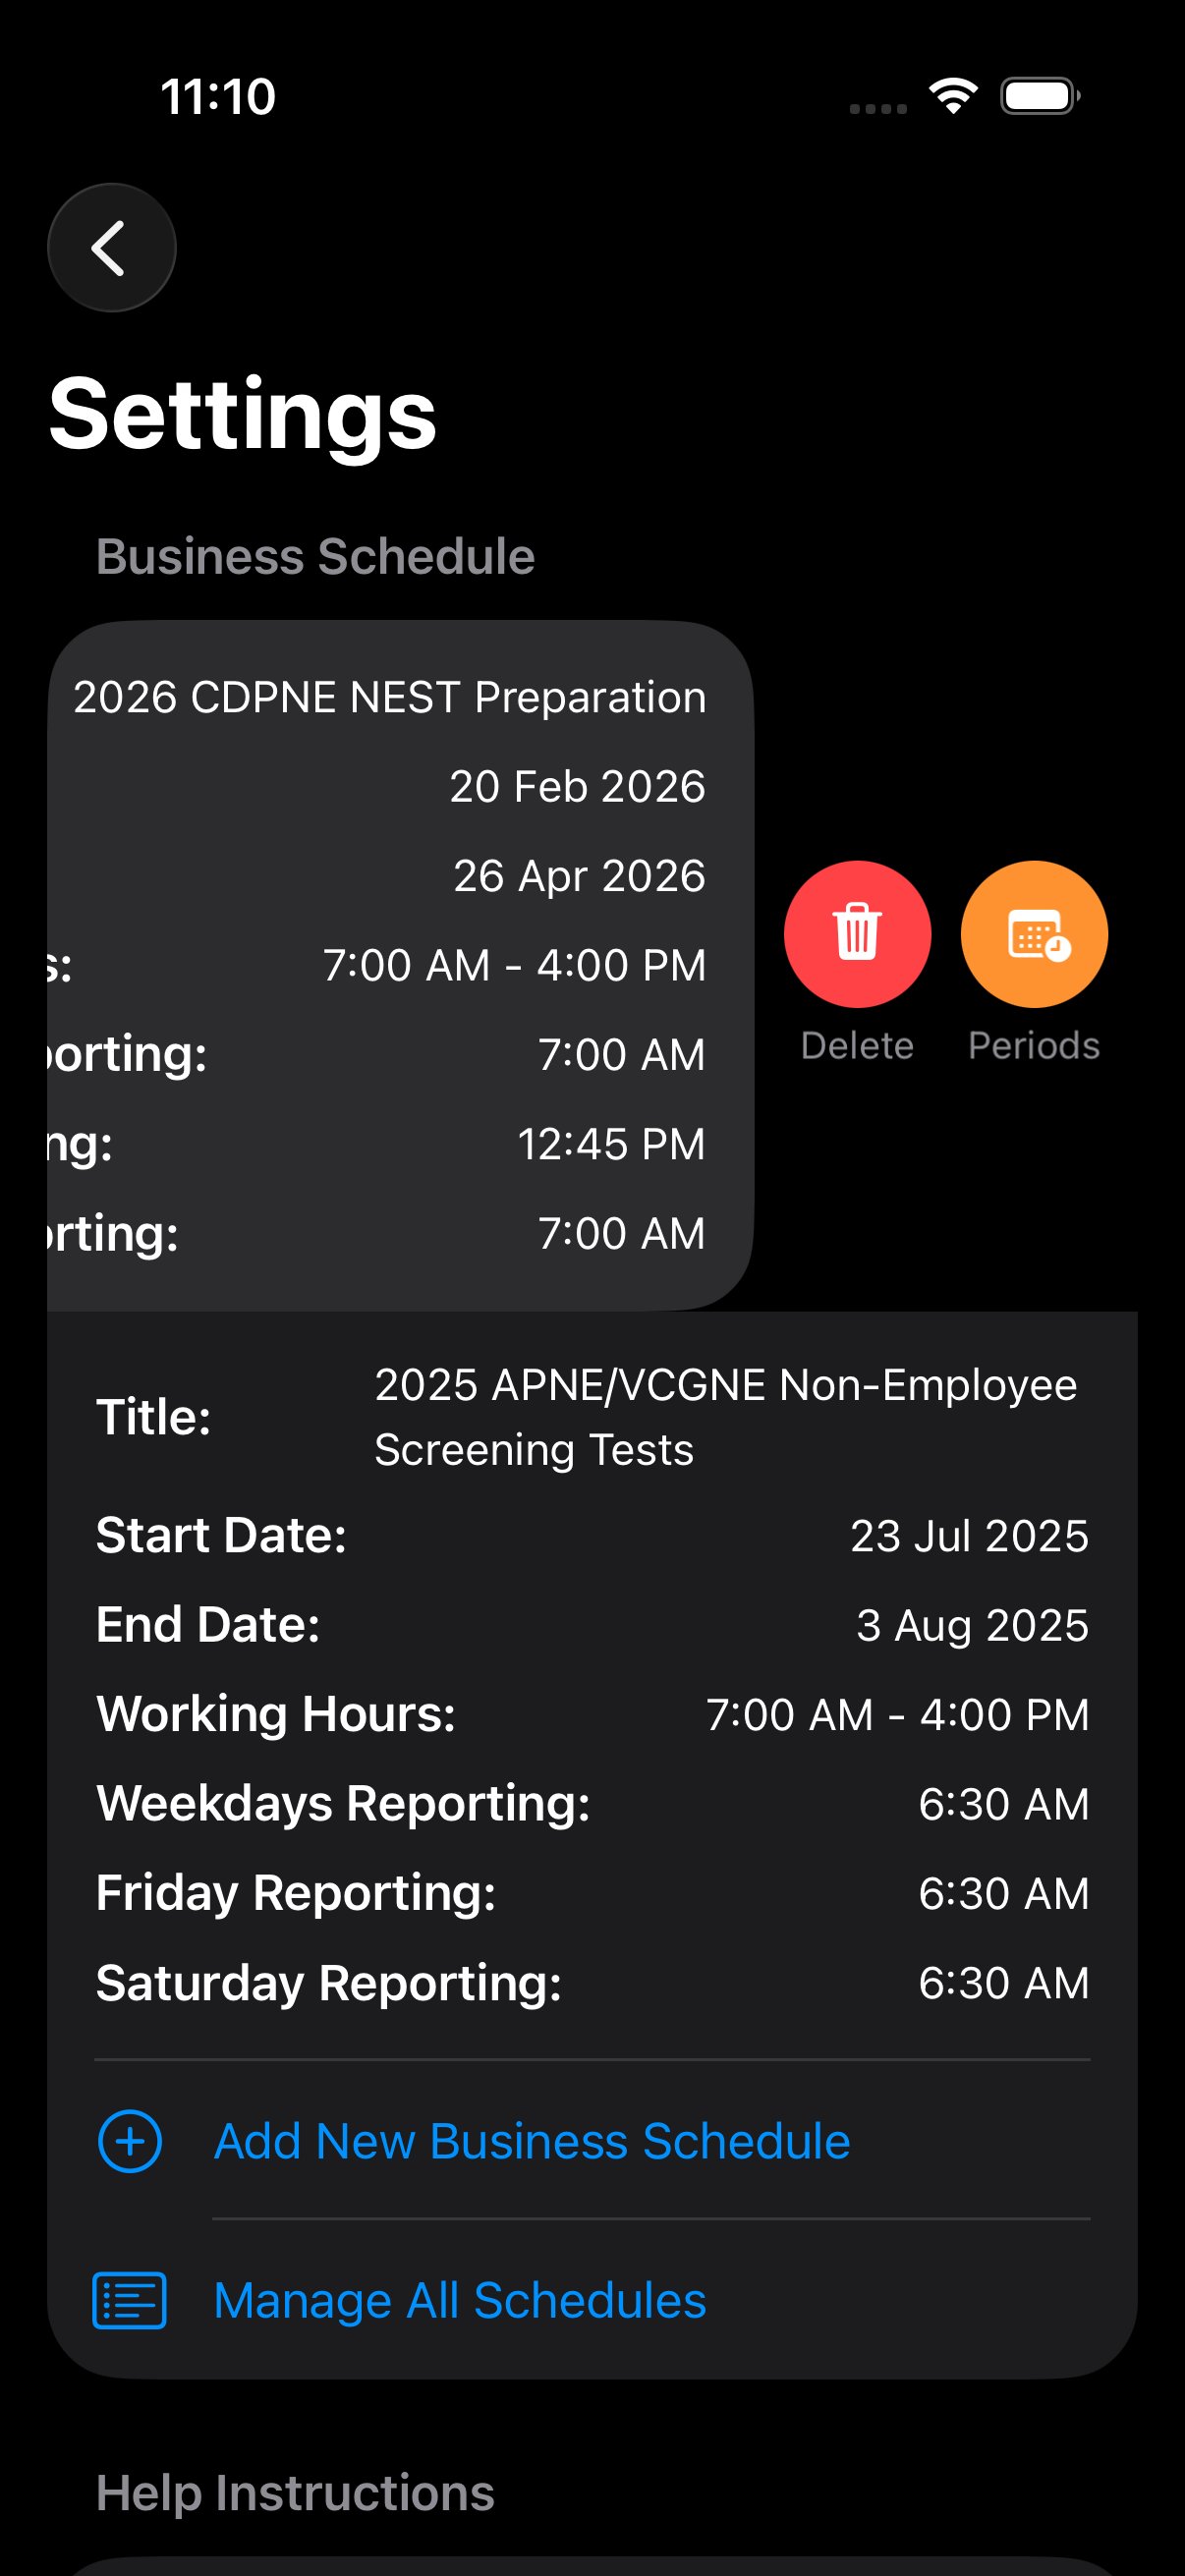
Business Schedule
Each Business Schedule is a named window with its own working hours and reporting times. Multiple schedules coexist (one for each event), and the active schedule is whichever one currently brackets today's date. The schedule sets the daily threshold against which OT is calculated and the expected reporting times the iPad enforces during attendance scans.
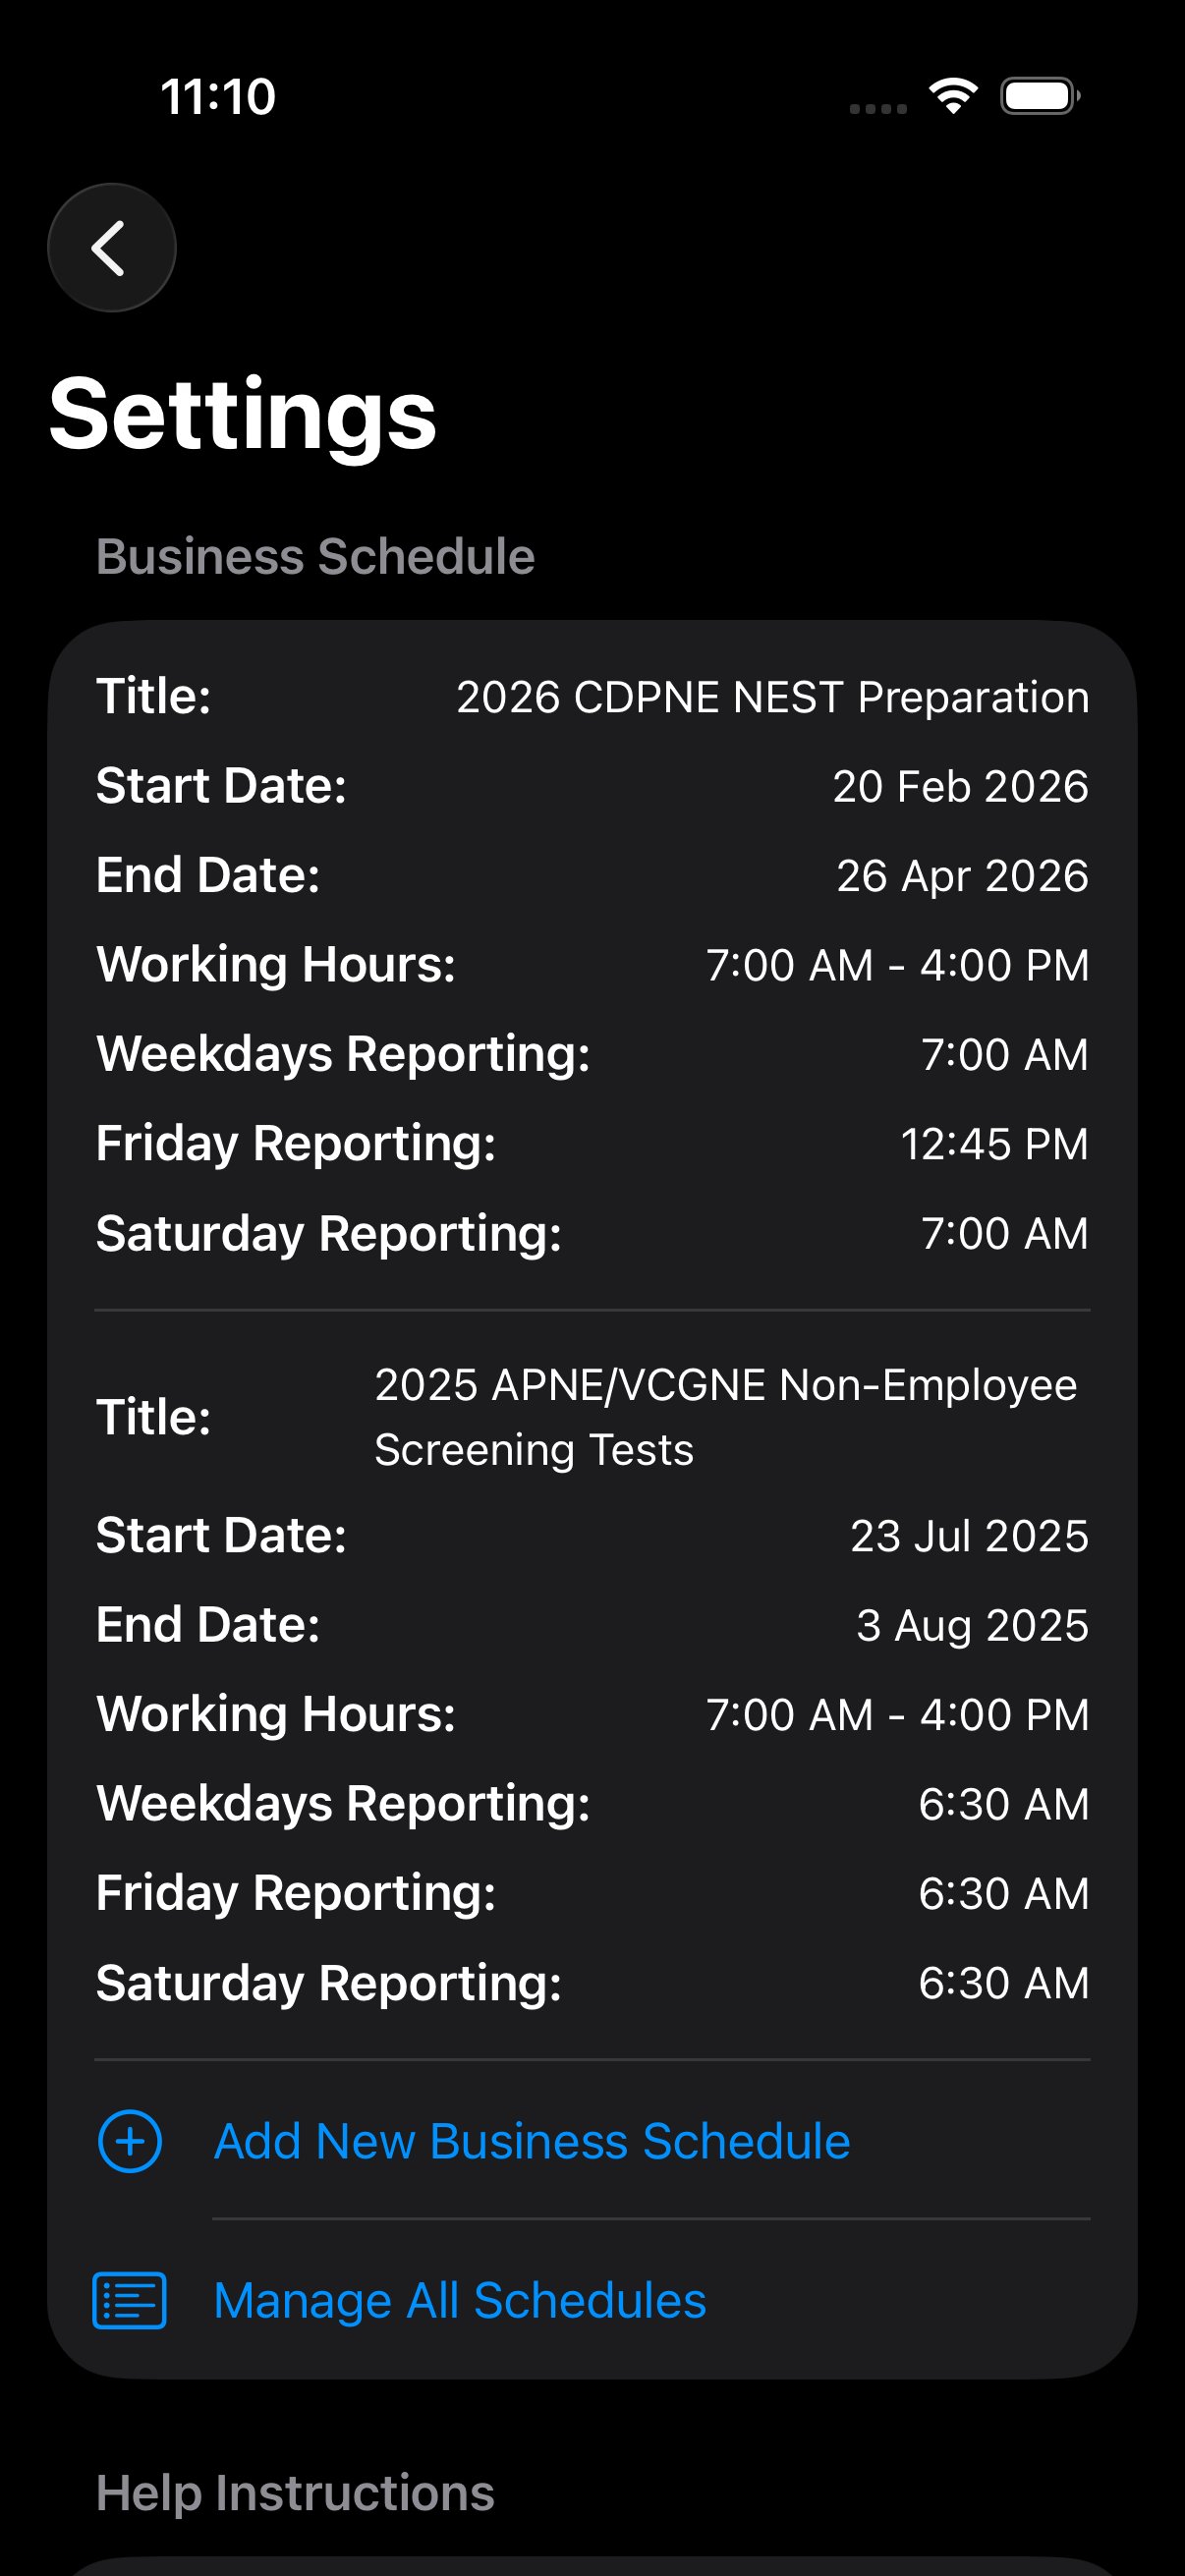
Long-press on any schedule reveals a context menu with two actions: Delete and Periods (open the Special Periods sub-editor for that schedule). Editing reporting times after attendance has been logged is allowed but will not retroactively re-classify existing records as on-time/late.
Special Periods
Overrides applied for specific date ranges within a schedule. Three built-in types:
- Holiday — 100% OT. Name and date range required (e.g. "National Day" · Sep 23–24).
- Ramadan — reduced daily threshold (default 6.0 h). Lunch block is swapped for an Iftar break.
- Special Duty — custom schedule for high-intensity events. Free-form hour overrides.
Cities Management
Cities are the geographic scope of every venue, batch, and access profile. Each city has a 3-letter authoritative code, a display name, GPS coordinates (used by the QR's location stamp during attendance), a seat count, and an active/inactive flag. Inactive cities don't appear in role assignment dropdowns but their historical records remain queryable.
The system currently has 12 cities defined, 7 active and 5 inactive, with a combined active capacity of 2,350 seats:
| City | Code | Status | Latitude | Longitude | Seats | Venues |
|---|---|---|---|---|---|---|
| Riyadh | RIY | Active | 24.713600 | 46.675300 | 500 | 1 |
| Jeddah | JED | Active | 21.389100 | 39.857900 | 500 | 2 |
| Dammam | DAM | Active | 26.420700 | 50.088800 | 400 | 0 |
| Abha | ABH | Active | 18.228016 | 42.547387 | 250 | 0 |
| Mubarraz | MUB | Active | 25.429100 | 49.578900 | 250 | 0 |
| Medina | MAD | Active | 24.446057 | 39.639298 | 225 | 0 |
| Ras Tanura | RAH | Active | 26.709203 | 50.054830 | 225 | 1 |
| Tabuk | TBK | Inactive | 28.398951 | 36.583478 | 0 | 0 |
| Dhahran | DHA | Inactive | 26.236100 | 50.039300 | 0 | 1 |
| Abqiaq | ABQ | Inactive | 25.957619 | 49.721416 | 0 | 0 |
| Sayhat | SYH | Inactive | 26.484400 | 50.040600 | 0 | 0 |
| Yanbu | YAN | Inactive | 24.085590 | 38.063580 | 0 | 0 |
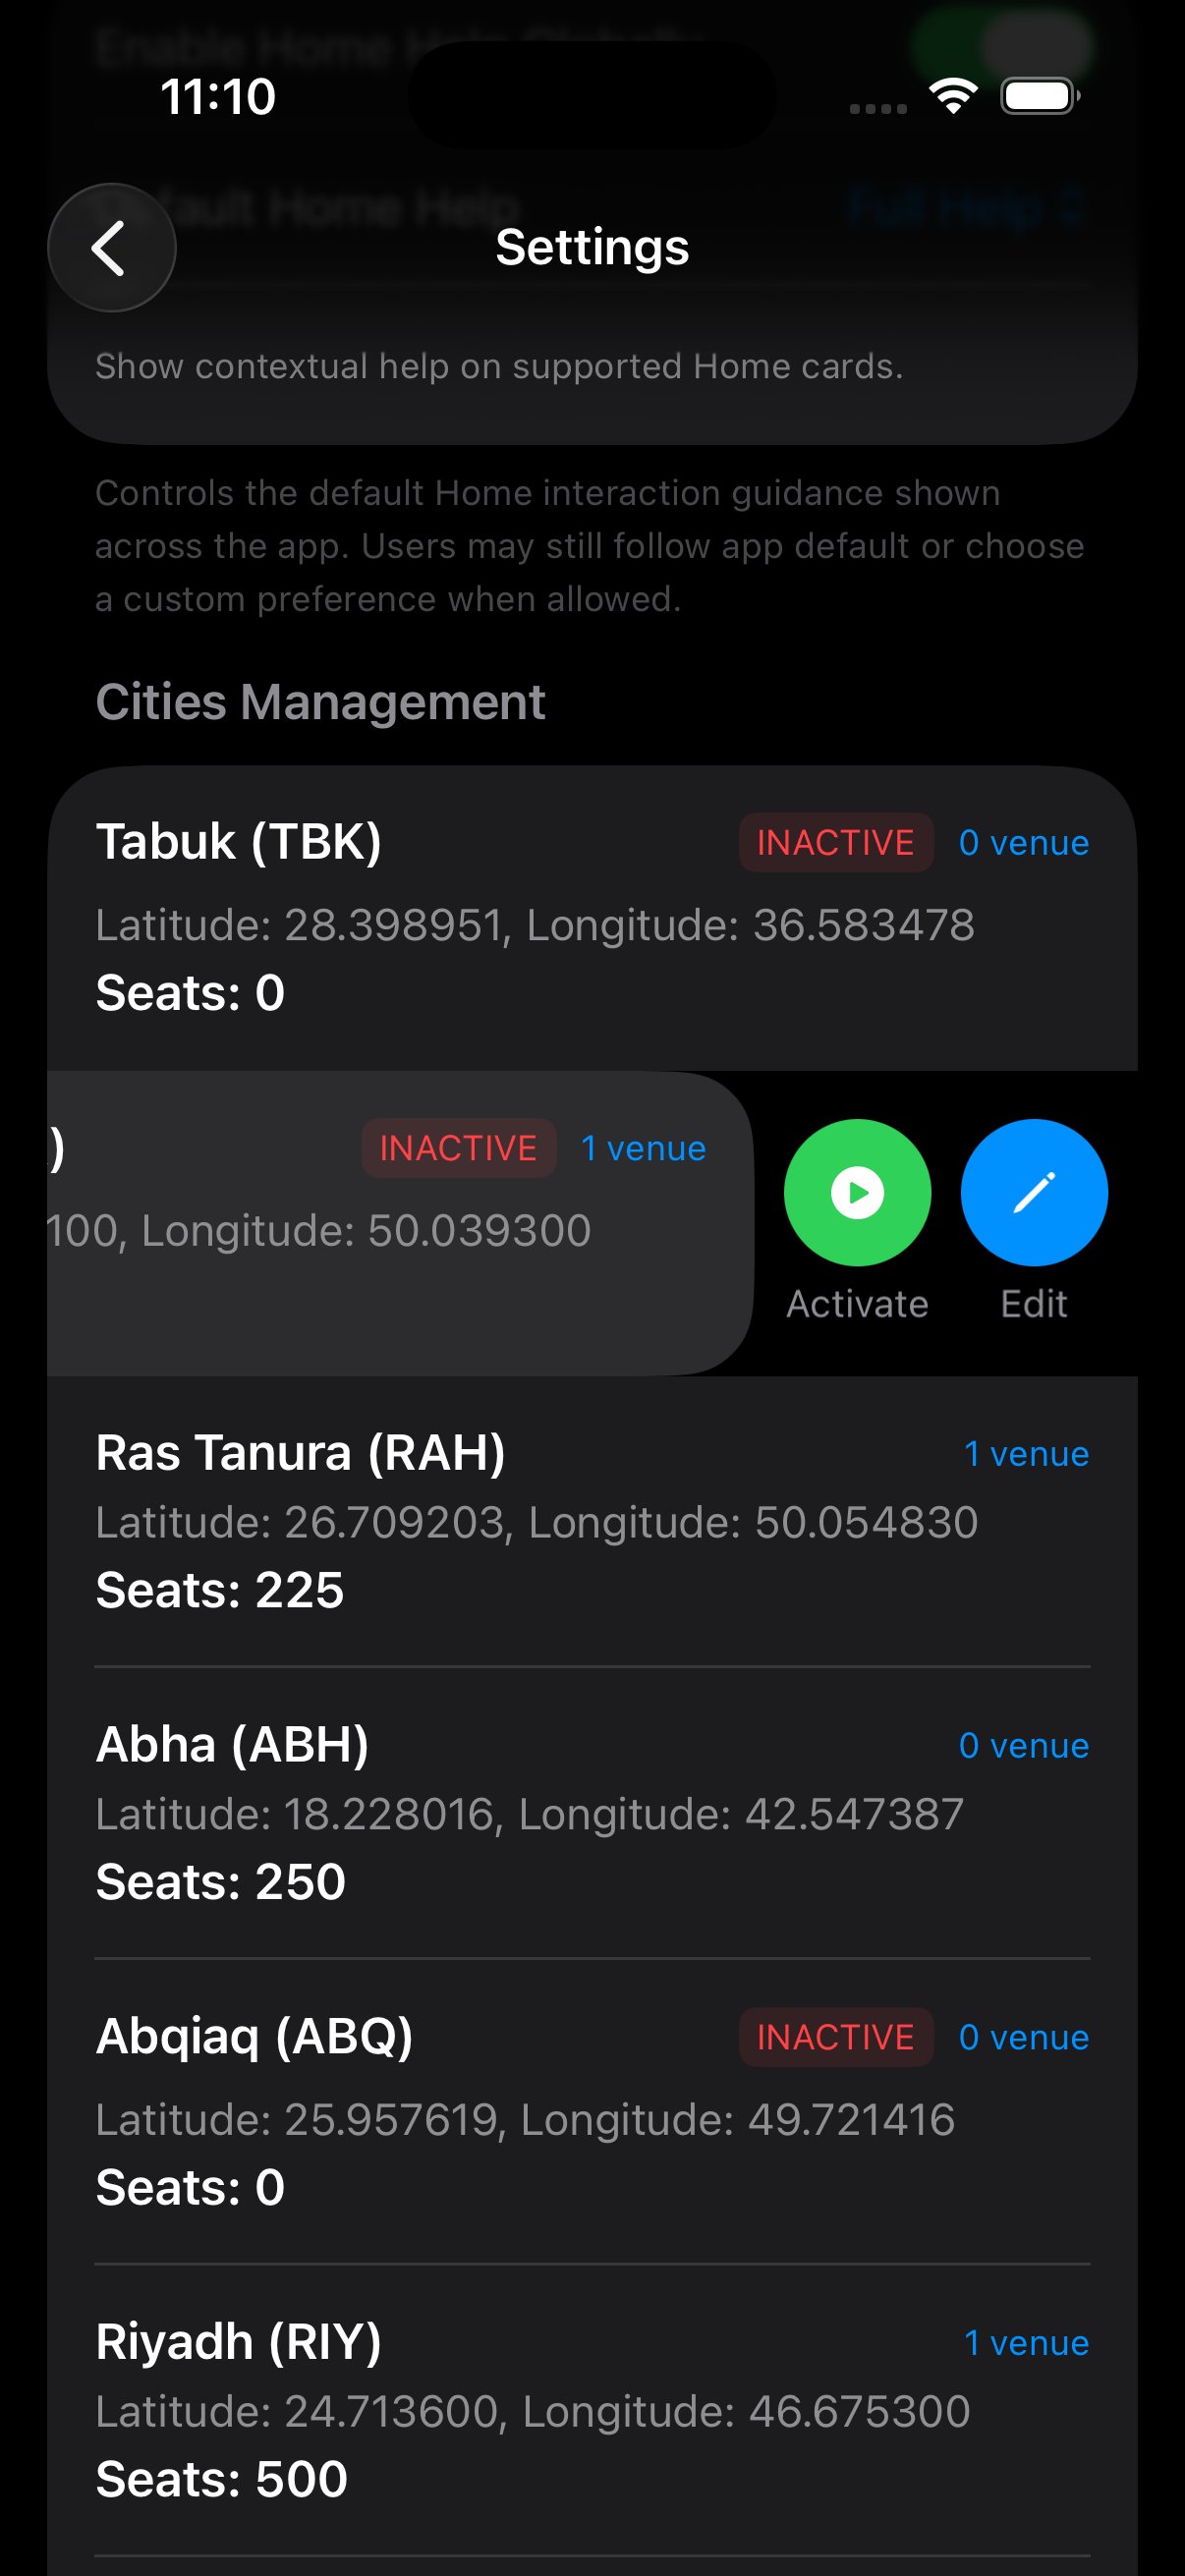
Code is authoritative
The 3-letter city code is used in QR payloads, box labels, seat maps, and Firestore paths. Changing the code for an existing city will break historic records and is blocked by the UI.
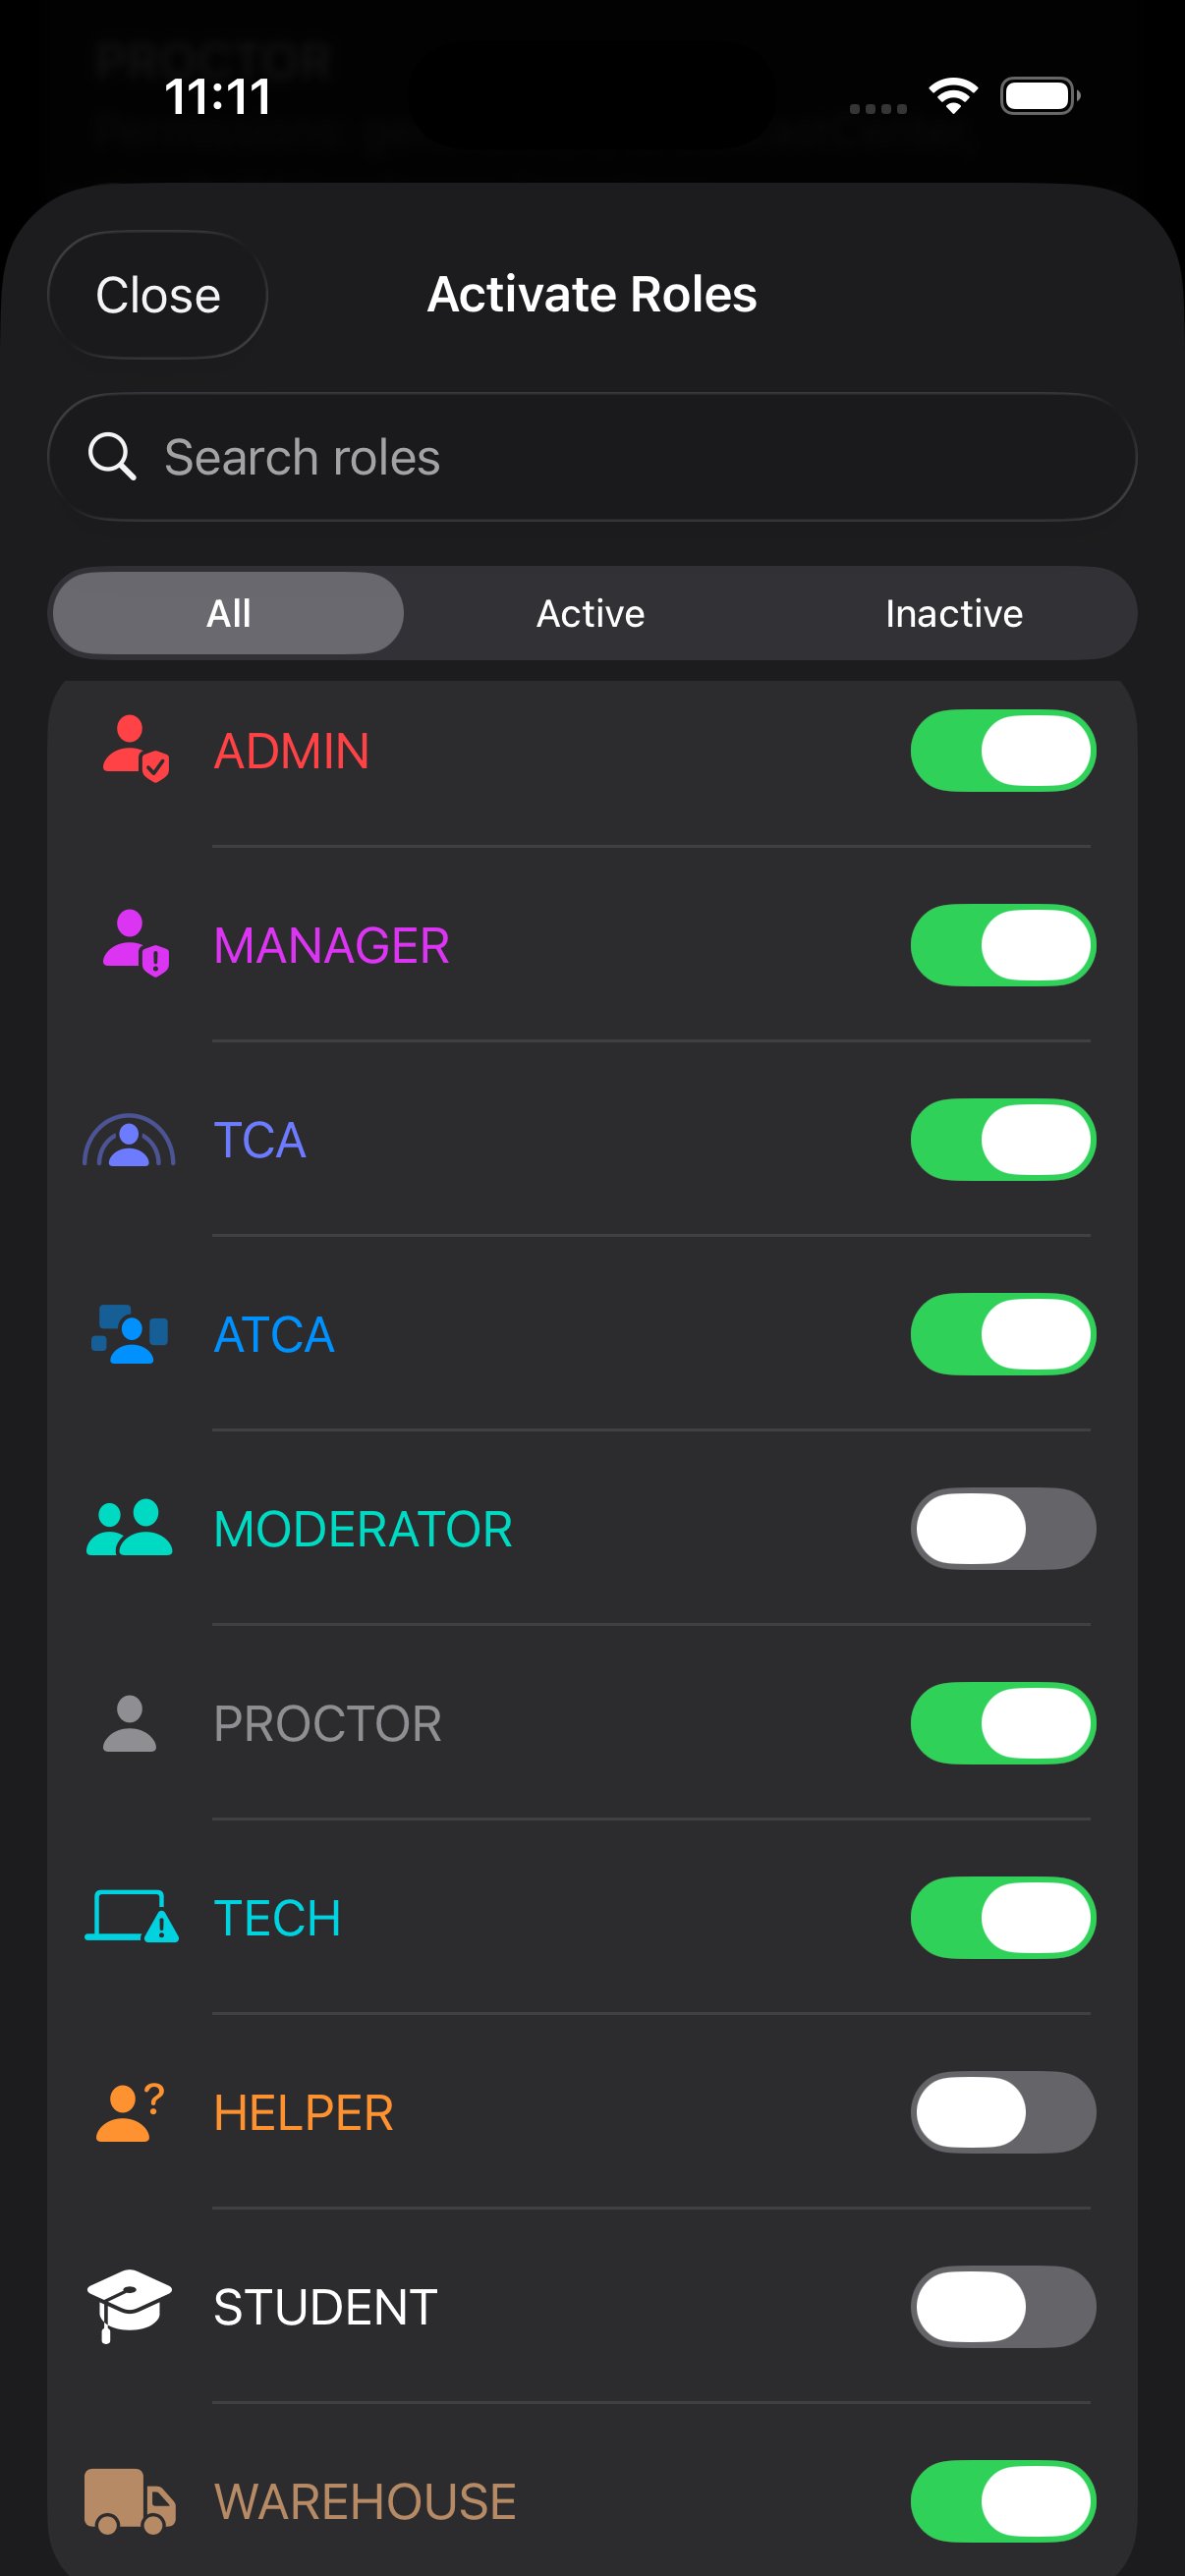
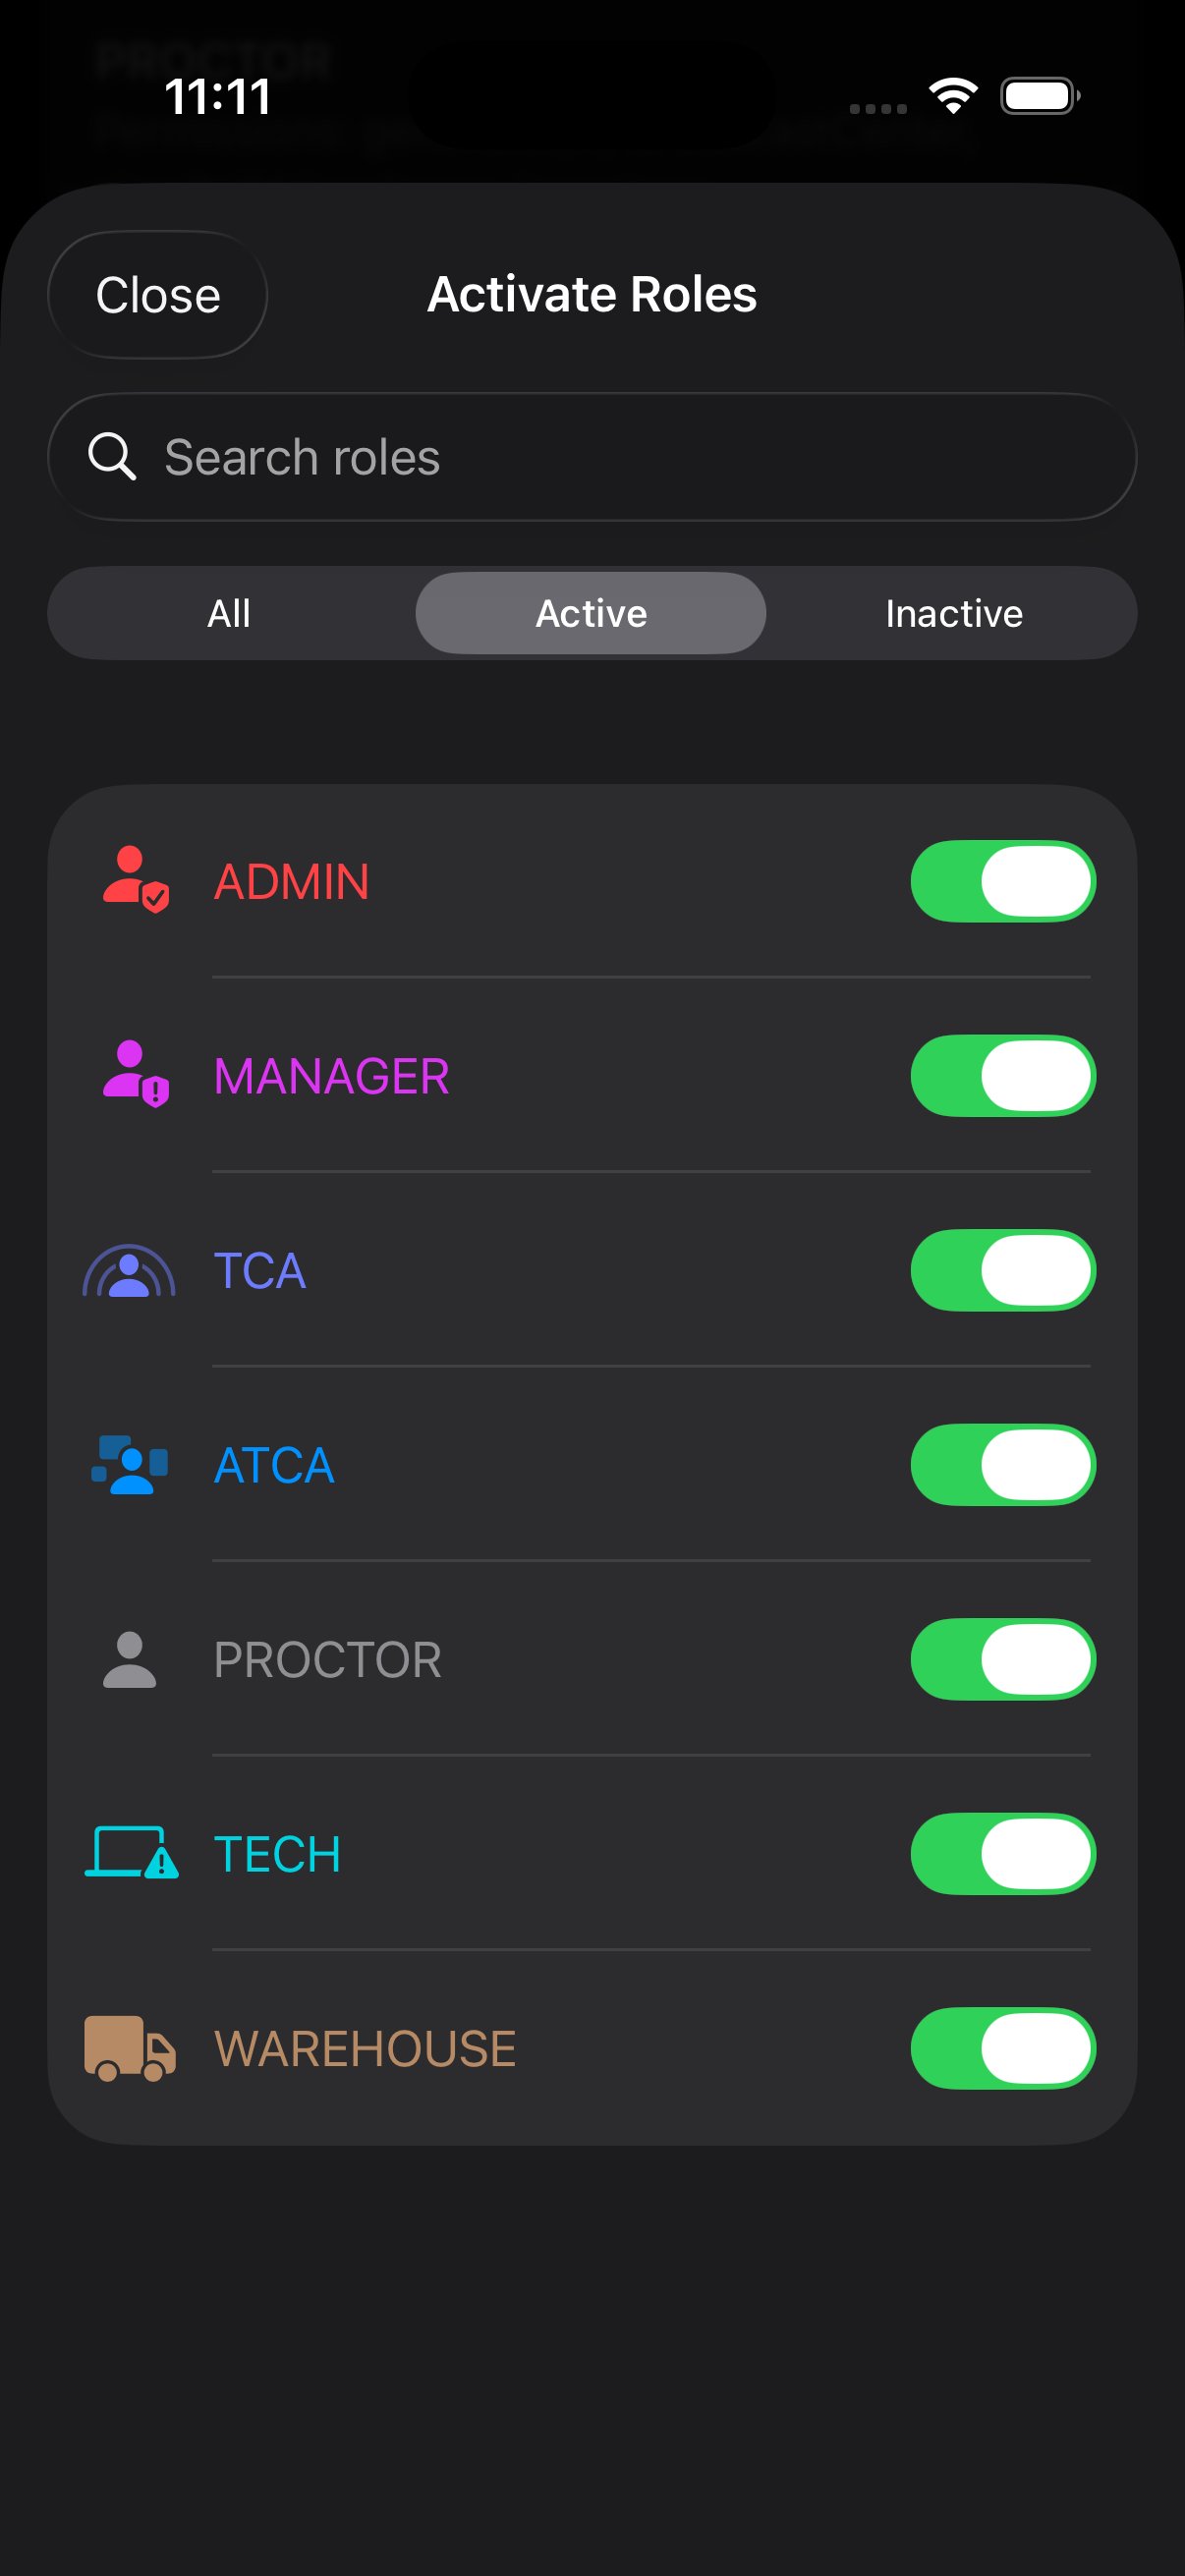
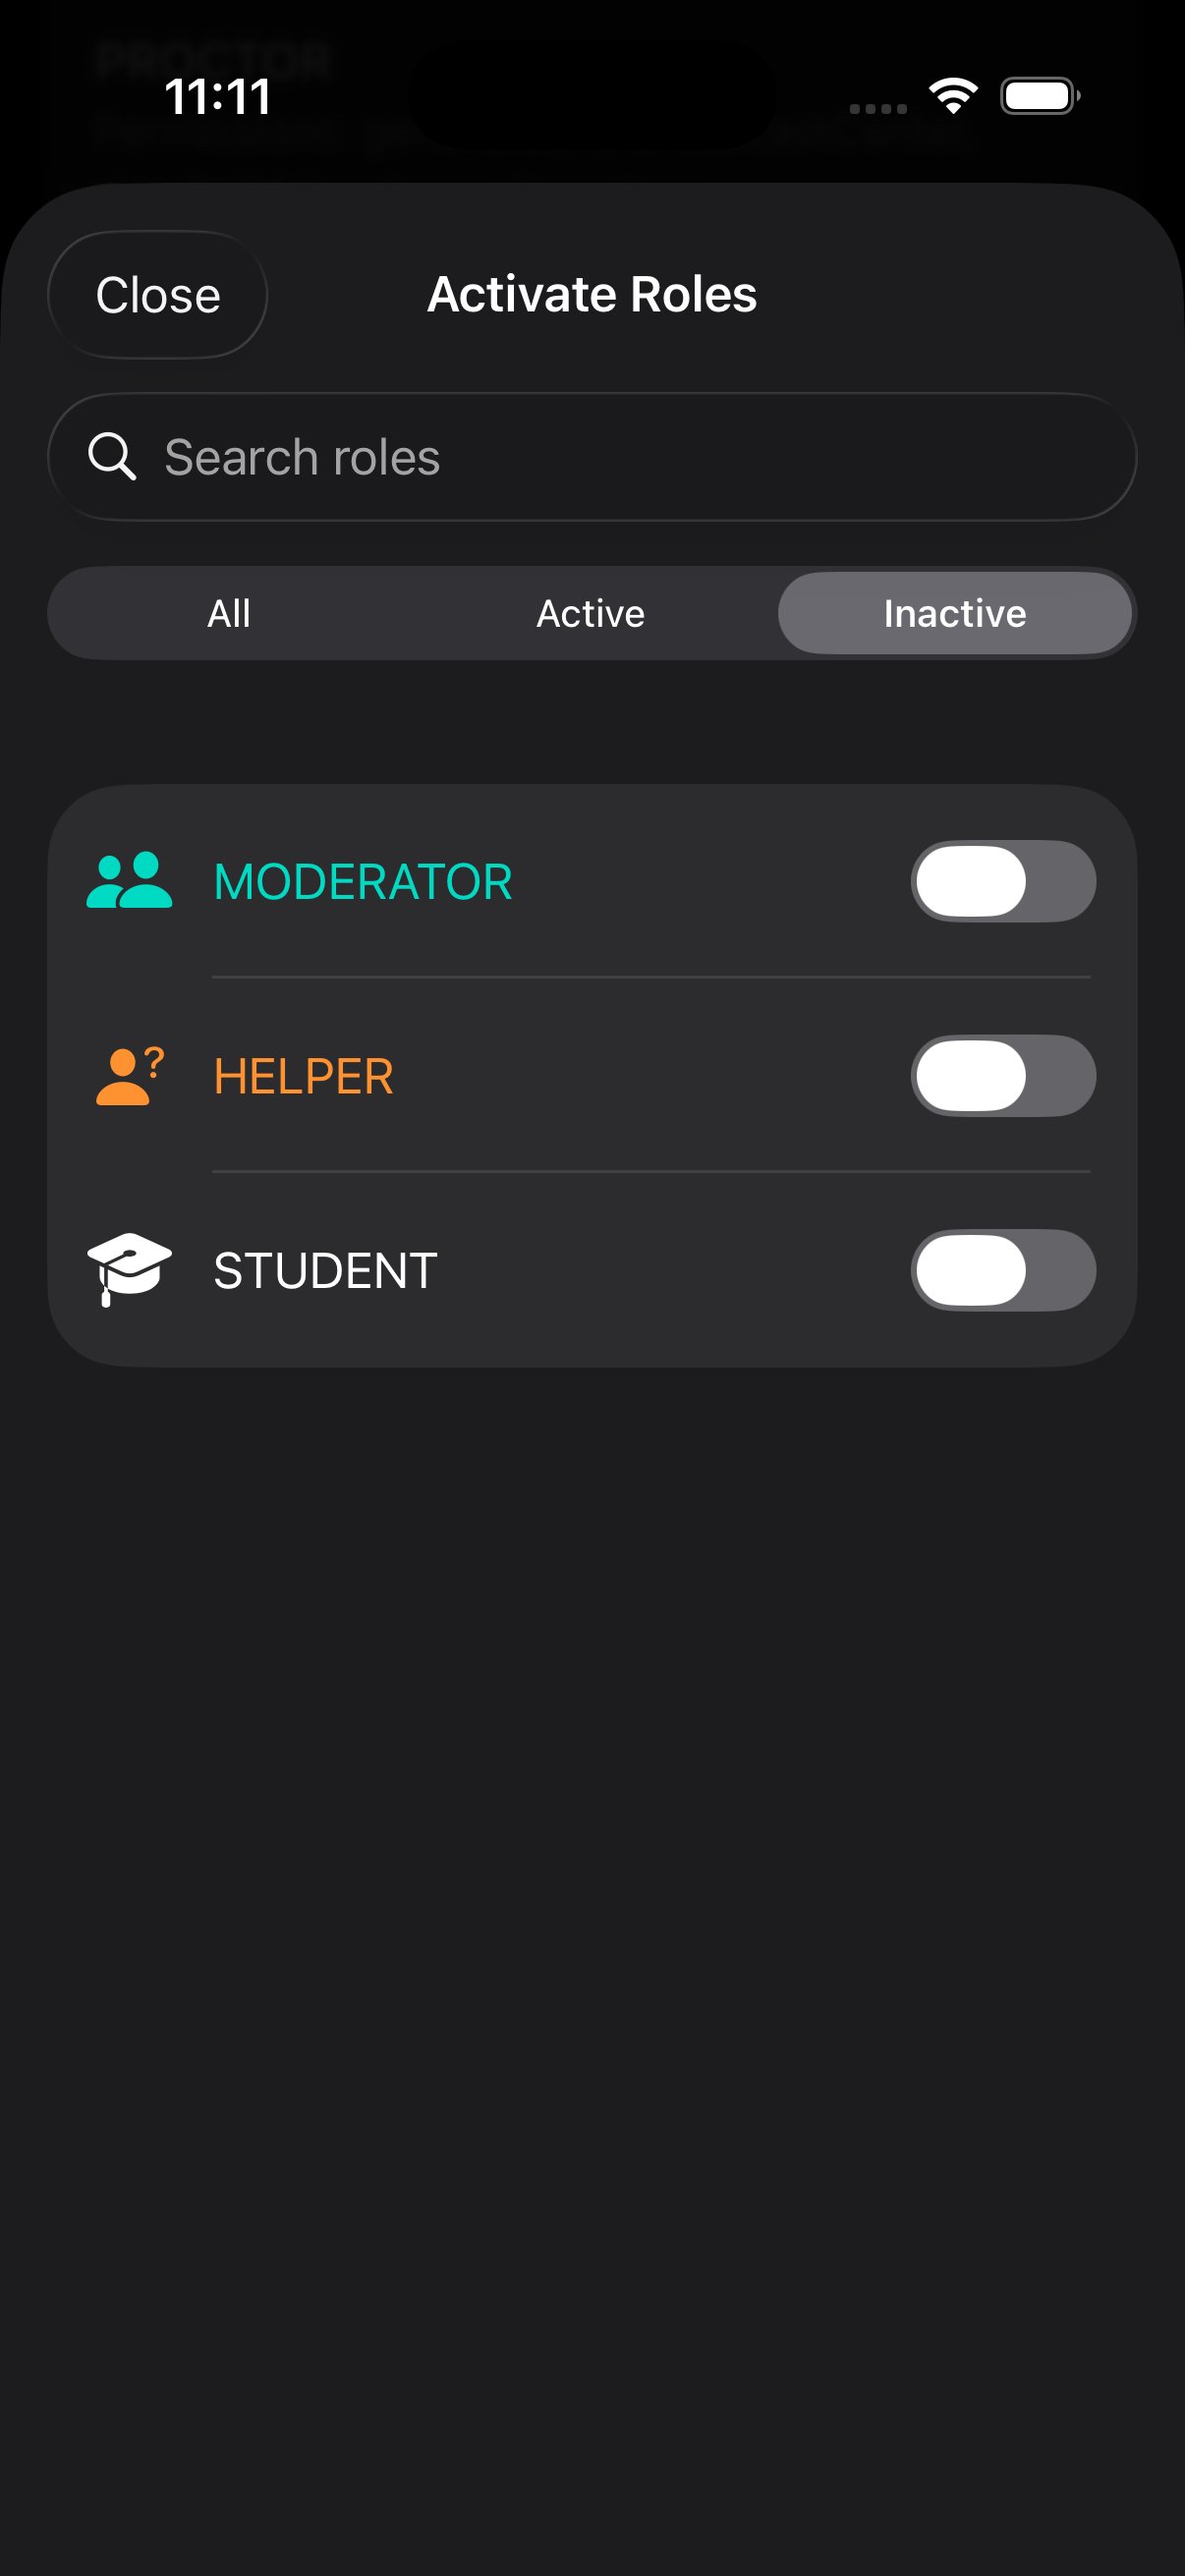
Activate Roles
The 10 system roles (Admin, Manager, TCA, ATCA, Moderator, Proctor, Tech, Helper, Student, Warehouse) are all defined in code, but each can be independently activated or deactivated for the current event. Deactivating a role hides it from "Add User" dropdowns and from broadcast routing, without deleting any users assigned to it. Switch a role back on at any time and existing users resume.
Roles & Permissions
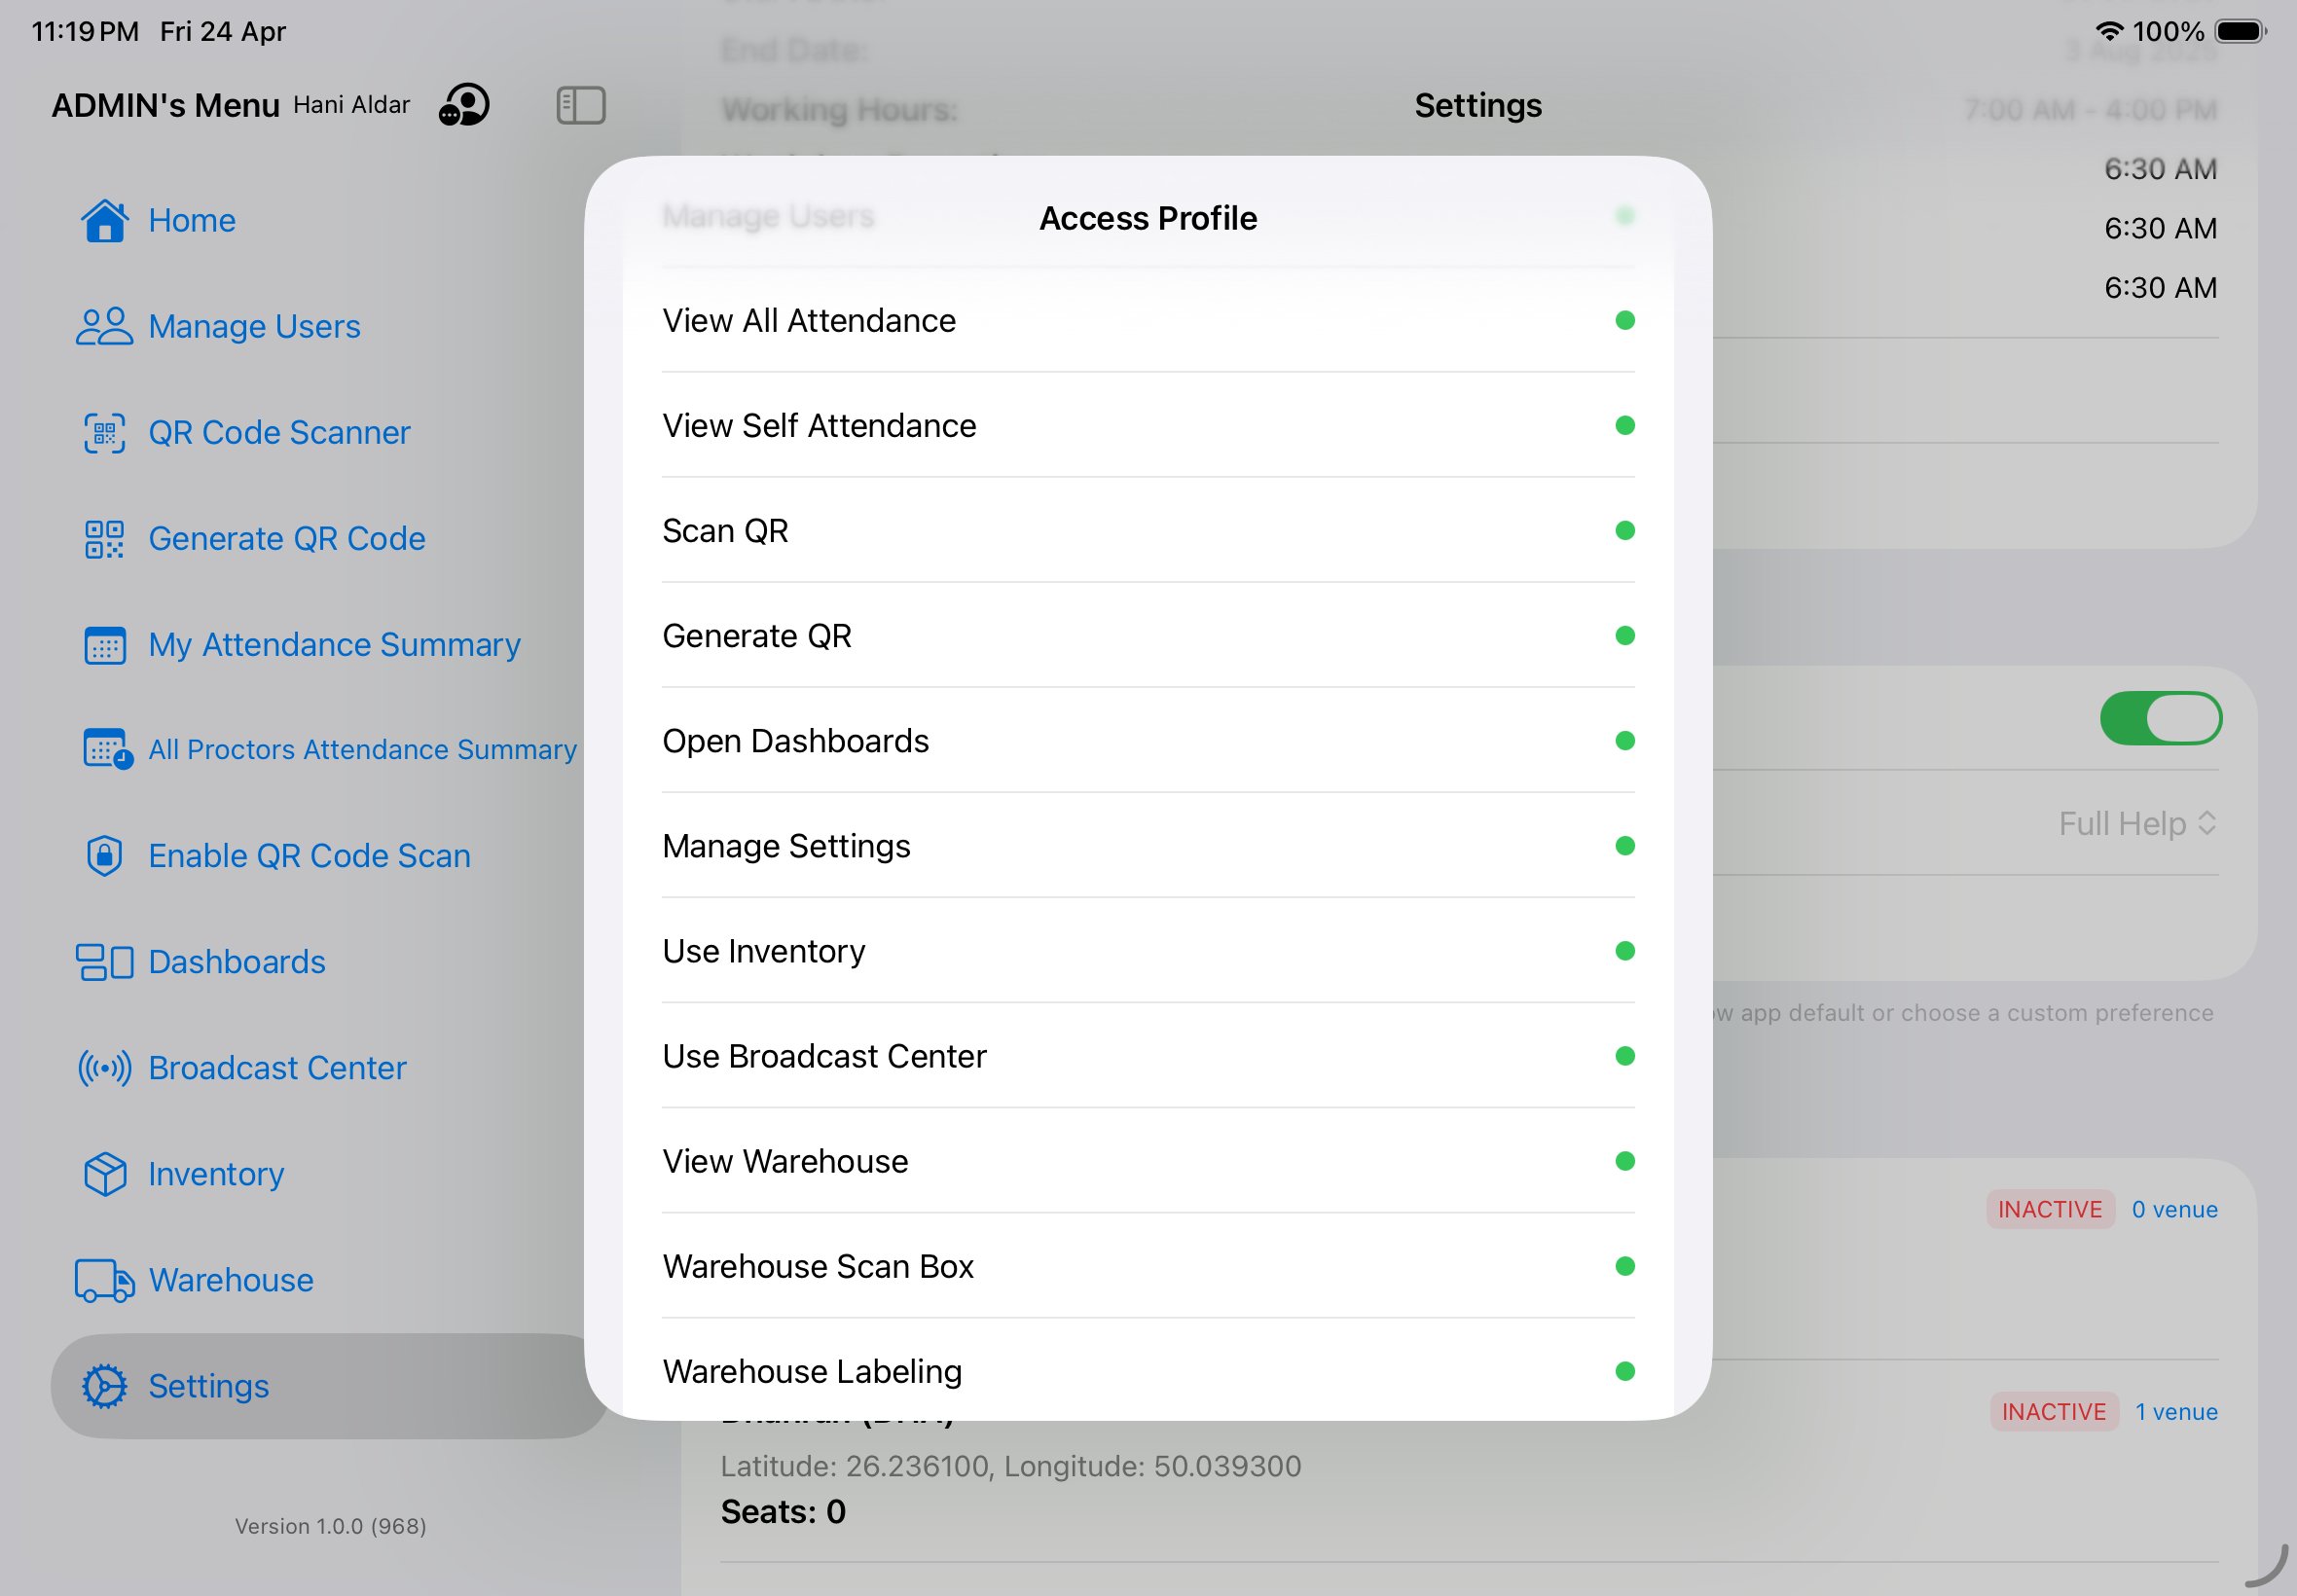
Each role has a default permission bundle. Edit a role's bundle via long-press → Edit; clone an existing role's bundle to a new role via long-press → Replicate. The bundle assigned at the role level applies to every user with that role, but individual users can have permissions added or revoked from this default in Manage Users → Edit Access Profile.
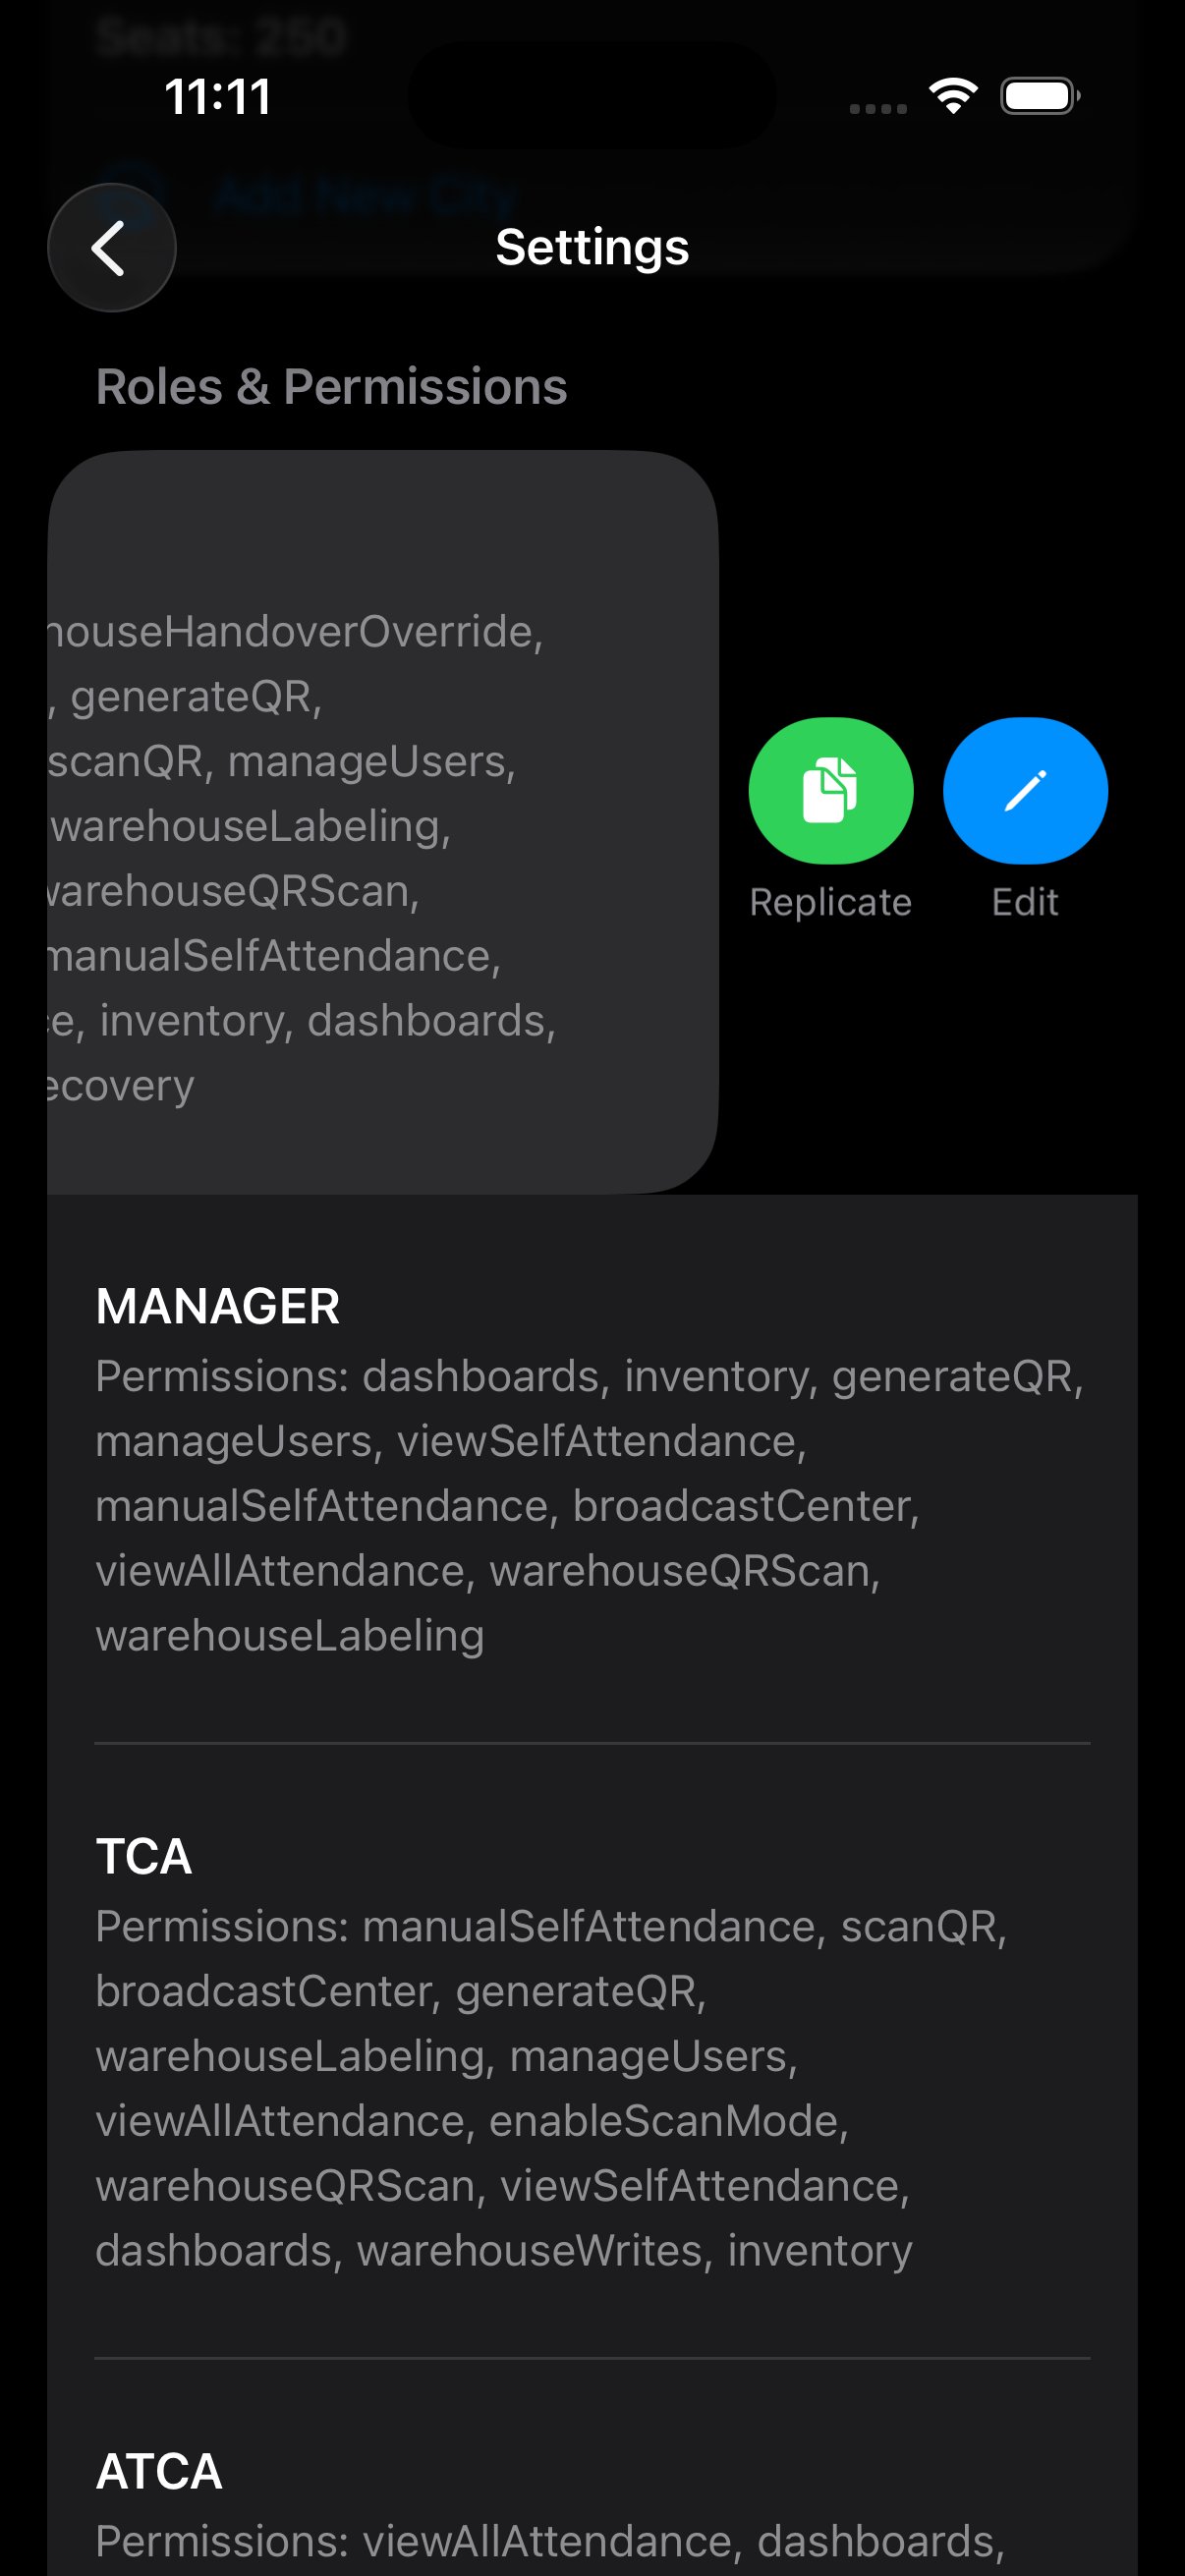
15 named permissions are recognized by the app:
| Permission | What it allows |
|---|---|
manualSelfAttendance | Log your own check-in/out without scanning a QR. |
attendanceEditOthers | Edit another user's attendance log. Bypasses the 3-day window. |
broadcastSendPassword | Send Password-type broadcasts. |
broadcastSendExecutive | Send Executive-type broadcasts. |
broadcastSendDirection | Send Direction-type broadcasts. |
broadcastSendGeneral | Send General-type broadcasts. |
broadcastRecallGlobal | Delete broadcasts globally after the 120 s sender window. |
inventoryRead | View the Inventory dashboard. |
inventoryWrites | Create, modify, or cancel batches. |
warehouseReads | View the Warehouse dashboard and pipeline. |
warehouseWrites | Advance stages, approve handovers. |
warehouseLabeling | Access the box labeling wizard and print labels. |
warehouseEnrollRecovery | Recover stalled enrollments (gated with confirmation). |
manageUsers | Add, edit, remove users. Change access profiles. |
manageSettings | Edit business schedule, special periods, cities, role permissions. |
XBadge (internal badge-number encryption)
XBadge is an internal helper that obfuscates a user's real badge number before it's written to Firestore. Rather than persisting the literal badge number, the app applies a simple encryption transform and stores the resulting code, so the underlying value isn't readable directly from the database. It is an implementation detail of the user-record layer — there is no XBadge configuration UI to interact with, and it has no relationship to the Broadcast Center, the Password channel, or any operational workflow visible to users.
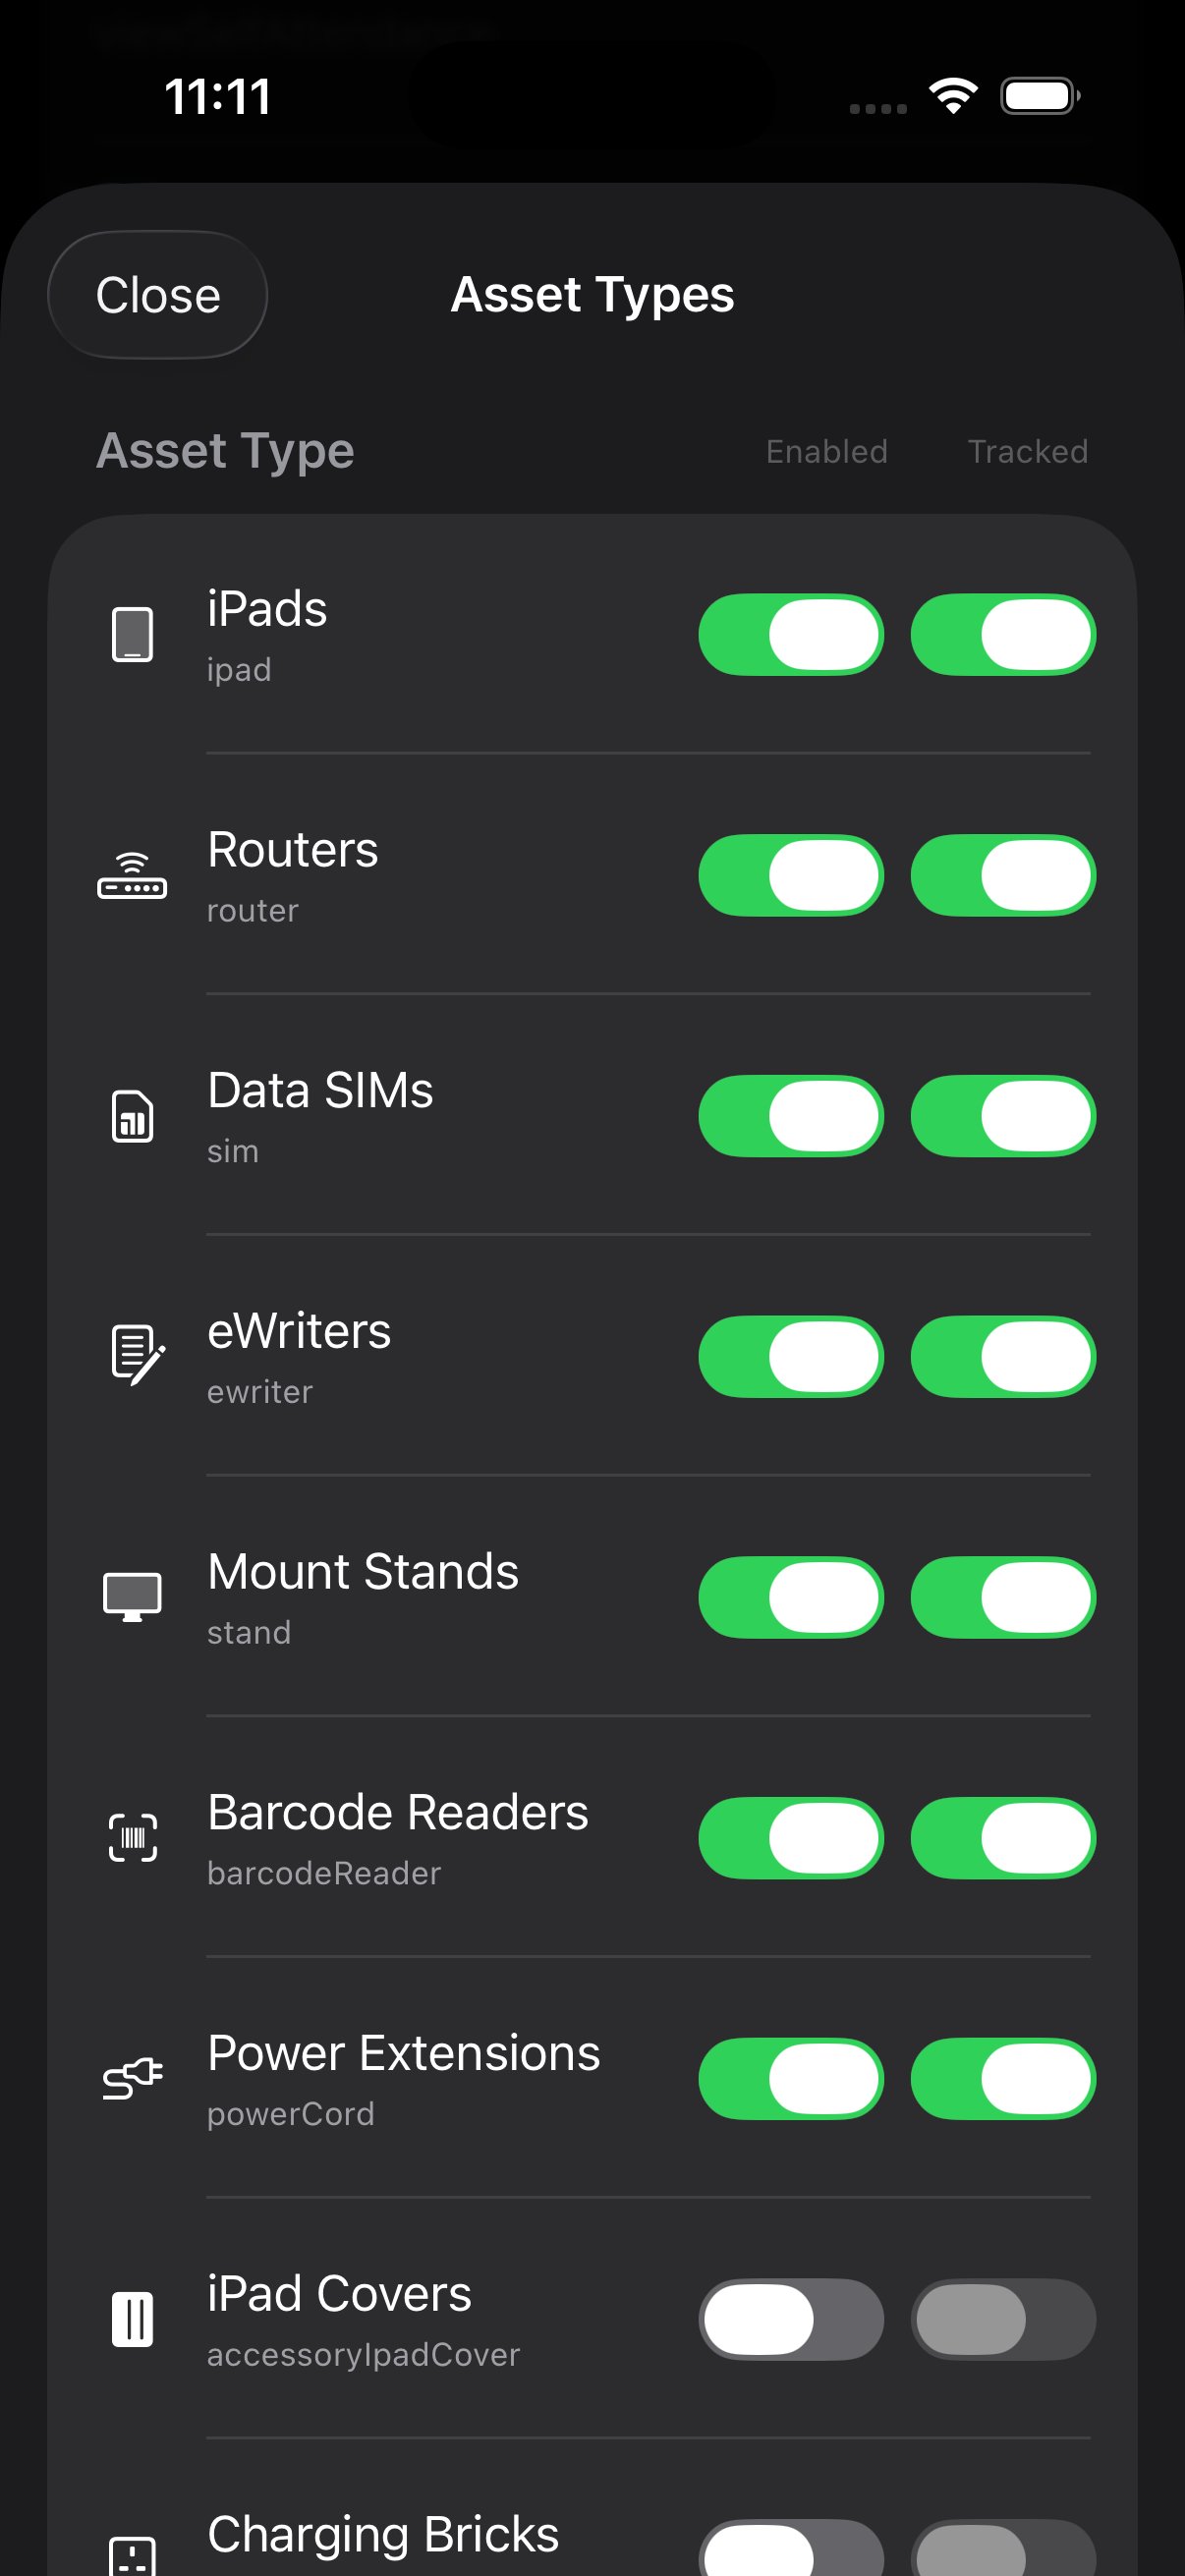
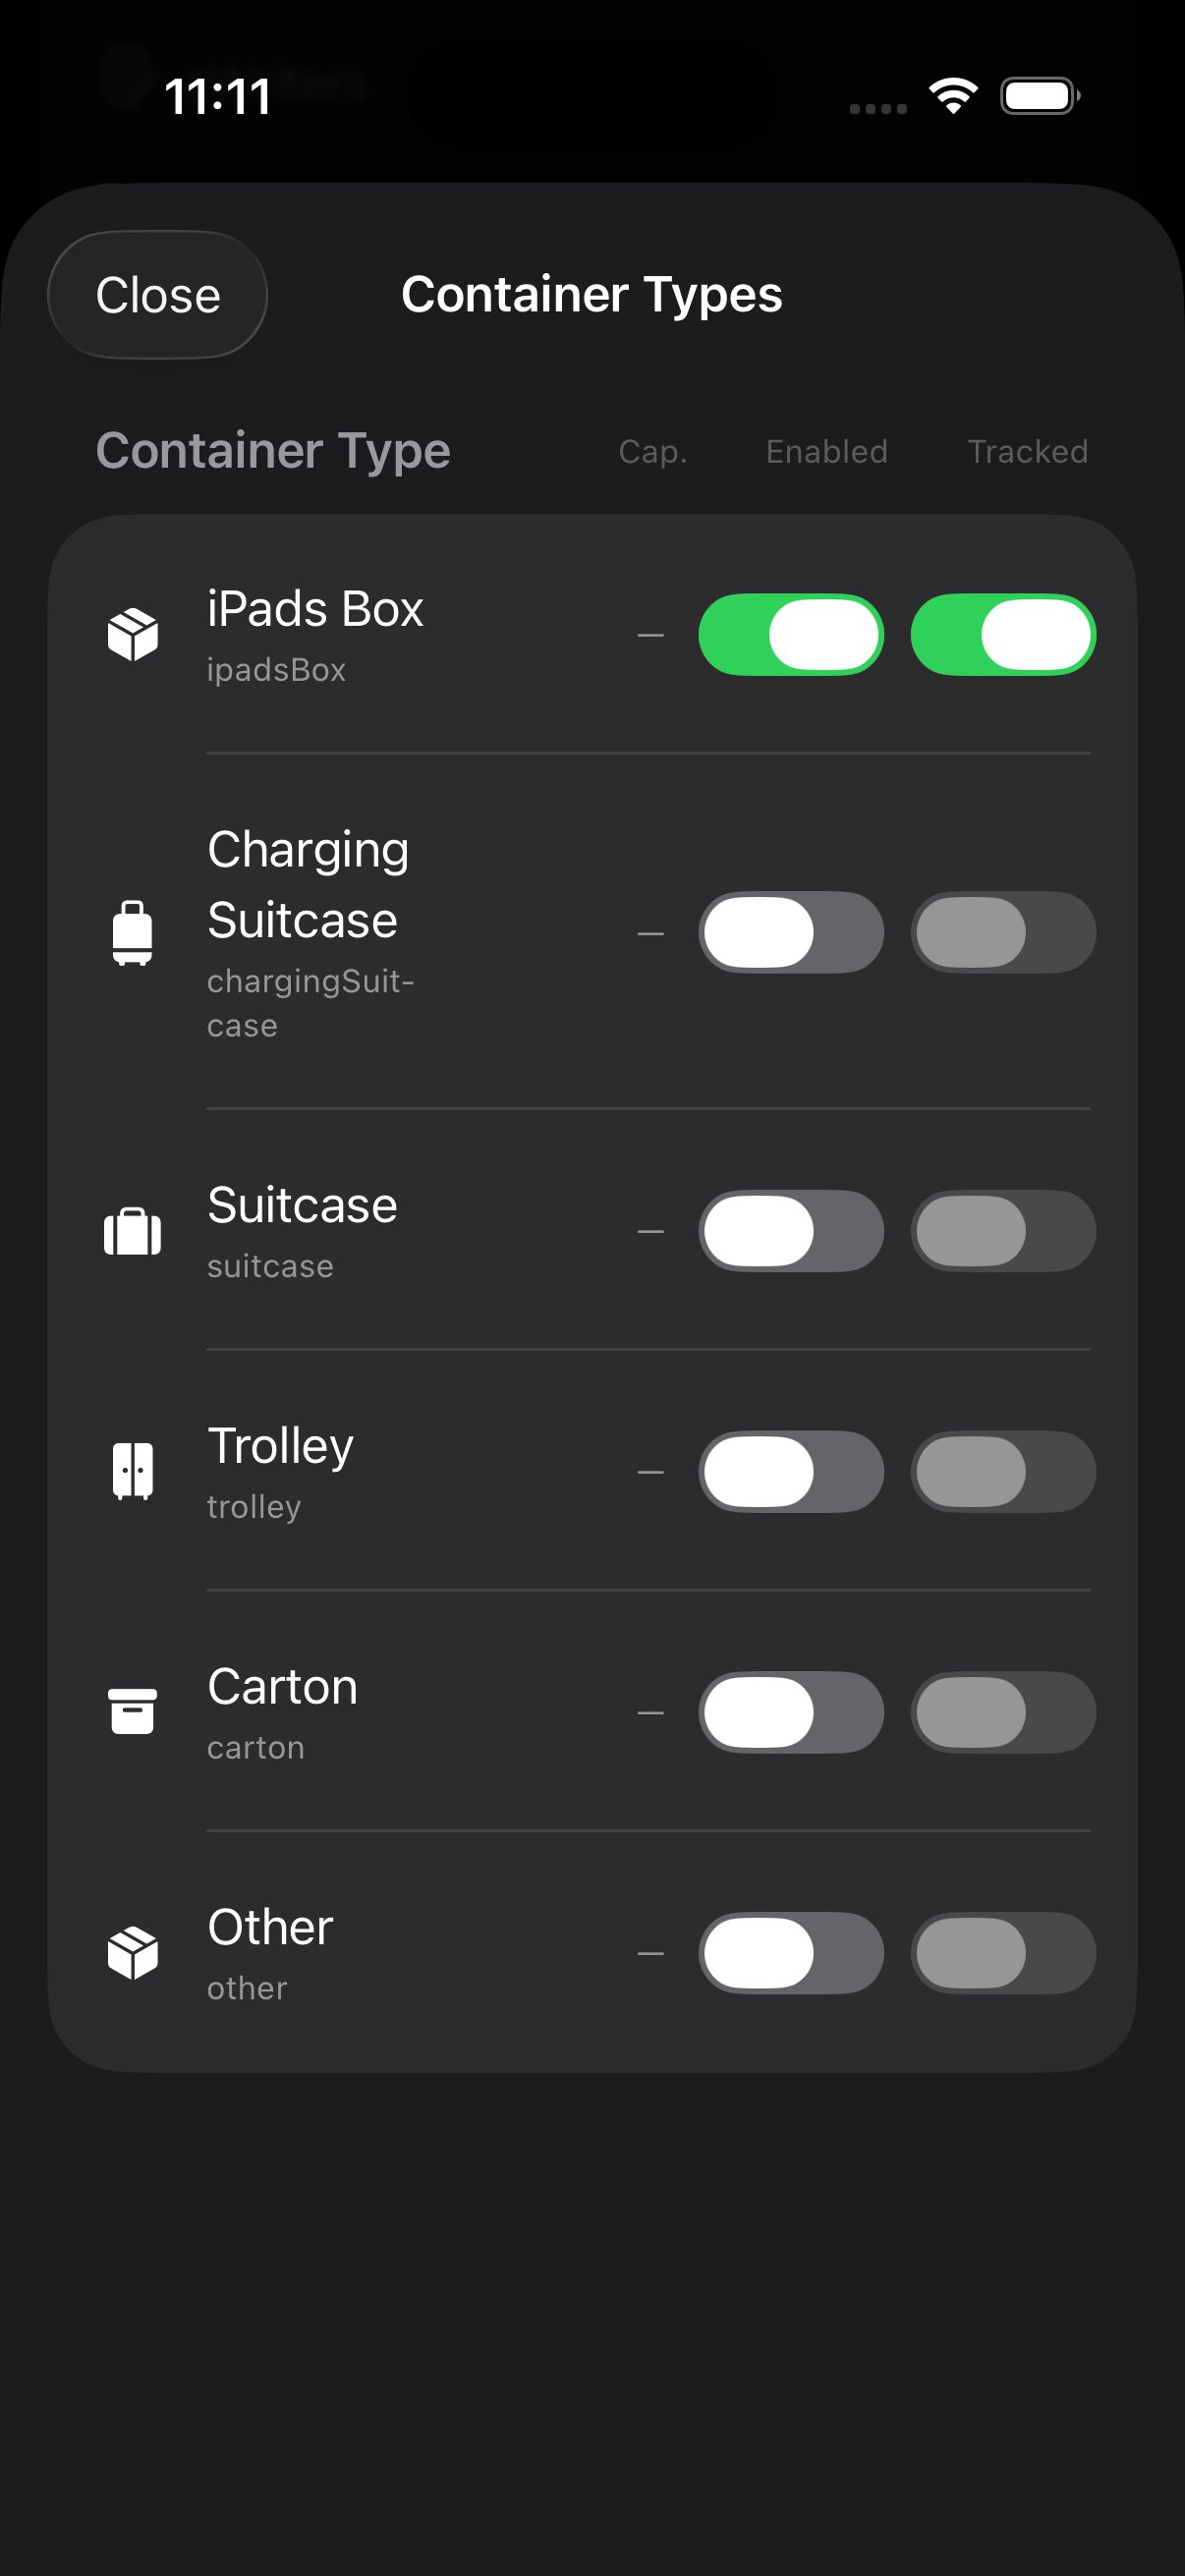
Warehouse asset & container types
Configure the catalog of items the warehouse tracks and the catalog of containers it puts them into. The whole warehouse pipeline — staging, configuring, enrolling, shipping, receiving — operates against these two catalogs, so any item not enabled here is invisible to every warehouse screen.
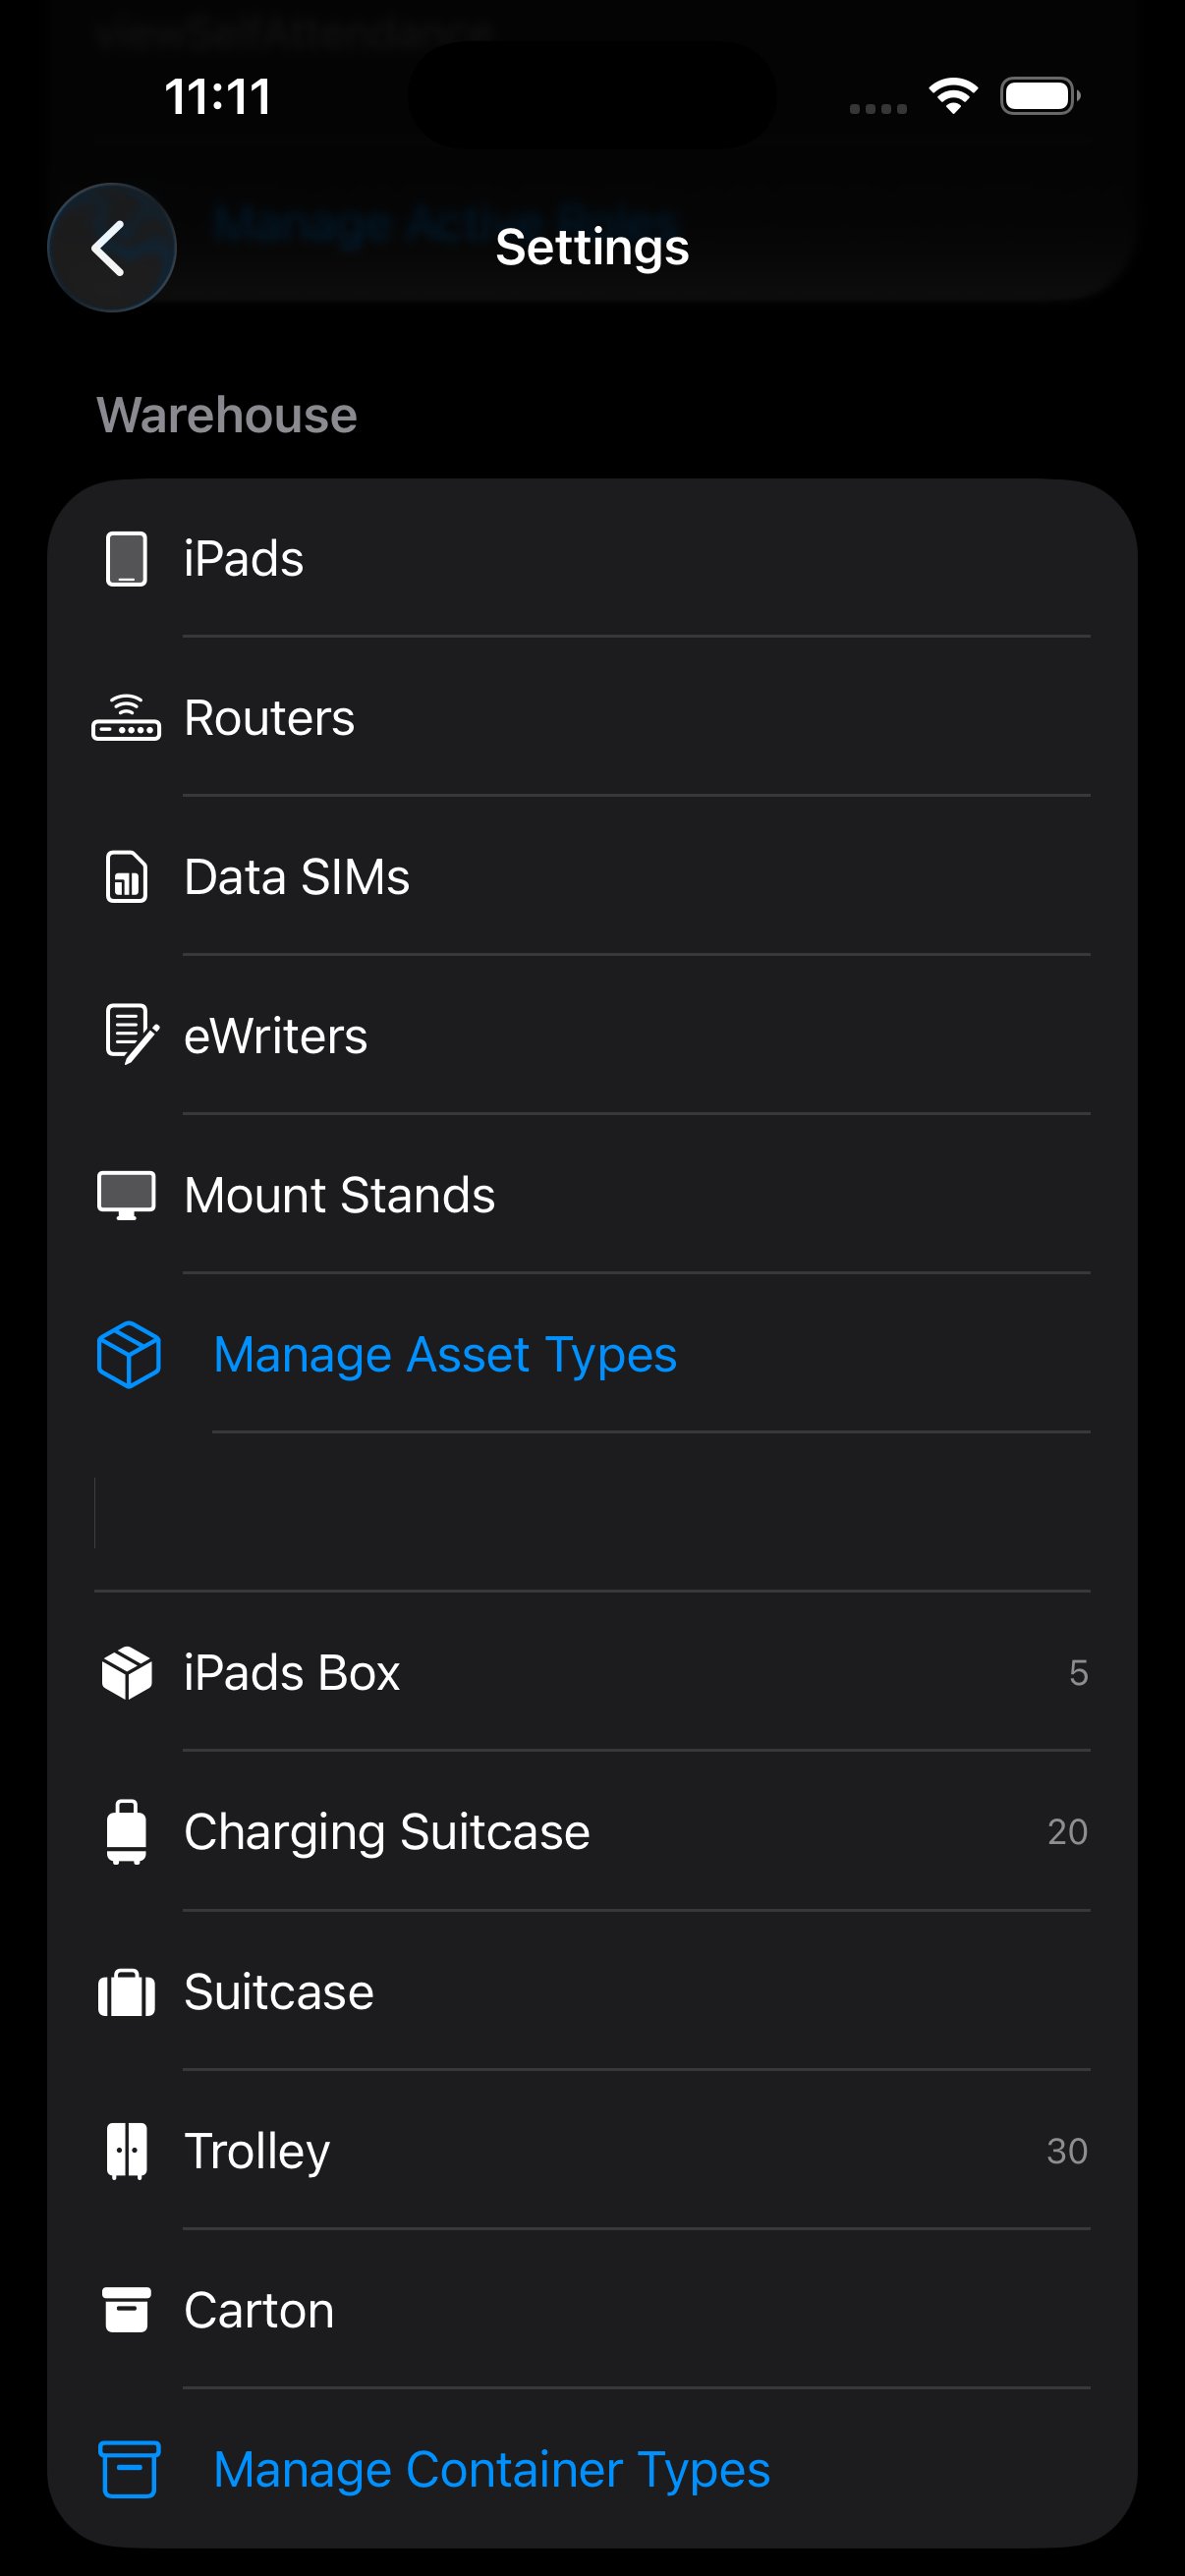
Both Manage Asset Types and Manage Container Types open a modal where each row has two toggles:
- Enabled — the type appears in pickers across the app (Inventory, Warehouse, Add Device).
- Tracked — the warehouse pipeline records lifecycle events for individual instances of this type. A type can be Enabled but un-Tracked (it's pickable, but you don't care to track each one) — useful for accessories like covers or charging bricks where a count is enough.
Help instructions
A three-state setting controlling in-app onboarding tooltips:
- .none
- No tooltips. For experienced users.
- .brief
- Short, one-line tooltips on hover/long-press.
- .full
- Full explanations with links into the help center.
First-run seed
On first install, three roles seed automatically: Admin, TCA, Proctor. Default Admin gets most permissions except inventoryWrites, warehouseWrites, and warehouseLabeling — these must be explicitly granted to avoid accidental warehouse actions.
Permission matrix.
Default permission bundles per role. An Admin can override any cell for a specific user via Manage Users → Edit Access Profile.
| Permission | Admin | Manager | TCA | ATCA | Tech | Warehouse | Proctor |
|---|---|---|---|---|---|---|---|
manualSelfAttendance | ✓ | ✓ | ✓ | ✓ | ✓ | ✓ | — |
attendanceEditOthers | ✓ | ✓ | ✓ | — | — | — | — |
broadcastSendPassword | ✓ | ✓ | — | — | — | — | — |
broadcastSendExecutive | ✓ | ✓ | — | — | — | — | — |
broadcastSendDirection | ✓ | ✓ | ✓ | ✓ | ✓ | — | — |
broadcastSendGeneral | ✓ | ✓ | ✓ | ✓ | ✓ | ✓ | — |
broadcastSendSupport | ✓ | ✓ | ✓ | ✓ | ✓ | ✓ | ✓ |
broadcastRecallGlobal | ✓ | ✓ | — | — | — | — | — |
inventoryRead | ✓ | ✓ | ✓ | ✓ | ✓ | ✓ | — |
inventoryWrites | —* | — | — | — | ✓ | ✓ | — |
warehouseReads | ✓ | ✓ | ✓ | — | ✓ | ✓ | — |
warehouseWrites | —* | — | — | — | — | ✓ | — |
warehouseLabeling | —* | — | — | — | — | ✓ | — |
warehouseEnrollRecovery | ✓ | — | — | — | — | — | — |
manageUsers | ✓ | ✓ | — | — | — | — | — |
manageSettings | ✓ | — | — | — | — | — | — |
* Default Admin excludes inventory/warehouse writes to prevent accidental stock mutations. Granted explicitly per user as needed.
Seeing your own permissions
Any user — not just Admins — can see exactly what they have access to by opening profile menu → Access Profile and scrolling to Menu Options. Each menu route has a green dot (granted) or grey dot (denied). It's the quickest way to answer "why can't I see X?".
Masquerade.
Admin-only superpower: see the app exactly as another user sees it. Invaluable for debugging "why can't they see X" and for on-the-fly permission tuning.
Starting a masquerade
- Go to Manage Users. Search or filter to find the target user.
- Long-press their row. A context sheet appears with Masquerade as... at the top.
- Confirm. The app rebuilds its navigation split view against the target's Access Profile.
- You're now them. A persistent red banner at the top reads "Masquerading as [Name]" with a Stop button.
What changes while masquerading
- Home fully re-renders for the target's role and permissions.
- Broadcasts you send are attributed to the target (use with care).
- The scanner will behave as the target role (e.g. no warehouse scan if target lacks permission).
- Your own notifications still arrive — they're not redirected.
Ending a masquerade
Two ways to exit:
- Tap Stop in the red banner.
- Open your profile menu and tap Stop Masquerade.
Implementation notes · UserAccessProfile rebuild
Masquerade triggers Notification.didSwitchMasquerade. The root ContentView observes this notification and rebuilds the UserAccessProfile via UserAccessProfile.build(), which re-derives the visible admin options, broadcast eligibility, and scanner capabilities.
See AppNotifyRouting.swift for the notification plumbing and UserAccessProfileStore.swift for the profile cache.
Errors & limits.
When something goes wrong, the app surfaces a human-readable message with an error code. This page is the canonical list — match the code you see to the row here for what it actually means and how to fix it.
Warehouse prep flow errors
| Code | User-facing message | Meaning & fix |
|---|---|---|
WPF001 | "Box not recognized." | Scanned wallpaper doesn't match any box document. Restage or contact Admin. |
WPF002 | "Serial already enrolled." | This serial belongs to another box in the current scheme. Can't double-enroll. |
WPF003 | "Stage advance blocked." | Strict transition violated. Check current stage against the transition table. |
WPF004 | "Handover not approved." | Cannot advance to In Venue until TCA approves receipt at the venue. |
WPF005 | "Label mismatch." | Printed label QR doesn't match scan. Regenerate the label. |
WPF006 | "Max serials exceeded." | 5 serials per label maximum. Split into multiple labels. |
WPF007 | "Scheme mismatch." | Box was created under a different event scheme. Restage to re-tag. |
WPF008 | "Recovery not permitted." | User lacks warehouseEnrollRecovery permission. |
WPF009 | "Box locked — contact admin." | Box has advanced past Ready to Ship. Labeling blocked. |
WPF010 | "Rejected handover." | TCA rejected this handover. Reconcile missing/damaged contents. |
WPF011 | "City mismatch." | Scanned box belongs to a different city than your scope. |
WPF012 | "Scheme expired." | Event scheme is past its window. Archive or extend via Admin. |
WPF013 | "Duplicate box." | Two boxes share the same label — only possible if a label was reprinted incorrectly. |
WPF014 | "Stage rewind blocked." | Reverting a stage requires Admin intervention with a reason. |
WPF015 | "Reconciliation incomplete." | Cannot advance from Back to WH to Completed while devices remain unaccounted. |
WPF016 | "Network unavailable." | Warehouse writes require connectivity. Reconnect and retry. |
WPF017 | "Scan buffer full." | Too many simultaneous scans queued. Wait and retry. |
Common Firestore errors
- PERMISSION_DENIED — your Access Profile doesn't allow the requested action. Check your role permissions.
- UNAVAILABLE — Firestore is reachable but the region is temporarily degraded. Retry in 30 s.
- DEADLINE_EXCEEDED — the write took longer than allowed. Network is slow — retry on a stronger connection.
- FAILED_PRECONDITION — a required index is missing. Surfaces during Admin analytics queries. Contact support.
Offline behavior
When the network drops, an offline overlay appears across every screen of the app. Writes are not cached — you must be online for attendance, broadcasts, and inventory writes. Reads of recent data remain visible via the last-cached state.
Hard limits
- QR validity
- 15 seconds
- Double-scan buffer
- 60 seconds
- Self-edit window
- 3 days
- Global-delete window
- 120 seconds from send
- Broadcast retention
- 300 days
- Student batch cap
- 20 devices / batch
- Serials per label
- 5 maximum
- Serial length
- 8–14 characters
- Location accuracy
- ~10 m (nearest ten meters)
- Location stamp precision
- 4 decimal places
Glossary.
Every term, every acronym, every shorthand that shows up in the app or in this help center. Alphabetical.
- AES-GCM
- Authenticated Encryption with Associated Data using Galois/Counter Mode. Used for broadcast message body encryption.
- APNs
- Apple Push Notification service. Delivers pushes to iOS devices.
- ATCA
- Assistant Test Centre Administrator. Rank 40 role. Supports the TCA.
- Batch
- A group of devices assigned together for an event. Four modes: student, staff, special, generic.
- Broken log
- Attendance anomaly flagged by the system. Five categories: missing check-in, missing check-out, out-of-order, duplicate, wrong city.
- City code
- Three-letter authoritative identifier for a city. Active set: RIY (Riyadh), JED (Jeddah), DAM (Dammam), ABH (Abha), MUB (Mubarraz), MAD (Medina), RAH (Ras Tanura). Inactive: TBK, DHA, ABQ, SYH, YAN.
- Common-use iPad
- Shared iPad running persistent biometric-locked scanner mode at the venue desk.
- Custody state
- Where a device currently lives: With Warehouse, In Transit, In Venue, With User, Returned.
- DEK
- Data Encryption Key. Per-message key wrapped via HKDF.
- FCM
- Firebase Cloud Messaging. The push-notification layer the app uses.
- Handover
- Stage 06 of the warehouse pipeline. Logistics pickup, TCA approval required to advance.
- HKDF-SHA256
- HMAC-based Key Derivation Function using SHA-256. Used to derive per-message wrap keys.
- Manual attendance
- Check-in/out logged via a form instead of QR scan. Requires permission. Flagged in audit.
- Masquerade
- Admin-only feature: see the app as another user for debugging.
- Rank
- Numeric weight from 1 (Student) to 100 (Admin). Drives broadcast eligibility and approval chains.
- Scheme
- Event-year identifier, e.g.
"2026". Tags all boxes and batches for that cycle. - SoD
- Start of Day. Marks the Business Schedule reference point.
- Support lifecycle
- Four states a support ticket moves through: none → open → inProgress → resolved.
- TCA
- Test Centre Administrator. Rank 50 role. Runs a single venue.
- WOW Room
- The operations command center during screening test events — the hub where real-time decisions happen. myProctor extends that same command experience to mobile devices: "The WOW Room in your Pocket" (iPhone, on the move) and "in your Hand" (iPad, at the desk). The WOW Room goes where you go.
- XBadge
- Internal helper that encrypts a user's badge number before it's written to Firestore. Implementation detail of the user-record layer; not user-facing and unrelated to broadcast messages.